Difference between revisions of "Documentation/OOo3 User Guides/Getting Started/Templates and Styles"
(→Dividing a document into chapters) |
m (→Loading styles from a template or document) |
||
| Line 209: | Line 209: | ||
# Click '''OK''' to copy the styles. You will not see any change on screen. | # Click '''OK''' to copy the styles. You will not see any change on screen. | ||
| − | {{Documentation/Note | + | {{Documentation/Note| To copy the styles from another document, click the '''From File''' button to open a window from which you can select the required document.}} |
[[Image:LoadStyles.png|thumb|none|500px|''Copying styles from a template into the open document'']] | [[Image:LoadStyles.png|thumb|none|500px|''Copying styles from a template into the open document'']] | ||
Revision as of 06:08, 17 June 2008
- Chapter 3: Using Styles and Templates
- Applying styles
- Modifying styles
- Creating new (custom) styles
- Copying and moving styles
- Deleting styles
- Using a template to create a document
- Creating a template
- Editing a template
- Adding templates using Extension Manager
- Setting a default template
- Associating a document with a different template
- Organizing templates
- Examples of style use
This is Chapter 3 of Getting Started with OpenOffice.org 3.x, produced by the OOoAuthors group.
Contents
- 1 What is a template?
- 2 What are styles?
- 3 Applying styles
- 4 Modifying styles
- 5 Creating new (custom) styles
- 6 Copying and moving styles
- 7 Deleting styles
- 8 Using a template to create a document
- 9 Creating a template
- 10 Editing a template
- 11 Adding templates using the Extension Manager
- 12 Setting a default template
- 13 Organizing templates
- 14 Examples of style use
- 14.1 Defining a different first page for a document
- 14.2 Dividing a document into chapters
- 14.3 Changing page orientation within a document
- 14.4 Different headers on right and left pages
- 14.5 Controlling page breaks automatically
- 14.6 Compiling an automatic table of contents
- 14.7 Speeding up work by defining a sequence of styles
What is a template?
A template is a model that you use to create other documents. For example, you can create a template for business reports that has your company’s logo on the first page. New documents created from this template will all have your company’s logo on the first page.
Templates can contain anything that regular documents can contain, such as text, graphics, a set of styles, and user-specific setup information such as measurement units, language, the default printer, and toolbar and menu customization.
All documents in OpenOffice.org (OOo) are based on templates. You can create a specific template for any document type (text, spreadsheet, drawing, presentation). If you do not specify a template when you start a new document, then the document is based on the default template for that type of document. If you have not specified a default template, OOo uses the blank template for that type of document that is installed with OOo. See Setting a default template for more information.
What are styles?
A style is a set of formats that you can apply to selected pages, text, frames, and other elements in your document to quickly change their appearance. When you apply a style, you apply a whole group of formats at the same time.
Many people manually format paragraphs, words, tables, page layouts, and other parts of their documents without paying any attention to styles. They are used to writing documents according to physical attributes. For example, you might specify the font family, font size, and any formatting such as bold or italic.
Styles are logical attributes. Using styles means that you stop saying “font size 14pt, Times New Roman, bold, centered”, and you start saying “Title” because you have defined the “Title” style to have those characteristics. In other words, styles means that you shift the emphasis from what the text (or page, or other element) looks like, to what the text is.
Styles help improve consistency in a document. They also make major formatting changes easy. For example, you may decide to change the indentation of all paragraphs, or change the font of all titles. For a long document, this simple task can be prohibitive. Styles make the task easy.
In addition, styles are used by OpenOffice.org for many processes, even if you are not aware of them. For example, Writer relies on heading styles (or other styles you specify) when it compiles a table of contents. Some common examples of style use are given in Examples of style use.
OpenOffice.org supports the following types of styles:
- Page styles include margins, headers and footers, borders and backgrounds. In Calc, page styles also include the sequence for printing sheets.
- Paragraph styles control all aspects of a paragraph’s appearance, such as text alignment, tab stops, line spacing, and borders, and can include character formatting.
- Character styles affect selected text within a paragraph, such as the font and size of text, or bold and italic formats.
- Frame styles are used to format graphic and text frames, including wrapping type, borders, backgrounds, and columns.
- Numbering styles apply similar alignment, numbering or bullet characters, and fonts to numbered or bulleted lists.
- Cell styles include fonts, alignment, borders, background, number formats (for example, currency, date, number), and cell protection.
- Graphics styles in drawings and presentations include line, area, shadowing, transparency, font, connectors, dimensioning, and other attributes.
- Presentation styles include attributes for font, indents, spacing, alignment, and tabs.
Different styles are available in the various components of OOo, as listed in Table 1.
Table 1. Styles available in OOo components
| Style Type | Writer | Calc | Draw | Impress |
|---|---|---|---|---|
| Page | X | X | ||
| Paragraph | X | |||
| Character | X | |||
| Frame | X | |||
| Numbering | X | |||
| Cell | X | |||
| Presentation | X | X | ||
| Graphics | (a) | X | X |
(a) Included in Frame styles
OpenOffice.org comes with many predefined styles. You can use the styles as provided, modify them, or create new styles, as described in this chapter.
Applying styles
OpenOffice.org provides several ways for you to select styles to apply.
Using the Styles and Formatting window
- Click the Styles and Formatting icon
 ] located at the left-hand end of the object bar, or click Format > Styles and Formatting, or press F11. The Styles and Formatting window shows the types of styles available for the OOo component you are using. You can move this window to a convenient position on the screen or dock it to an edge (hold down the Ctrl key and drag it by the title bar to where you want it docked).
- Click on one of the icons at the top left of the Styles and Formatting window to display a list of styles in a particular category.
- To apply an existing style (except for character styles), position the insertion point in the paragraph, frame, or page, and then double-click on the name of the style in one of these lists. To apply a character style, select the characters first.

Using Fill Format mode
Use Fill Format to apply a style to many different areas quickly without having to go back to the Styles and Formatting window and double-click every time. This method is quite useful when you need to format many scattered paragraphs, cells, or other items with the same style.
- Open the Styles and Formatting window and select the style you want to apply.
- Click the Fill Format mode icon
 .
.
- To apply a paragraph, page, or frame style, hover the mouse over the paragraph, page, or frame and click. To apply a character style, hold down the mouse button while selecting the characters, Clicking on a word applies the character style for that word. Repeat step 3 until you made all the changes for that style.
- To quit Fill Format mode, click the Fill Format mode icon again or press the Esc key.
| When this mode is active, a right-click anywhere in the document undoes the last Fill Format action. Be careful not to accidentally right-click and thus undo actions you want to keep. |
Using the Apply Style list
After you have used a style at least once in a document, the style name appears on the Apply Style list at the left-hand end of the Formatting toolbar, next to the Styles and Formatting icon.
You can open this list and click once on the style you want, or you can use the up and down arrow keys to move through the list and then press Enter to apply the highlighted style.

Modifying styles
OpenOffice.org provides several ways to modify styles (both the predefined styles and custom styles that you create):
- Changing a style using the Style dialog
- Updating a style from a selection
- Use AutoUpdate (paragraph and frame styles only)
- Load or copy styles from another document or template
Changing a style using the Style dialog
To change an existing style using the Style dialog, right-click on the required style in the Styles and Formatting window and select Modify from the pop-up menu.
The Style dialog displayed depends on the type of style selected. Each style dialog has several tabs. See the chapters on styles in the user guides for details.
Updating a style from a selection
To update a style from a selection:
- Open the Styles and Formatting window.
- In the document, select an item that has the format you want to adopt as a style.
- In the Styles and Formatting window, select the style you want to update (single-click, not double-click), then long-click on the arrow next to the New Style from Selection icon and click on Update Style.
Template:Documentation/Caution'''

Using AutoUpdate
AutoUpdate applies to paragraph and frame styles only. If the AutoUpdate option is selected on the Organizer page of the Paragraph Style or Frame Style dialog, applying direct formatting to a paragraph or frame using this style in your document automatically updates the style itself.
Updating styles from a document or template
You can update styles by copying or loading them from a template or another document. See Copying and moving styles.
Creating new (custom) styles
You may want to add some new styles. You can do this in two ways:
- Creating a new style using the Style dialog
- Creating a new style from a selection
Creating a new style using the Style dialog
To create a new style using the Style dialog, right-click in the Styles and Formatting window and select New from the pop-up menu.
If you want your new style to be linked with an existing style, first select that style and then right-click and select New.
If you link styles, then when you change the base style (for example, by changing the font from Times to Helvetica), all the linked fonts will change as well. Sometimes this is exactly what you want; other times you do not want the changes to apply to all the linked styles. It pays to plan ahead.
The dialogs and choices are the same for defining new styles and for modifying existing styles. See the chapters on styles in the user guides for details.
Creating a new style from a selection
You can create a new style by copying an existing style. This new style applies only to this document; it will not be saved in the template.
- Open the Styles and Formatting window and choose the type of style you want to create.
- In the document, select the item you want to save as a style.
- In the Styles and Formatting window, click on the New Style from Selection icon.
- In the Create Style dialog, type a name for the new style. The list shows the names of existing custom styles of the selected type. Click OK to save the new style.
-
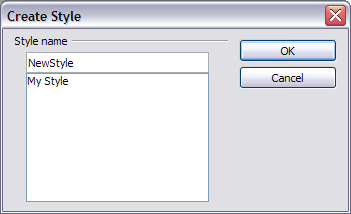 Naming a new style created from a selection.

Dragging and dropping to create a style
You can drag and drop a text selection into the Styles and Formatting window to create a new style.
Writer
Select some text and drag it to the Styles and Formatting window. If Paragraph Styles are active, the paragraph style will be added to the list. If Character Styles are active, the character style will be added to the list.
Calc
Drag a cell selection to the Styles and Formatting window to create cell styles.
Draw/Impress
Select and drag drawing objects to the Styles and Formatting window to create graphics styles.
Copying and moving styles
You can copy or move styles from one template or document into another template or document, in two ways:
- Using the Template Management dialog
- Loading styles from a template or document
Using the Template Management dialog
To copy or move styles using the Template Management dialog:
- Click File > Templates > Organize.
- In the Template Management dialog, set the lists at the bottom to either Templates or Documents, as needed. The default is Templates on the left and Documents on the right.
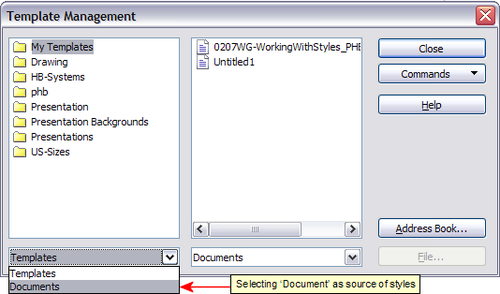 Choosing to copy styles from a document, not a template.
 - Open the folders and find the templates from and to which you want to copy. Double-click on the name of the template or document, and then double-click the Styles icon to show the list of individual styles (Figure 6).
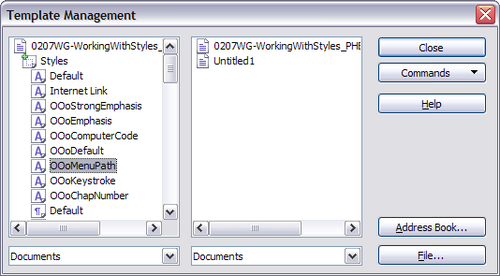 Copying a style from one document to another.
 - To copy a style, hold down the Ctrl key and drag the name of the style from one list to the other.

If you do not hold down the Control key when dragging, the style will be moved from one list to the other. The style will be deleted from the list you are dragging it from. - Repeat for each style you want to copy. If the receiving template or document hasmany styles, you may not see any change unless you scroll down in the list. When you are finished, click Close.


Loading styles from a template or document
You can copy styles by loading them from a template or another document:
- Open the document you want to copy styles into.
- In the Styles and Formatting window, long-click on the arrow next to the New Style from Selection icon, and then click on Load Styles.
- On the Load Styles dialog, find and select the template you want to copy styles from.
- Select the categories of styles to be copied. Select Overwrite if you want the styles being copied to replace any styles of the same names in the document you’re copying them into.
- Click OK to copy the styles. You will not see any change on screen.

Deleting styles
You cannot remove (delete) any of OOo’s predefined styles from a document or template, even if they are not in use.
You can remove any user-defined (custom) styles; but before you do, you should make sure the styles are not in use. If an unwanted style is in use, you will want to replace it with a substitute style.
To delete unwanted styles, right-click on them (one at a time) in the Styles and Formatting window and click Delete on the pop-up menu.
If the style is in use, you receive a warning message.
| Make sure the style is not in use before deletion. Otherwise, all objects with that style will return to the default style and retain their formatting as manual formatting. This can be a problem in a long document. |
If the style is not in use, you receive a confirmation message; click Yes.
Using a template to create a document
To use a template to create a document:
- From the main menu, choose File > New > Templates and Documents. The Templates and Documents window opens.
- In the box on the left, click the Templates icon if it is not already selected. A list of template folders appears in the center box.
- Double-click the folder that contains the template that you want to use. A list of all the templates contained in that folder appears in the center box.
- Click the template that you want to use. You can preview the selected template or view the template’s properties:
- To preview the template, click the Preview icon. A preview of the template appears in the box on the right.
- To view the template’s properties, click the Document Properties icon. The template’s properties appear in the box on the right.
- Click Open. The Templates and Documents window closes and a new document based on the selected template opens in OOo. You can then edit and save the new document just as you would any other document.

Creating a template
You can create your own templates in two ways:
- From a document
- Using a wizard
Creating a template from a document
To create a template from a document:
- Open a new or existing document of the type you want to make into a template (text document, spreadsheet, drawing, presentation).
- Add the content and styles that you want.
- From the main menu, choose File > Templates > Save. The Templates dialog opens.
- In the New template field, type a name for the new template.
- In the Categories list, click the category to which you want to assign the template. (The category is simply the template folder in which you want to save the template. For example, to save the template in the “My Templates” folder, click the My Templates category.) To learn more about template folders, see Organizing templates.
- Click OK. OOo saves the new template and the Templates window closes.

Any settings that can be added to or modified in a document can be saved in a template. For example, below are some of the settings (although not exhaustive) that can be included in a Writer document and then saved as a template for later use:
- Printer settings: which printer, single sided / double sided, and paper size, and so on
- Styles to be used, including character, page, frame, numbering and paragraph styles
- Format and settings regarding indexes, tables, bibliographies, table of contents
Creating a template using a wizard
You can use wizards to create templates for letters, faxes, agendas, presentations, and Web pages.
For example, the Fax Wizard steps you through the following choices:
- Type of fax (business or personal)
- Document elements like the date, subject line (business fax), salutation, and complementary close
- Options for sender and recipient information (business fax)
- Text to include in the footer (business fax)
To create a template using a wizard:
- From the main menu, choose File > Wizards > [type of template required].
- Follow the instructions on the pages of the wizard. This process is slightly different for each type of template, but the format is very similar.
- In the last section of the wizard, you can specify the name and location for saving the template. The default location is your user templates directory, but you can choose a different location if you prefer.
- Finally, you have the option of creating a new document from your template immediately, or manually changing the template. For future documents, you can re-use the template created by the wizard, just as you would use any other template.

Editing a template
You can edit a template’s styles and content, and then, if you wish, you can reapply the template’s styles to documents that were created from that template. (Note that you can only reapply styles. You cannot reapply content.)
To edit a template:
- From the main menu, choose File > Templates > Organize. The Template Management dialog opens.
- In the box on the left, double-click the folder that contains the template that you want to edit. A list of all the templates contained in that folder appears underneath the folder name.
- Click the template that you want to edit.
- Click the Commands button and choose Edit from the drop-down menu.
- Edit the template just as you would any other document. To save your changes, choose File > Save from the main menu.

The next time you open a document that was created from the changed template, the following message appears.

Click Yes to apply the template’s changed styles to the document. Click No if you do not want to apply the template’s changed styles to the document. Whichever option you choose, the message box closes and the document opens in OOo.
Adding templates using the Extension Manager
The Extension Manager provides an easy way to install collections of templates, graphics, macros, or other add-ins that have been “packaged” into files with a .OXT extension. See Chapter 14 (Customizing OpenOffice.org) for more about the Extension Manager.
This Web page lists many of the available extension: http://extensions.services.openoffice.org/. To install an extension, follow these steps:
- Download an extension package and save it anywhere on your computer.
- In OOo, select Tools > Extension Manager from the menu bar. In the Extension Manager dialog, click Add.
- A file browser window opens. Find and select the package of templates you want to install and click Open.The package begins installing. You may be asked to accept a license agreement.
- When the package installation is complete, the templates are available for use through File > New > Templates and Documents and the extension is listed in the Extension Manager.

Setting a default template
If you create a document by choosing File > New > Text Document (or Spreadsheet, Presentation, or Drawing) from the main menu, OOo creates the document from the Default template for that type of document. You can, however, set a custom template to be the default. You can reset the default later if you choose.
Setting a custom template as the default
You can set any template to be the default, as long as it is in one of the folders displayed in the Template Management window.
To set a custom template as the default:
- From the main menu, choose File > Templates > Organize. The Template Management window opens.
- In the box on the left, double-click the folder containing the template that you want to set as the default, then select the template.
- Click the Commands button.
- From the drop-down menu, choose Set As Default Template. The next time that you create a document by choosing File > New, the document will be created from this template.
Resetting the default template
To re-enable OOo’s Default template for a document type as the default:
- In the Template Management window, in the box on the left, click any folder.
- Click the Commands button and choose Reset Default Template from the drop-down menu. The next time that you create a document by choosing File > New, the document will be created from OOo’s Default template for that document type.
Organizing templates
OOo can only use templates that are in OOo template folders. You can create new OOo template folders and use them to organize your templates, and import templates into those folders. For example, you might have one template folder for report templates and another for letter templates. You can also export templates.
To begin, choose File > Templates > Organize from the main menu. The Template Management window opens.
Creating a template folder
To create a template folder:
- In the Template Management window, click any folder.
- Click the Commands button and choose New from the drop-down menu. A new folder called Untitled appears.
- Type a name for the new folder, and then press the Enter key. OOo saves the folder with the name that you entered.
Deleting a template folder
You cannot delete template folders supplied with OOo or installed using the Extension Manager; you can only delete template folders that you have created.
To delete a template folder:
- In the Template Management window, click the folder that you want to delete.
- Click the Commands button and choose Delete from the drop-down menu. A message box appears and asks you to confirm the deletion. Click Yes.
Moving a template
To move a template from one template folder to another template folder:
- In the Template Management window, double-click the folder that contains the template you want to move. A list of all the templates contained in that folder appears underneath the folder name.
- Click the template that you want to move and drag it to the desired folder. If you do not have the authority to delete templates from the source folder, this action copies the template instead of moving it.
Deleting a template
You cannot delete templates supplied with OOo or installed using the Extension Manager; you can only delete templates that you have created.
To delete a template:
- In the Template Management window, double-click the folder that contains the template you want to delete. A list of all the templates contained in that folder appears underneath the folder name.
- Click the template that you want to delete.
- Click the Commands button and choose Delete from the drop-down menu. A message box appears and asks you to confirm the deletion. Click Yes.
Importing a template
If the template that you want to use is in a different location, you must import it into an OOo template folder.
To import a template into a template folder:
- In the Template Management window, double-click the folder into which you want to import the template.
- Click the Commands button and choose Import Template from the drop-down menu. A standard file browser window opens.
- Find and select the template that you want to import and click Open. The file browser window closes and the template appears in the selected folder.
Exporting a template
To export a template from a template folder to another location:
- In the Template Management window, double-click the folder that contains the template you want to export. A list of all the templates contained in that folder appears underneath the folder name.
- Click the template that you want to export.
- Click the Commands button and choose Export Template from the drop-down menu. The Save As window opens.
- Find the folder into which you want to export the template and click Save.
Examples of style use
The following examples of common use of page and paragraph styles are taken from Writer. There are many other ways to use styles; see the guides for the various components for details.
Defining a different first page for a document
Many documents, such as letters and reports, have a first page that is different from the other pages in the document. For example, the first page of a letterhead typically has a different header, or the first page of a report might have no header or footer, while the other pages do. With OOo, you can define the page style for the first page and specify the style for the following pages to be applied automatically.
As an example, we can use the First Page and Default page styles that come with OOo. The figure below shows what we want to happen: the first page is to be followed by the default page, and all the following pages are to be in the Default page style. Details are in Chapter 4 (Formatting Pages) in the Writer Guide.

Dividing a document into chapters
In a similar way, you can divide a document into chapters. Each chapter might start with the First Page style, with the following pages using the Default page style, as above. At the end of the chapter, we can insert a manual page break and specify the next page to have the First Page style to start the next chapter, as shown below.

Changing page orientation within a document
A Writer document can contain pages in more than one orientation. A common scenario is to have a landscape page in the middle of a document, whereas the other pages are in a portrait orientation. This can also be done with page breaks and page styles.
Different headers on right and left pages
Page styles can be set up to have the facing left and right pages mirrored or only right (first pages of chapters are often defined to be right-page only) or only left. When you insert a header on a page style set up for mirrored pages or right-and-left pages, you can have the contents of the header be the same on all pages or be different on the right and left pages.
For example, you can put the page number on the left-hand edge of the left pages and on the right-hand edge of the right pages, put the document title on the right-hand page only, or make other changes.
Controlling page breaks automatically
Writer automatically flows text from one page to the next. If you do not like the default settings, you can change them For example, you can require a paragraph to start on a new page or column and specify the style of the new page. A typical use is for chapter titles that you always want to start on a new right-hand (odd-numbered) page.
Compiling an automatic table of contents
In order for Writer to compile an automatic table of contents, the headings that are to appear in the contents list must be identified as headinga. You do this by applying styles to them. Writer comes with 10 levels of predefined heading styles. You can change the formatting (font, color, size, and so on) of these predefined heading styles, and you can define your own custom styles. Then use Tools > Outline Numbering to tell Writer which styles go with which level in the table of contents.
Speeding up work by defining a sequence of styles
You can set up one paragraph style so that when you press Enter at the end of that paragraph, the following paragraph automatically has the style you wish applied to it. For example, you could define a Heading 1 paragraph to be followed by a Text Body paragraph. A more complex example would be: Title followed by Author followed by Abstract followed by Heading 1 followed by Text Body. By setting up these sequences, you can avoid manually applying styles in most cases.
| Content on this page is licensed under the Creative Common Attribution 3.0 license (CC-BY). |