Travail avec les styles de page
- Création de nouveaux styles personnalisés
- Travail avec les styles de paragraphe
- Travail avec les styles de paragraphe conditionnels
- Travail avec les styles de caractère
- Travail avec les styles de cadre
- Travail avec les styles de page
- Exemple d'une séquence de page de chapitre
- Travail avec les styles de liste
- Exemple : création d'un style de liste simple
Les styles de page sont aux pages ce que les styles de paragraphe sont aux paragraphes. Tout comme les styles de paragraphe permettent de définir des propriétés de paragraphe (couleur de la police, couleur et autres), les styles de page permettent de définir des propriétés de page (marges, taille de la page, en-tête et pieds de page, entre autres). Cependant, au contraire des paragraphes qui peuvent avoir des propriétés que l'on applique directement, les pages n'ont qu'un style de page et n'ont pas de propriétés qui puissent être appliquées directement.
Antoine est avocat et vit en Californie USA. Pour ses lettres, la première page a un en-tête de lettre et les pages suivantes identifient uniquement le destinataire, la date et le numéro de page. Antoine réalise cela en utilisant les styles de page. Il utilise également les styles de page pour correspondre aux espacements requis (tels que les marges) pour les lettres officielles de la court de l'état de californie.
Cette section décrit comment créer un nouveau style de page, explique la signification de certaines options de la boîte de dialogue Style de page et illustre leur usage.
Créer un nouveau style de page
À la différence des autres styles, les styles de page peuvent être créés et modifiés uniquement en utilisant la fenêtre Styles et formatage. Ouvrez la fenêtre Styles et formatage et cliquez sur l'icône Styles de page ![]() . Faites un clic avec le bouton droit n'importe où dans la fenêtre principale et sélectionnez Nouveau.
. Faites un clic avec le bouton droit n'importe où dans la fenêtre principale et sélectionnez Nouveau.
La boîte de dialogue Style de page contient huit onglets montrés ci dessous.
La propriété Style de suite
Comme pour les autres styles, la propriété Style de suite décrite dans L'onglet Gérer permet de spécifier le style des éléments suivants de la catégorie de style avec laquelle vous travaillez. Cette propriété est particulièrement important pour un style de page, comme les exemples suivants le démontre.
Définir une page de titre
Supposong un scénario commun : vous souhaitez que le document ait une page de titre qui soit différente du reste du document :
- Elle ne doit pas avoir d'en-tête et de numéro de page.
- La marge de gauche et de droite doivent être les mêmes.
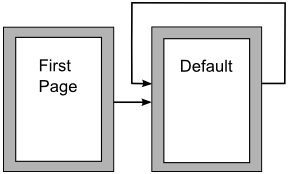
Pour la page de titre, nous pouvons utiliser le style prédéfini Première page qui vient avec Apache OpenOffice et pour le reste du document, nous pouvons utiliser le style de page Standard.
La figure ci dessous montre l'enchaînement de pages requis. Sur l'onglet Gérer' du style de page Standard, laissez la propriété Style de suite définie sur Standard. Sur l'onglet Gérér du style de page Première page, assurez-vous que la propriété Style de suite est définie sur Standard.
Paramètres généraux des styles de page
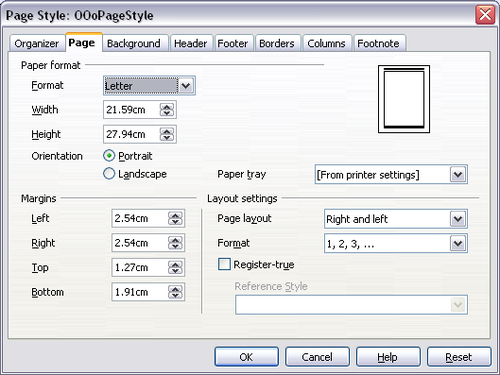
L'onglet Page de la boîte de dialogue Style de page est l'endroit où vous contrôlez les paramètres généraux de la page. L'onglet montré ci dessous est constitué de trois sections, plus une zone d'aperçu dans la coin supérieur droit.
In the Paper format section, you can specify the size of the paper choosing from one of the many predefined formats. Selecting “user”, you can use the Width and Height fields to define your own paper size. If using a predefined format, select the orientation of the paper between portrait and landscape. If your printer has more than one tray, you can specify in the drop down menu the tray from which to print pages in the new page style.
Use the Margins section to specify the size of the margins in your preferred unit of measurement. If you select Mirrored margins in the Page layout settings, the left margin becomes the Inner margin, while the right margin becomes the Outer margin.
In the Layout settings field, you can specify the desired Page layout among the four available options. Decide whether the page style being defined applies to both left and right pages (default) or if instead it should be applied only to one or the other types. If you plan to bind the printed pages using this style like a book, select a mirrored layout. Use the Format drop-down menu to determine the page numbering style to apply to this page style.
Another common practice in page layouts involves having asymmetrical page margins—both for left and right margins and for top and bottom margins. There are various schemes for accomplishing this. The most common of them follow these two general rules for printed page layouts: (a) The outer margin (right margin on a right-hand page) would have a wider margin than an inner margin (left margin on a right-hand page); (b) The bottom margin would be larger than a top margin. The rationale for an asymmetrical page layout is allowing more space for readers to place their hands while holding the books or other printed documents. About.com describes some page layouts on their Web site:[1]Perfect Proportions Using Page Margins in Desktop Publishing.
If you decide to check the Register-true box, Writer will create a vertical grid on the page with a spacing between grid points that depends on the selected Reference Style. The vertical grid makes sure that text printed on adjacent columns, opposite pages, or even both sides of the same sheet of paper, is aligned—making it easier to read as well as being more pleasant to see.
Background and Border pages
Use the Background page to apply a background or the Border page to draw a border around text area of the page. You can choose between a solid color or a graphic image for the background and several styles of line for the borders. Note that the page area affected by these changes does not include the area outside the margins. If you plan to print on colored paper and want to have a feel of the final result you will obtain or want to use a light color for the font, rather than changing the background,then go to Tools > Options > Openoffice.org and in the Appearance section, change the Document background color.
You can associate a different header or footer to each page style. This property makes it very easy to have different headers on left and right pages, to avoid headers on pages at the start of a new chapter, and so on.
Setting up the header and footer pages is straightforward. The instructions here refer to the header, but the footer page has the same options. Activate the input boxes by selecting Header on, then specify the left margin, right margin, and spacing to the main text area. For the height of the header area, you can either select the AutoFit height box, which will make Writer adapt the size to the contents, or specify the height manually. Clicking More opens a new dialog box, where you can set the borders and background of the header area.
If you deselect the Same content left/right box, you can specify a different header for left or right pages, even if you use a single style for both. Below is an example.
Columns page
Use this page to create the desired column layout for the page style. The page is subdivided into three sections: Settings, Width and Spacing and Separator Line. The Settings section contains thumbnails of predefined columns settings you can select, as well as a text box where you can enter the desired number of columns if you need to create a customized one.
After you select more than one column, the Width and Spacing section becomes active. If you are not satisfied with the predefined settings (equally spaced columns), deselect the AutoWidth option and enter the parameters manually. When you work with multiple columns per page, you can also fine tune the position and size of a separator line between the columns.
Footnote page
Use this page to adjust the appearance of the footnotes. Keeping the default setting Not larger than page area, the footnotes area is calculated automatically on the basis of the number of footnotes. If you prefer to control manually the maximum space that footnotes can take, select the Maximum footnote height option and enter the value in the preferred unit of measurement. Use the second section of the page to customize the separator between the footnotes and the main area.
| Content on this page is licensed under the Creative Common Attribution 3.0 license (CC-BY). |


