Writer documents
Creating a new document
Creating a blank document
You can create a new, blank document in Writer in a number of ways:
Each method opens a new, empty document. If you already have a document open, the new document appears in a new window.
Creating a document from a template
You can use templates to create new documents in Writer. Templates serve as the foundation of a set of documents, to make sure they all have a similar layout. For example, all the documents of the Writer Guide are based on the same template. As a result, all the documents look alike—they have the same headers and footers, use the same fonts, and so on.
Unfortunately, a brand-new OpenOffice.org installation does not contain many templates. It is possible for you to add new templates to your installation and use them for new documents. This is explained in Chapter 10 (Working with Templates). Many more templates can be downloaded from the Internet.
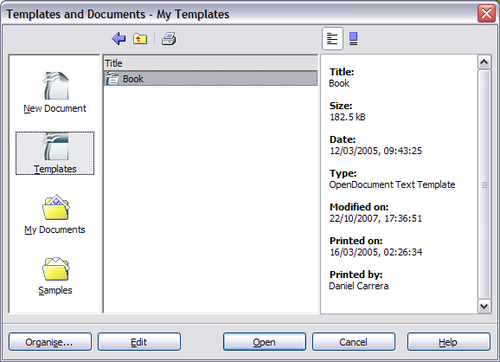
Once you do have templates on your system, you can create new documents based on them by using File > New > Templates and Documents. This opens a window where you can choose the template you want to use for your document.
The example shown below uses a template called "book" in the My Templates folder. Select it, then click the Open button. A new document is created based on the formats defined in the template.
For more about templates, see Chapter 10 (Working with Templates).
Opening an existing document
Here is one way to open an existing document in Writer:
- Click File > Open (or press Control+O).
- In the file chooser, you can reduce the list of files by selecting the type of file you are looking for. If you choose Text documents as the file type, you will only see documents Writer understands.
- Select the file you want, and then click Open.
You can also open an existing OOo Writer document using the same methods you would use to open any document in your operating system.
Saving a document
There are three ways to save a document in Writer:
- Press Control+S.
- Select File > Save.
- Click the Save button on the main toolbar.
You also can tell Writer to save your document automatically at regular intervals. To enable this, you must configure OpenOffice.org to save all documents automatically.
- Select Tools > Options. The Options window appears.
- Select Load/Save > General.
- Click on Save AutoRecovery information every. This enables the box to set the interval. The default value is 30 minutes. Enter the value you want by typing it or by pressing the up or down arrow keys.
Saving as a Microsoft Word document
You may need to share your documents with other people who do not use OpenOffice.org, but use Microsoft Word instead. Fortunately, OpenOffice.org can read and write Word files. To save a document as a Microsoft Word file:
- First save your document in OpenOffice.org's format (*.odt). If you do not, any changes you made since the last time you saved will only appear in the Microsoft Word version of the document.
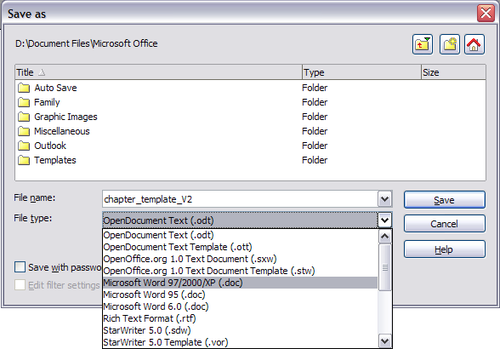
- Then click File > Save As. The Save As dialog box (shown below) appears.
- In the Save as type drop-down menu, select the type of Word format you need.
- Click Save.
From this point on, all changes you make to the document will occur only in the Microsoft Word document. You have actually changed the name of your document. If you want to go back to working with the OpenOffice.org version of your document, you must open it again.
Printing a document
For more information about printing documents, see Chapter 5 (Printing, Faxing, Exporting, and Emailing).
Quick printing
Click the Print File Directly icon ![]() to send the entire document to the default printer defined for your computer.
to send the entire document to the default printer defined for your computer.
Controlling printing using the Print dialog box
For more control over printing, use File > Print to display the Print dialog box.
On the Print dialog box, you can choose:
- Which printer to use (if more than one are installed on your system) and the properties of the printer—for example, orientation (portrait or landscape), which paper tray to use, and what paper size to print on. The properties available depend on the selected printer; consult the printer's documentation for details.
- Which pages to print, how many copies to print, and in what order to print them.
- Use dashes to specify page ranges and commas or semicolons to separate ranges; for example, 1, 5, 11-14, 34-40.
- Selection is the highlighted part of a page or pages.
- Which items to print. Click the Options button to display the Printer Options dialog box. For details about print options and setting defaults for Writer, see Chapter 5 (Printing, Faxing, Exporting, and Emailing).
Previewing pages before printing
The normal page view in Writer shows what each page will look like when printed, but it shows only one page at a time. If you are designing a document to be printed double-sided, you may want to see what facing pages look like. OOo provides a way to do this in Page Preview.
Click File > Page Preview, or click the Page Preview icon. ![]()
The Writer window changes to display the current page and the following page and the Page Preview toolbar replaces the Formatting toolbar.
- To display left and right pages in their correct orientation (facing pages), click the Book Preview icon
 .
. - To print the document in this page view, click the Print page view icon.

- To choose margins and other options for the printout, click the Print options page view icon
 to display the Print Options dialog box. For more information, see Chapter 5 (Printing, Faxing, Exporting, and Emailing).
Exporting to PDF
OpenOffice.org can export documents to PDF (Portable Document Format). This industry-standard file format for file viewing is ideal for sending the file to someone else to view using Acrobat Reader or other PDF viewers.
Quick export to PDF
Click the Export Directly as PDF icon ![]() to export the entire document using the default PDF settings. You are asked to enter the file name and location for the PDF file, but you do not get a chance to choose a page range or the print quality.
to export the entire document using the default PDF settings. You are asked to enter the file name and location for the PDF file, but you do not get a chance to choose a page range or the print quality.
Controlling PDF content and quality
For more control over the content and quality of the resulting PDF, use File > Export as PDF. You are asked to enter the location and file name of the PDF to be created, and then the PDF Options dialog box opens.
Here you can choose which pages to include in the PDF, the type of compression to use for images (which affects the quality of images in the PDF), and other options. For more information, see Chapter 5 (Printing, Faxing, Exporting, and E-mailing).
Closing a document
To close a document, click File > Close.
You can also close a document by clicking on the Close icon on the document window. In Windows XP, this button looks like the red X shown in Figure 10.
If more than one OOo window is open, each window looks like the sample shown on the left in Figure 10. Closing this window leaves the other OOo windows open.
If only one OOo window is open, it looks like the sample shown on the right in Figure 10. Notice the small black X below the large red X. Clicking the small X closes the document but leaves OOo open. Clicking the large red X closes OOo completely.
If the document has not been saved since the last change, a message box is displayed. Choose whether to save or discard your changes.
- Save: The document will be saved and then closed.
- Discard: The document will be closed, and all modifications since the last save will be lost.
- Cancel: Nothing will happen, and you will return to the document.
| Not saving your document could result in the loss of recently made changes, or worse still, your entire file. |
| Content on this page is licensed under the Creative Common Attribution 3.0 license (CC-BY). |


