Working with frames on Writer
Inserting a Frame
Frames in Writer are similar to LaTeX "minipages". Basically, a frame is a small "floating page" on top of a real page. Frames accept any kind of content: text; pictures; tables... even other frames.
Frames are used extensively in Writer: each inserted picture, OLE object (Math objects, charts...), are inside a frame. When a caption is added to a picture, this picture, which is already inside a frame, will be automatically included on another frame that enclose the paragraph with the automatic numbering.
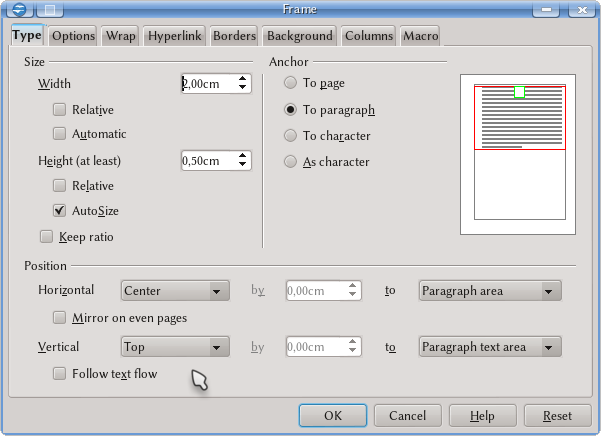
The sceenshot below shows the result of the menu command Insert → Frame. The purpose of the individual tabs will be discussed in the following sections.
Type tab
On the top left of this tab it is possible to define the Frame size.
- "Relative" means "Relative to the text area".
- "Automatic" (for Width) and "AutoSize" (for height) makes the frame grow with the content.
- "Keep ratio" forces width and height of the frame to grow proportionally.
On the top right it is possible to choose the "Anchoring". This option selects how the frame will be positioned from a reference point, that is the point at which the frame was inserted:
- To page: this associates the frame with the page on which it was inserted. It is important to be careful with this option because the picture will remain on that page even if all the previous pages are empty.
- To paragraph: the default option. The picture will follow the paragraph in which it was inserted.
- To character: similar to the previous option, but considering the exact point inside the paragraph where the image was inserted.
- As character: the frame will move inside the text as if it were another character. This is the default option for frames associated with Math objects.
On the lower part of this tab the position options are found.
The available options will depend upon the selected anchoring: for example, selecting "As character" we lose the horizontal position options.
Two important options are "Mirror on even/odd pages" and "Follow text flow".
The mirror option will automatically change the frame position when we are on an odd or even page. For example, if we choose "Outside" will be positioned to the right on odd pages and to the left on even pages.
The option "Follow text flow" is useful to avoid the possibility of a frame going outside the limits of the text area on the page.
Options tab
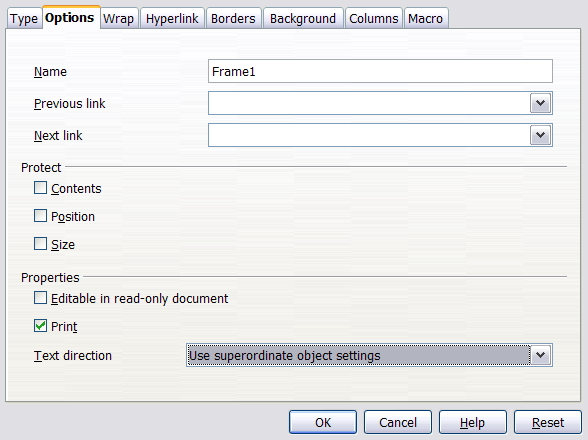
As shown above, the Options tab allows the setting of various options for the frame.
- Name
- The unique name of the frame
- This makes it simpler to identify on the Navigator.
- Default is Framennn where nnn is an increasing number starting at 1.
- The unique name of the frame
- Previous Link
- The name of the previous frame in a linked set.
- Next Link
- The name of the next frame in a linked set.
| When linking two or more frames, the content of the one will be able to flow to the next. The frames can be on different pages: when the first one is full, the content will flow to the next. |
- Protect
- This section allows you to protect various attributes of the frame.
- Contents
- When checked this option protects the contents of the frame from being changed.
- Position
- When checked this option protects the position of the frame from being changed.
- Size
- When checked this option protects the size of the frame from being changed.
- Text Direction
- This section sets the text direction for the frame. The options are as follows.
- Left-to-right (horizontal)
- Left justified text
- Right-to-left (horizontal)
- Right justified text
- Left-to-right (vertical)
- Vertical text aligned to the left margin
- Use superordinate object settings
- Use the default text flow settings for the page. This is the default.
- Left-to-right (horizontal)
- This section sets the text direction for the frame. The options are as follows.
Wrap tab
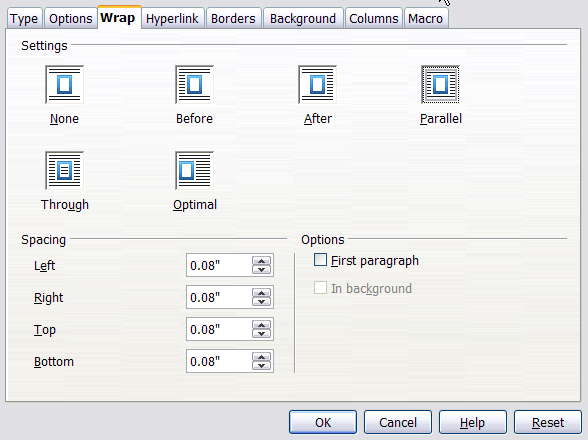
Here it is possible to define how the text and other content flow around the frame. For example, if the frame takes only a fraction of the page width it is possible to set the text to surround it: the option "Optimal" will be the more appropriate in this situation.
The screenshot above shows all the attributes that can be set on this tab.
- Settings
- None
- No wrapping of text
- Before
- Text wraps before the frame only
- After
- Text wraps after the frame only
- Parallel
- Text wraps around the frame on all sides
- Through
- Frame is placed in front of text
- Optimal
- Automatically wraps text on all four sides of frame
- None
- Spacing
- Left
- Space between text and left side of frame
- Right
- Space between text and right side of frame
- Top
- Space between text and top of frame
- Bottom
- Space between text and bottom of frame
- Left
- Options
- First paragraph
- makes the selected wrap option valid only for the first paragraph: the following paragraphs will move to below the frame
- In background
- sends frame behind the content
Hyperlink Tab
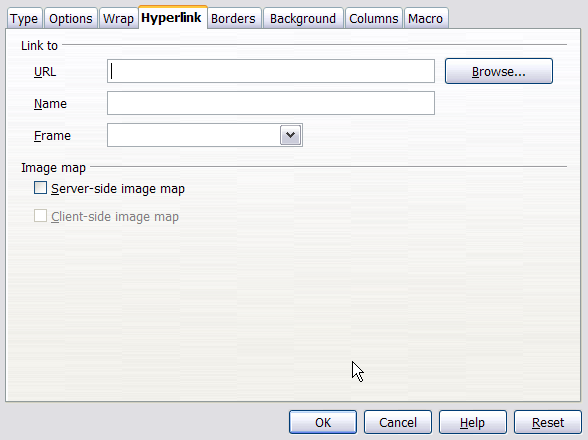
This tab is used to associate a hyperlink to the frame. The file can be a local file on the computer or local network, or on the internet. The hyperlink will work with a Ctrl +Click on the frame. The options for this screen are as follows.
- Link To
- URL
- Complete path of file
- Browse
- Browse computer or local network for file
- Name
- Name for hyperlink
- Frame
- ID of frame to associate to.
- URL
- Image Map
- Server Side Image Map
- Uses image map on remote server
- Client Side Image Map
- Uses client side image map
- Server Side Image Map
Borders tab
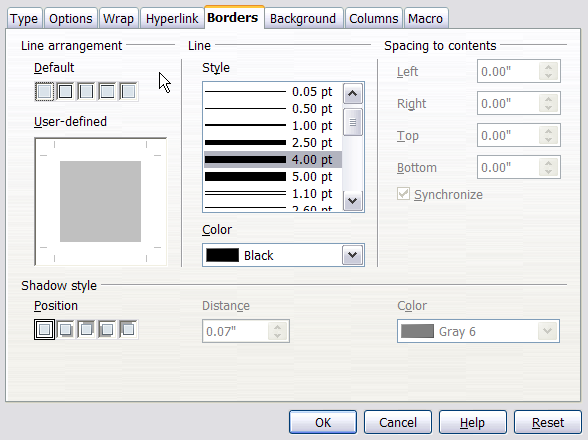
As the name implies, the function of this tab is to draw borders around the frame. The different options available will be discussed below.
Line Arrangement
This section of the tab is used to define the way the lines are arranged to form the border. It is further divided into Default and User Defined areas as defined below.
- Default
- This area has five predefined border arrangements as defined below from left to right. They are activated by clicking on them with the mouse.
- None
- No border, this is the default setting.
- Set All Four Borders
- Creates border on all 4 sides
- Set Left and Right Borders Only
- Create border on left and right only
- Set Top and Bottom Borders Only
- Create border on the top and bottom only
- Set Left Border Only
- Create border on left side only
- None
- This area has five predefined border arrangements as defined below from left to right. They are activated by clicking on them with the mouse.
- User Defined
- This area is used to define a custom border arrangement. This is done by clicking the side (or sides) of the shaded area that you want the border on. For example if you wanted the border on the right and top of the frame you would click those sides of the area.
Line
This section is used to define the attributes of the lines used to form the border. It is further divided into Style and Color areas as defined below.
- Style
- Presents a list box with various styles of lines and thicknesses that can be used to form the borders.
- Default single line of 0.05 points.
- Presents a list box with various styles of lines and thicknesses that can be used to form the borders.
- Color
- Presents a drop-down list of available colors for lines.
- Default is Black
- Presents a drop-down list of available colors for lines.
Spacing to Contents
Used to set the spacing between the edges of the border and the content. Each edge can be set individually or synchronized to the same distance.
- Left
- Spin-box to set distance to left edge
- Right
- Spin-box to set distance to right edge
- Top
- Spin-box to set distance to top edge
- Bottom
- Spin-box to set distance to bottom edge
- Synchronize
- Check box to synch all edges to identical value on entering it in one spin-box
Background Tab
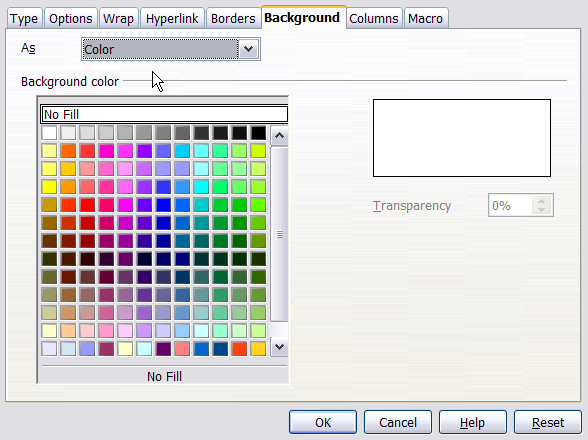
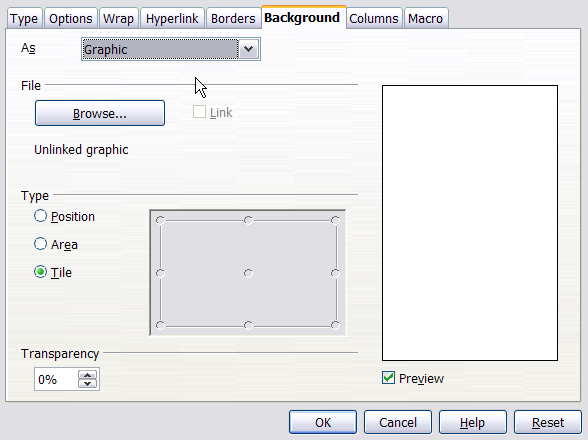
This tab is used to set a background for the frame. The background can be either a continuous color or an image. Each type will be described in a separate section.
Background Tab Color
The above illustration shows the tab set for the use of a continuous background color.
- As
- Drop down list specifying type of background
- Background color
- Palette of color choices
- Color chosen will appear in the box next to the palette and the name at the bottom of the palette.
- Palette of color choices
Background Tab Graphic
The above illustration shows the tab set for the use of a graphic background.
- As
- Drop down list specifying type of background
- File
- Browse
- Browse computer or local network for file
- Link
- Check-box to create a link to the graphic rather then embed it directly
- Default is unchecked
- Check-box to create a link to the graphic rather then embed it directly
- Unlinked Graphic
- Shows whether the graphic is unlinked or linked depending on the state of the Link check-box
- Default is as shown
- If linked will show the path to the file
- Shows whether the graphic is unlinked or linked depending on the state of the Link check-box
- Browse
Columns tab
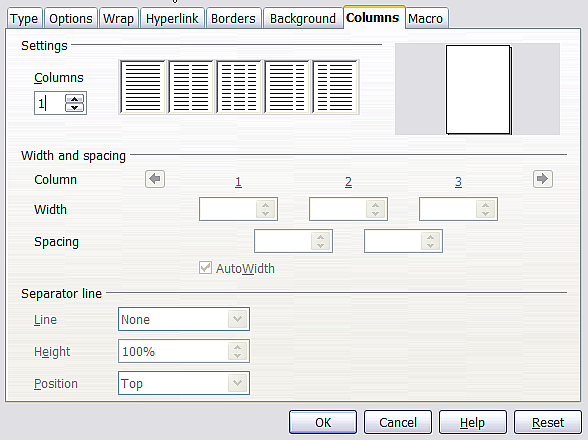
As shown above the columns tab is used to set-up the contents of the frame in a columnar fashion.
Macro tab
To associate a macro with the frame, in a way that the selected macro automatically activates when a selected event is verified, like a click on the frame or the introduction text on it.


