Getting to know Apache OpenOffice Draw
Introduction
Draw interface follow the same guiding lines described on the beginning of this guide.
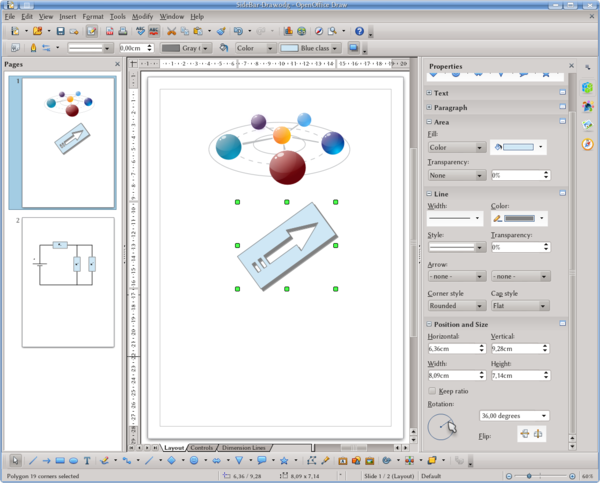
As it is possible to see on the screen shot, we have several toobars that can be turned on and off with View → Toolbars or edited on Tools → Customize → Toolbars tab. To the left of the screen we see the "Pages" panel, that display a thumbnail of each page existing on the document. To the right we have the Sidebar introduced on Apache OpenOffice 4.0, offering several tools to create or edit objects.
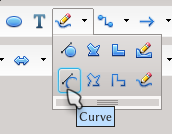
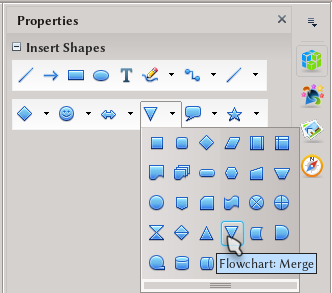
Several buttons on both, the toolbars and the sidebar are drop down menus offering several options.
As shown on the screenshot, these menus have on the bottom a sort of "handler": grabbing the menu with the mouse from there and dragging it far from the parent button will create a new toolbar with those tools that can be left floating or anchor (or closed) as any other toolbar.
The button corresponding to that menu will reflect the selected tool.
We will talk about the use of each tool on the corresponding section of this guide, but usually they are quite simple to use: just click and drag with the mouse to draw a rectangle, for example, or a line.
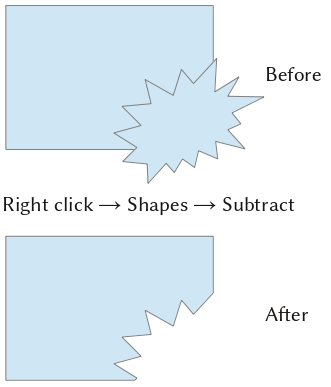
When selecting one or more objects, there are several actions available on the right click, like aligning, grouping, or even merging and subtracting.
All those options will be presented in detail on the section devoted to Draw tools.
Sidebar on Draw
By default (extensions installed by the user may add new decks and/or panels), the sidebar in Draw feature four decks, each one with one or several panels.
Properties deck
The content displayed by Properties deck depends on the selected object. If no object is selected, it only display the "Insert Shape" panel
Once an object is selected, several panels are presented below. The panels "Text" and "Paragraph" can be used to select font properties and alignment of text associated to an object (we will come back to this later).
For vector inserted graphics, panels to change the properties of the filling and the lines that form the object are available as "Area" and "Line" panels. With these panels it is possible to set a background either as a solid color, as a picture, gradient or patter, set transparency, etcetera.
For lines it is possible to set an arrow head on either end, decide if at corners lines should be rounded, mitered or bevelet, if the line caps are square or rounded, etcetera.
The "Position and Size" panel permits to move, resize and rotate any selected object or picture.
If a picture is selected, a panel called "Graphic" will be available. This panel can be used to set image contrast or color (turn a picture to black and white, for example), set transparency or even modify the color balance or the gamma value.
| The graphic panel do not change the picture, just apply a "mask" to it. The real picture is not edited and can be seen again just by turning of the selected filters. |
Styles and Formatting Deck
Also in Draw it is possible to define styles to be applied to several objects, controlling the appearance and properties of those objects on a centralized way. We will come back to the use of styles on Draw on the next section.
Gallery Deck
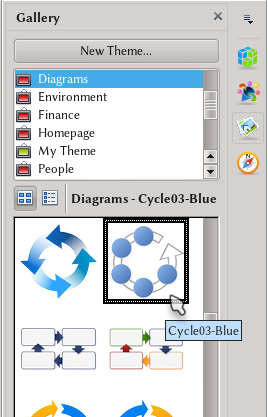
The gallery offers a series of pictures, diagrams and sounds ready to be used on any document.
Selecting a theme listed on the top of the deck, you just need to drag and drop the selected image into your document, or right click → Insert. It is also possible to create a custom theme with the New Theme button: just drag and drop the pictures you want to add to the gallery either from the document or from the file browser of your system to the newly created theme.
| You cannot add objects to existing themes, unless it is the (empty by default) theme called "My Theme": you need to either use My Theme or create a new one. |
The navigator can be used to browse between pages (called Slides on the navigator) and objects inserted on those pages. By default, only those objects with a "name" (right click on the object → Name) will be shown on Navigator, but you can choose to also show unnamed object as well opening the menu "Show Shapes" to the right of the buttons on top of the Navigator.
| There is a problem that do not permit to select unnamed objects from the navigator on Draw. See Issue 96488 for more details. |
Text on Draw Objects
Every object or picture can be associated with text: a double click is enough to be able to insert text that will remain "linked" to the object.
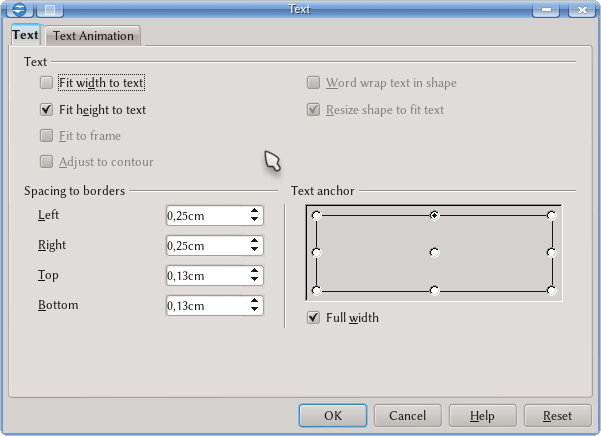
The properties of that text can be managed just by selecting it and applying manual formatting with the help of the Text and Paragraph panels on the Properties deck on the Sidebar, or with the use of the formatting toolbars. With a right click on the object → Text, it is possible to set how the text will be aligned with the object, the anchoring point, spacing to borders, if it should remain inside the object or not, etcetera.
Some options ("Fit width to text" and "Fit height to text") on this menu are only available for text boxes.
Other options ("Word wrap text in shape" and "Resize shape to fit text") are only available for non rectangular drawing objects.
TODO: more detailed description for this options. Description for the "Text animation" tab.
It is also possible to enter text independently of any object on the drawing, by using the text tool (the button with a T): in practice, this insert a box without border line and without background and set to change its size to give place to the text.
Text, as any other property for drawing objects and pictures, can be controlled by the use of styles, as we will see on the next section of this guide.

