Calc's User Interface
Calc's User Interface
Introduction
When you open the Calc window, the document will be displayed by default in the view option "Normal". This view displays the range of cells without indicating the borders of the print area. In order to change the view to display the print area choose View → Page Break Preview.
As already discussed in the chapter Apache OpenOffice User Interface, there are many menus and toolbars that make up the interface of OpenOffice components. Many of the menus and toolbars of the OpenOffice Calc interface are similar to those already discussed in the Writer's Guide. In this section, we will show you the unique aspects of the OpenOffice Calc interface.
Formula Bar
The formula bar has five components: the name box, the function wizard, the sum function, the function button and the input line. The name box shows what cell or group of cells that are currently selected. The function wizard button will open another window with the functions available in Apache OpenOffice Calc. The function wizard will be discussed later in the guide. The sum function button adds the sum function into the input line. The function button adds an equal sign to the input line to prepare for the input of a function expression. Finally, the input line allows you to input data and functions into cells. It also displays the contents of a cell before the execution of the function.
Sheets Tabs
By default, when you open a new Calc document, there with be three sheets which can be accessed using the sheets tabs. Each of these sheets is an independent blank sheet of cells. The manipulation of these sheets will be discussed later in this guide.
Status Bar
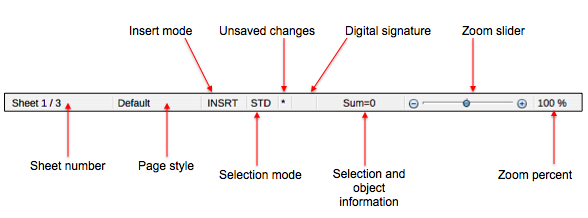
The status bar is located at the bottom of the window. It is very similar to the Writer's status bar with some differences.

Sheet number
Displays the current sheet number and the total number of sheets.
Page style
Displays the current page style. To edit the page style, double-click on this field and the Page Style dialog will open.
Insert mode
Click to toggle between INST (Insert) mode and OVER (Overwrite) mode. Insert mode will insert text after the cursor position moves forward. Typing in overwrite mode replaces text after the cursor position.
Selection mode
Displays the current selection mode. In STD or standard, mouse click selects the cell you have clicked on and unmarks all marked cells. In EXT or extend, a mouse click marks a rectangular range from the current cell to the cell you clicked. This can also be done by a Shift-click on a cell. In ADD, a mouse click in a cell adds it to the already marked cells. A mouse click in a marked cell unmarks it. This can also be down by a Ctrl-click on a cell. You can cycle through these options by clicking on the selection mode.
Unsaved changes
An asterisk (*) appears if changes are not saved.
Digital signature
If the document has not been digitally signed, double-clicking in this area opens the Digital Signatures dialog where you can sign the document. If the document has been digitally signed, an icon (![]() ) will show in this area. You can double-click the icon to view the certificate.
) will show in this area. You can double-click the icon to view the certificate.
Selection and object information
This section displays information about the current document. By default, it displays the sum of the selected cells.
Zoom slider and percent
To change the view magnification, drag the Zoom slider or click on the + and - signs. You can also right-click on the zoom level percentage to select a magnification value or double-click to open the Zoom & View Layout dialog.
