Documentation/OOoAuthors User Manual/Writer Guide/Creating an alphabetic index
| [[{{{PrevPage}}}|< Previous Page
]] |
[[{{{NextPage}}}|Next Page
>]] |
Creating an alphabetic index
An alphabetical index (referred to as an index) is a list of keywords or phrases used throughout a document that, if listed in order, may help the reader find information quickly. Generally an index is found in the back of book or document and lists several keywords or phrases in alphabetical order with page numbers.
This section describes how to:
- Add index entries
- Create an alphabetic index quickly
- Customize the display of index entries
- View and edit existing index entries
Adding index entries
Before you create an index, you must create some index entries.
- Either highlight the word or phrase to add to the index or place the cursor at the beginning of the word or phrase. (If you want to add multiple words as one entry it will generally be better to highlight the entire phrase.)
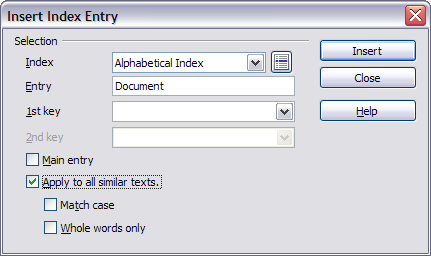
- Click Insert > Indexes and Tables > Entry to display a dialog box similar to that shown below. You can accept the word or phrase shown in the Entry box or change it to whatever you want. If you placed the cursor at the beginning of a word, clicking on the Entry text box inserts the word into the text box.
- Click Insert to create the entry.
- You can create multiple entries without closing the dialog box. For each one:
- Click at the location in the document that you want to index.
- Click again on the dialog box.
- Change the entry if needed, and click Insert.
- When you are satisfied with the entries, click Close.

Inserting an index entry.
Note: If field shading is active (see Tools > Options > OpenOffice.org> Appearance > Text Document > Field shadings), when a selected word or phrase has been added to the index, it is shown in the text with a gray background. Index entries whose text is different from the text in the document are marked by a small gray rectangle.
Tip: You can also open the Insert Index Entry dialog box by clicking the Entry icon on the Insert toolbar, as shown below.
Creating an alphabetic index quickly
Now that there are index entries, you can create the index.
Although indexes can be customized extensively in Writer, most of the time you will need to make only a few choices. To create an index quickly:
- Place the cursor where you want to add the index and click Insert > Indexes and Tables > Indexes and Tables.
- In the Type box on the Index/Table page of the Insert Index/Table dialog box, select Alphabetical Index.
- In the Options section, you may want to uncheck the Case sensitive checkbox.
- Click OK.
If you add, delete, or change the text of index entries, you need to update the index. Writer does not update an index automatically. To do this, follow the steps outlined in Updating a table of contents.
Customizing index entries
Below is a brief explanation of the fields in the Insert Index Entry dialog box and how to use them.
- Index – The type of index this entry is for. The default is Alphabetical Index, but you can use this field to create extra entries for a table of contents or user-defined indexes or lists of almost anything. For example, you might want an index containing only the scientific names of species mentioned in the text, and a separate index containing only the common names of species. See Creating and using other types of indexes.
- Entry – The word or phrase to be added to the selected index. This word or phrase does not need to be in the document itself; you can add synonyms and other terms that you want to appear in the index.
- 1st key – An index key is an index entry that has no associated page number and has several subentries that do have page numbers. Keys are useful ways of grouping related topics. (See Example of using an index key.)
- 2nd Key – You can have a three-level index, where some of the first-level keys have level-2 entries that are also keys (without page numbers). This degree of index complexity is not often necessary.
- Main entry – When the same term is indexed on several pages, often one of those pages has more important or detailed information on that topic, so it is the main entry. To make the page number for the main, or most important, entry stand out, select this checkbox and then define the character style for the page number of a main index entry to be bold, for example.
- Apply to all similar texts – Select this checkbox if you want Writer to automatically identify and mark any other word or phrase that matches the current selection. The Match case and Whole words only checkboxes become available if this checkbox is selected.
Example of using an index key
An index key is a primary entry under which subentries are grouped. For example, you might want to create a grouping similar to this:
OpenOffice.org
Writer, 5
Calc, 10
Impress, 15
In this example, OpenOffice.org is the 1st key. The subentries (with the page numbers showing) are the indexed entries. To insert an index entry for the topic Writer, on the Insert Index Entry dialog box, type “Writer” in the Entry box and “OpenOffice.org” in the 1st key box.
Customizing the appearance of an index
The Insert Index/Table dialog box has five pages. Any or all of them can be used to customize the appearance of an index.
- Use the Index/Table 'page to set the attributes of the index.
- Use the Entries and Styles pages to format the entries in the index.
- Use the Columns tab to put the index into more than one column.
- Use the Background tab to add color or a graphic to the background of the index.
The preview box, located on the left-hand side of the dialog box, shows as you work how the index will look. (If you do not see the preview box, select the Preview checkbox in the lower right-hand corner of the dialog box.)
After making your changes, click OK to save the index so it appears in your document.
Using the Index/Table page
Use the Index/Table page to set the basic attributes of the index.

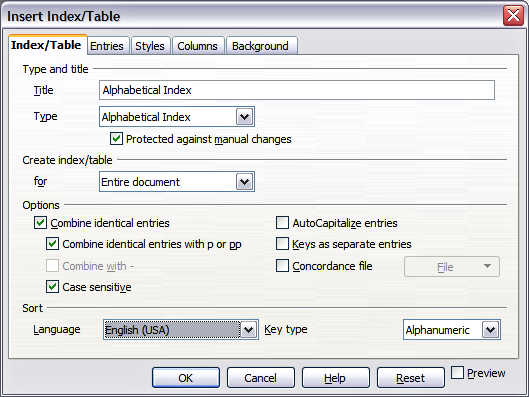
Index/Table page of Insert Index/Table dialog box.
- To give the Index a title, type it in the Title field. (You can change an existing title by typing over it.) To delete the title, clear the Title field.
- To prevent the index from being changed accidentally, check the Protected against manual changes checkbox. If this box is checked, the index can only be changed using the context menu or the Insert Table/Index dialog box. If the box is not checked, the index can be changed directly on the document page, just like other text. Tip: Any manual changes to an index are lost when you update it.
- From the drop-down list in the Create index/table area, select Entire document. You can also choose to create an index for just the current chapter.
- Various other options determine how the index handles entries:
- Combine identical entries. Defines how identical entries are dealt with. Normally each page number of an indexed word or phrase will be shown in the index; however these can be combined using the Combine identical entries with p or pp. If you want a page range displayed, select Combine with – (which will produce something similar to 23–31). If you want different entries based on what letters are capitalized, select Case sensitive.
- AutoCapitalize entries. Automatically capitalizes the first letter of each entry regardless of how they show within the document itself.
- Keys as separate entries. For the keys to have their own page numbers, select this option.
- Concordance file. Enables a list of words in an external file to be imported (select using the File button) and then used within the index. The concordance file has a special file format; for further information, refer to concordance file in Help > OpenOffice.org Help. Using a concordance file can speed up production of an index, but unless the words are very carefully selected and you edit the index afterwards, the resulting index can be full of entries for minor mentions of a term, making it less useful than a more selective index.
- Sort. Defines how the entries are sorted when displayed. The only option is alphanumeric, but you can define which language alphabet will be used.
Using the Entries page
Use the Entries page to set exactly how and what will be displayed for each of the entries. The dialog box is similar to the figure below.

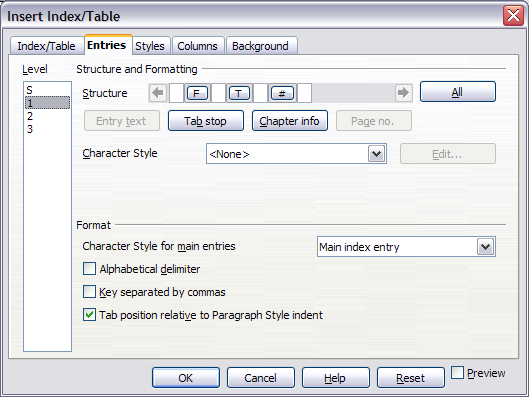
Entries page for creating an alphabetical index.
To begin, click a number in the Level column to select the index level whose elements you want to format. (You will be able to apply your changes to all index levels later.) The Structure line displays the elements for entries in that level. Each button on the Structure line represents one element:
- The E button represents the entry text.
- The T button represents a tab stop.
- The # button represents the page number.
- The CI button represents chapter information. This may not be displayed immediately, but can be added.
Each white field on the Structure line represents a blank space. You can add custom text if you desire.
Note: On some operating systems, the E# and E buttons display as F# and F, and the LS and LE buttons display as IS and IF (the bottom of the E and L are cut off). This problem will be fixed in a future release of OpenOffice.org.
Changing elements
To change an element in the Structure line, click the button representing that element and then click the element that you want to substitute in the row of buttons just below the Structure line. For example, to change entry text to a tab stop, click the E# button on the Structure line (it shows then as being pressed) and then click the Tab stop button in the row of available elements.
Deleting elements
To delete an element from the Structure line, click the button that represents that element and then press the Delete key on your keyboard. For example, to delete a tab stop, click the T button and then press the Delete key.
Adding elements
To add an element to the Structure line:
- Place the cursor in the white field to the left of where you want to insert the element.
- Click one of the buttons below the Structure line. (For example, to add a tab stop, click the Tab stop button.) A button representing the new element appears on the Structure line.
Applying character styles
Each of the items that can be added to the Structure line may have additional formatting. For example, you may want the page number to be a different size from the rest of the index text. To do this, apply a character style to one of the elements in the Structure line.
To apply a character style to an element:
- On the Structure line, click the button representing the element to which you want to apply a style.
- Select the desired style from the Character Style drop-down list. Writer applies the style to the selected element.
To view or edit the attributes of a character style, select the style from the Character Style drop-down list and then click the Edit button.
Formatting entries
Apply additional formatting using the options in the Format section.
- Alphabetical delimiter. This will display, as a means of separating index entries, the first letter of all the subsequent index entries. For example:
- A
- apple, 4
- author, 10
- B
- break, 2
- bus, 4
- Key separated by commas. Arranges the entries in the index on the same line but separated by commas.
- Tab position relative to Paragraph Style indent. When checked, entries are indented according to the settings of their individual formats. Where a paragraph style with an indent on the left is in use, tab stops will be relative to this indent. If this checkbox is not selected, tab stops will be relative to the left margin position.
Using the Styles, Columns and Background pages
Refer to Using the Styles page, Using the Columns page, and Using the Background page.
Maintaining an index
To modify the appearance of an index:
- Click anywhere in the index and then right-click.
- From the pop-up menu, choose Edit Index/Table. The Insert Index/Table dialog box opens and you can edit and save the index using the five tabs described in the previous section.
To update or delete an index, follow the process described in the sections Updating a table of contents and Deleting a table of contents.
Viewing and editing existing index entries
Once you have added the initial entries, you can make some amendments or add some new ones. You can view and edit these using the following steps:
- Ensure that field shading is active (Tools > Options > OpenOffice.org> Appearance > Text Document > Field shadings), so you can locate index entries more easily.
- Place the cursor immediately to the left of an existing index entry in the body of your document and select Edit > Index Entry. Alternatively, right-click on the word or phrase and from the context menu select Index Entry.
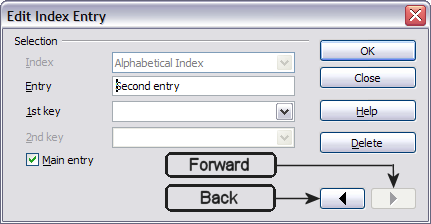
- A dialog box similar to the one below appears. You can move through the various index entries using the forward and back arrow buttons. If there is more than one entry for a single word or phrase, then you can scroll through each of the entries.
- Make the necessary modifications or additions to the index entries and, when finished, click OK.
| Content on this page is licensed under the Creative Common Attribution 3.0 license (CC-BY). |

