Advanced form customization
Linking a macro to a form control
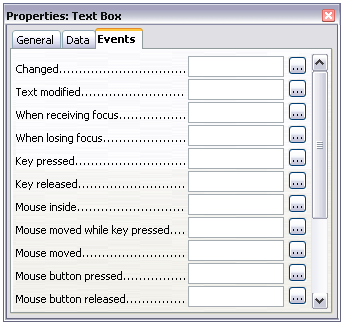
You can set any form control (for example, text box or button) to perform an action when triggered by some event. To see the full list of events, right-click on the form control when the design mode is on, select Control and click on the Events tab.
To assign a macro to an event:
- Create the macro. (See Chapter 17, “Getting Started with Macros” in the Getting Started guide.)
- Right-click on the form control, select Control and click on the Events tab.
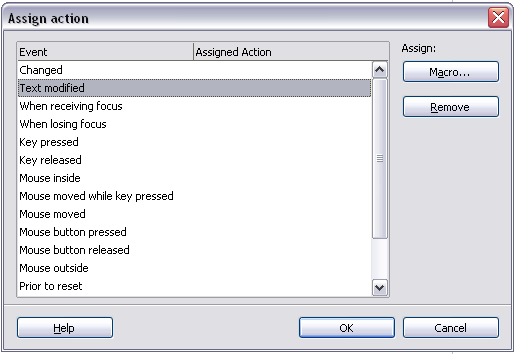
- Click the ... button to the right of the event to bring up the Assign action dialog box.
- Click Assign and select the macro.

Control properties events tab.

Assign action dialog box.
Macros can also be assigned to events relating to the form as a whole. To assign these, right-click on a form control in the document, select Form and click on the Events tab.
Read-only documents
Having created your form, you want whoever is using it to be able to access the information stored in the database, or complete the form, without changing the layout. There is an easy way to do this: make the document read-only.
Select Tools > Options > OpenOffice.org > Security> Open this document in read only mode.
Fine-tuning database access permissions
By default, when a database is accessed from a form, any changes can be made to it: records can be added, deleted and amended. You may not want that behaviour. For example, you may want users to be able only to add new records or to be prohibited from deleting existing records.
In design mode, right-click on a form control and select Form from the pop-up menu. On the Data tab of the Form Properties dialog box are a number of options: Allow additions, Allow deletions, Allow modifications and Add data only. Set each of these to Yes or No to control the access users have to the data source.
Individual fields can also be protected. This might be useful if you wanted a user to be able to modify some parts of a record but only view others, such as a stock list where item descriptions are fixed and quantities can be modified.
To make an individual field read-only, in design mode, right-click on the form control within the document and select Control from the pop-up menu. Select the General tab and set Read-only to Yes.
Form control formatting options
You can customize the way form controls look and behave in a number of ways. These are all accessed in Design mode. Right-click on the form control, select Control from the pop-up menu and select the General tab in the Properties dialog box.
- Set a label for the control in the Label field. Some form controls, such as push buttons and option buttons, have visible labels that can be set. Others, such as text boxes, do not.
- Set whether the form control will print out if the document is printed with the Print option.
- Use the Font setting to set the font, typeface and size for a field.
- For a text box, you can set the maximum text length. This is very useful when adding records into a database. Every database text field has a maximum length and, if the data entered is too long, OOo displays an error message. By setting the maximum text length of the form control to be the same as that of the database field, this error can be avoided.
- You can set the default option for a form control. By default, a control is blank, or has every option unselected. You can set the control to start with a particular option or list item selected.
- For controls where a password is being entered, setting the Password character (for example to *) displays only that character, but saves what the user really types.
- You can add additional information and help text for a form control.
- Other formatting controls such as background color, 3-D look, text formatting, scroll bars and borders allow you to further define how the control appears.
| Content on this page is licensed under the Creative Common Attribution 3.0 license (CC-BY). |