The Draw Workplace
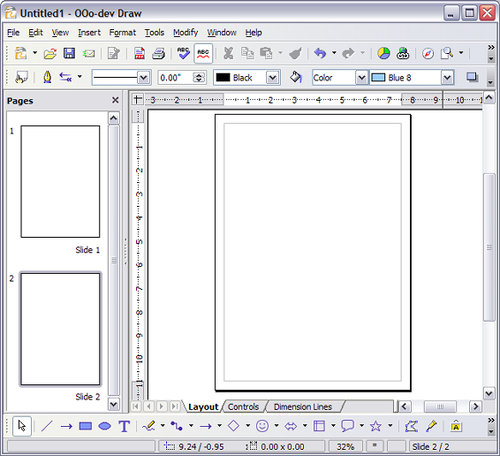
The main components of the Draw interface are shown in Figure 1.
The large area in the center of the window is where the drawings are made. It is surrounded by toolbars and information areas. You can vary the number and position of the visible tools, so your setup may look a bit different. For example, many people put the main Drawing toolbar on the left-hand side of the workspace, not at the bottom as shown here.
Toolbars
The various Draw toolbars can be displayed or hidden according to your needs.
To display or hide the toolbars, click View > Toolbars. On the menu that appears, choose which toolbars you want to display.
You can also select the buttons that you wish to appear on the corresponding toolbar. On the View > Toolbars menu, select Customize, click on the Toolbars tab, select the toolbar you want to change, and then select the desired buttons for that toolbar. Each toolbar has a different list of buttons. See Chapter 4 (Menus and Toolbars) for more information.
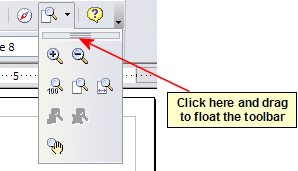
Many toolbar buttons are marked with a small arrow beside the button. The arrow indicates that this button has additional functions. Click the arrow and a submenu or floating toolbar appears, showing its additional functions (see Figure 2).
You may wish to keep this submenu displayed on your screen, but in a different position. You can make a submenu into a floating toolbar. To do so, click the area at the top of the submenu, drag it across the screen, and then release the mouse button. Floating toolbars can be docked on an edge of the screen or within one of the existing toolbar areas at the top of the screen, as described in Chapter 4.
| Most buttons marked with the small arrow can become floating toolbars. The floating toolbar capability is common to all components of the OpenOffice.org suite. |
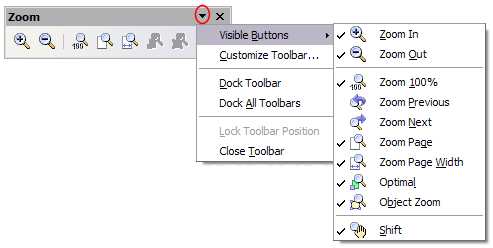
Click the arrow on the title bar of a floating toolbar to display additional functions (see Figure 3).
The tools available in the various toolbars are explained in the following sections.
Standard toolbar
The Standard toolbar looks like this:
It is the same for all parts of OpenOffice.org.
Line and Filling toolbar
The Line and Filling toolbar lets you modify the main properties of a drawing object. See page 15 for details.
If the selected object is text, the toolbar changes to the one shown below, which is similar to the Formatting toolbar in Writer.
Drawing toolbar
The Drawing toolbar is the most important toolbar in Draw. It contains all the necessary functions for drawing various geometric and freehand shapes and organizing them on the page.
Color Bar
To display the Color Bar, use View > Toolbars > Color Bar. The toolbar then appears at the bottom of the workspace.
This toolbar lets you rapidly choose the color of the objects in your drawing. The first box in the panel corresponds to Invisible (no color).
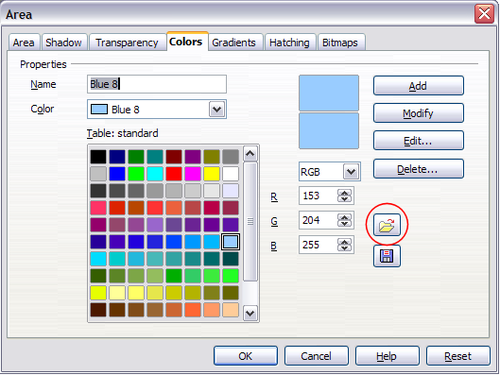
The default color palette can be changed using Format > Area, as shown in Figure 4. Choose the tab marked Colors.
If you click on the Load Color List button (circled), the file selector asks you to choose a palette file (bearing the file extension .soc). Several palettes are supplied as standard with OpenOffice.org. For example, web.soc is a color palette that is particularly adapted to creating drawings that are going to appear in web pages, because the colors will be correctly displayed on workstations with screens displaying at least 256 colors.
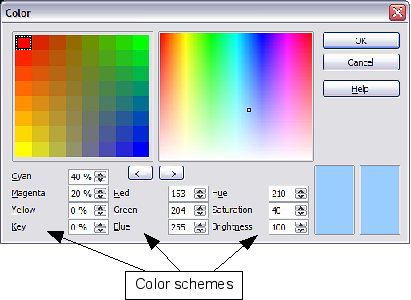
The color selection box also lets you individually change any color by modifying the numerical values in the fields provided to the right of the color palette. You can click on Edit to display a dialog (shown in Figure 5), making the choice of colors easier.
You can use the color schemes known as CMYK (Cyan, Magenta, Yellow, Black), RGB (Red, Green, Blue) or HSB (Hue, Saturation, Brightness).
Options toolbar
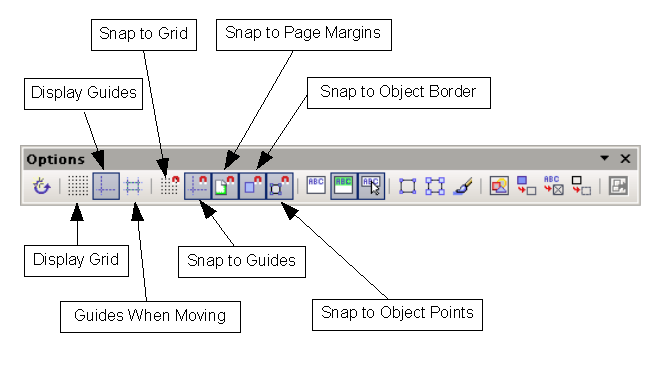
The Options toolbar lets you activate or deactivate various drawing aids. The Options toolbar is not displayed unless it is first selected. To display it, select View > Toolbars > Options.
Using the grid
The snap tools are divided into three groups: the grid, snap lines, and snap points.
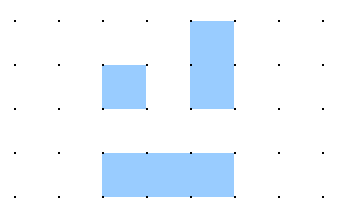
Draw provides a grid of points to which objects can be snapped. Click on the Display Grid button in the Options toolbar to display the grid, and then click on the Snap to Grid button to activate it. The work area will be filled with a grid, as shown in Figure 6. This grid will not be printed or appear in exported files, such as a PDF.
When the grid is active, shapes can be positioned easily by using the dots as a guide. In the following example, the objects are positioned exactly on the dots in the grid.
The spacing between the dots is defined in the Grid options dialog under the Drawing area of the OOo options (Tools > Options > OpenOffice.org Draw > Grid).
In the dialog shown in Figure 7, you can set the following parameters:
- Vertical and horizontal spacing of the dots in the grid. You can also change the unit of measurement used in the general Draw options (Tools > Options > OpenOffice.org Draw > Grid > General).
- The resolution is the size of the squares or rectangles in the grid. If the resolution is Horizontal 1cm, Vertical 2cm, the grid consists of rectangles 2cm high and 1cm wide.
- Subdivisions are additional points that appear along the sides of each rectangle or square in the grid. Objects snap to subdivisions as well as to the corners of the grid.
- The pixel (pix element) size of the snap area defines how close you need to bring an object to a snap point or line before it will snap to it.
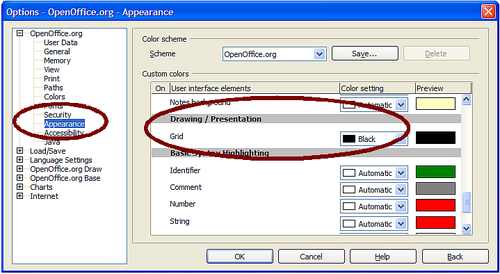
The default grid dots are light gray, which can be very hard to see. To improve visibility, go to Tools > Options, then OpenOffice.org > Appearance (Figure 8).
Under Custom colors, scroll down until you see Drawing / Presentation. Then set the Grid color to a darker color like black.
Rulers
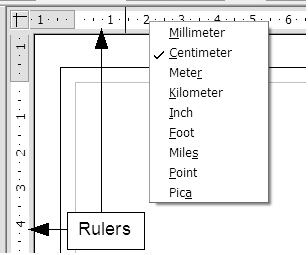
You should see rulers on the upper and left-hand sides of the workspace (see Figure 9). These show the size of the objects on the page. The rulers show the location of the mouse cursor, to help you position objects more precisely. The rulers also are used to manage handle points and capture lines that make positioning objects easier.
The page margins in the drawing area are also represented on the rulers. You can change the margins directly on the rulers by dragging them with the mouse. To modify the units of measurement of the rulers, right-click on one of the rulers. The two rulers can have different units.
Status Bar
The Status Bar is located at the bottom of the screen. The middle part of this area (shown below) is particularly relevant to the Draw module.
The sizes are given in the current unit (not to be confused with the ruler units). This unit is defined in Tools > Options > OpenOffice.org Draw > General, where you can also change the scale of the page. Another way to change the scale is to double-click on the number shown in the status bar.
| Content on this page is licensed under the Creative Common Attribution 3.0 license (CC-BY). |
