Linking to registered data sources
You can access a variety of databases and other data sources and link them into Calc documents. First you need to register the data source with OpenOffice.org. (To register means to tell OOo what type of data source it is and where the file is located.) The way to do this depends on whether or not the data source is a database in *.odb format.
To register a data source that is in *.odb format:
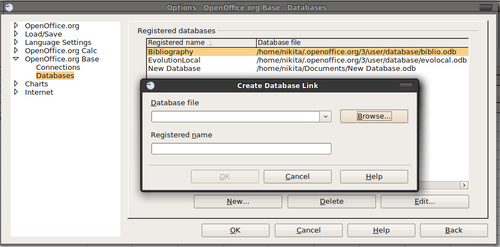
- Choose Tools > Options > OpenOffice.org Base > Databases.
- Click the New button (below the list of registered databases) to open the Create Database Link dialog.
- Enter the location of the database file, or click Browse to open a file browser and select the database file.
- Type a name to use as the registered name for the database and click OK. The database is added to the list of registered databases. The OK button is enabled only when both fields are filled in.
To register a data source that is not in *.odb format:
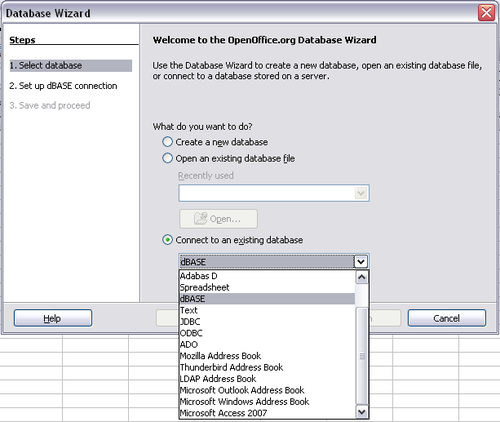
- Choose File > New > Database to open the Database Wizard.
- Select Connect to an existing database. The choices for database type depend on your operating system. For example, Microsoft Access and other Microsoft products are not among the choices if you are using Linux. In our example, we chose dBASE.
- Click Next. Type the path to the database file or click Browse and use the Open dialog to navigate to and select the database file before clicking Open.
- Click Next. Select Yes, register the database for me, but clear the checkbox marked Open the database for editing.
- Click Finish. Name and save the database in the location of your choice. Note: changes made to the *.odb do not affect the original dBASE file.
Once a data source has been registered, it can be used by any OOo component (for example Calc).
Viewing data sources
Open a document in Calc. To view the data sources available, press F4 or select View > Data Sources from the menu bar. The Data Source View pane opens above the spreadsheet. A list of registered databases is in the Data Explorer area on the left. (The built-in Bibliography database is included in the list.) To view each database, click on the + to the left of the name of the database. (This has been done for the Automobile database in the figure below.) Click on the + next to Tables to view the individual tables.
Now click on a table to see all the records held in it. The data records are displayed on the right side of the Data Source View pane. To see more columns, you can click the Explorer On/Off button to hide the Data Explorer area.
At the top of the Data Source View pane, below the Calc toolbars, is the Table Data bar. This toolbar includes buttons for saving records, editing data, finding records, sorting, filtering, and other functions. For more details about this toolbar, see the Help for data source browser.
Below the records is the Form Navigation bar, which shows which record is selected and the total number of records. To the right are five tiny buttons; the first four move backwards or forwards through the records, or to the beginning or end.
Editing data sources
Some data sources (such as spreadsheets) cannot be edited in the data source view.
In editable data sources, records can be edited, added, or deleted. If you cannot save your edits, you need to open the database in Base and edit it there (see next section). You can also hide columns and make other changes to the display.
Launching Base to work on data sources
You can launch OOo Base at any time from the Data Source View pane. Right-click on a database or the Tables or Queries icons and select Edit Database File. Once in Base, you can edit, add, and delete tables, queries, forms, and reports.
For more about using Base, see Getting Started with Base in the Getting Started guide.
Using data sources in Calc spreadsheets
Data from the tables in the data source pane can be placed into Calc documents in a variety of ways.
You can select a cell or an entire row in the data source pane and drag and drop the data into the spreadsheet. The data is inserted at the place where you release the mouse button.
An alternative method uses the Data to Text icon and will include the column headings above the data you insert:
- Click the cell of the spreadsheet which you want to be the top left of your data including the column names.
- Press F4 to open the database source window and select the table containing the data you want to use.
- Select the rows of data you want to add to the spreadsheet:
- Click the gray box to the left of the row you want to select if only selecting one row. That row is highlighted.
- To select multiple adjacent rows, hold down the Shift key while clicking the gray box of the rows you need.
- To select multiple separate rows, hold down the Control key while selecting the rows. The selected rows are highlighted.
- To select all the rows, click the gray box in the upper left corner. All rows are highlighted.
- Click the Data to text icon
 to insert the data into the spreadsheet cells.
You can also drag the data source column headings (field names) onto your spreadsheet to create a form for viewing and editing individual records one at a time. Follow these steps:
- Click the gray box at the top of the column (containing the field name you wish to use) to highlight it.
- Drag and drop the gray box to where you want the record to appear in the spreadsheet.
- Repeat until you have moved all of the fields you need to where you want them.
- Close the Data Source window: press F4.
- Save the spreadsheet and click the Edit File button
 on the Standard toolbar, to make the spreadsheet read-only. All of the fields will show the value for the data of the first record you selected.
 - Add the Form Navigation toolbar: View > Toolbars > Form Navigation. By default, this toolbar opens at the bottom of the Calc window, just above the status bar.
- Click the arrows on the Form Navigation toolbar to view the different records of the table. The number in the Record box changes as you move through the records. The data in the fields changes to correspond to the data for that particular record number. You can also search for a specific record, sort and filter records, and do other tasks using this toolbar.
| Content on this page is licensed under the Creative Common Attribution 3.0 license (CC-BY). |


