Difference between revisions of "FR/Documentation/Writer Guide/Utiliser sections"
m (→Créer des sections) |
m (→Using the Section page) |
||
| Line 50: | Line 50: | ||
A tout moment, vous pouvez restaurer les paramètres de ces onglets à leur valeur par défaut en cliquant sur le bouton ''Rétablir'' (remarquez cependant que vous ne pouvez pas restaurer l'onglet ''Section''. Si vous souhaitez annuler des modifications faites dans l'onglet ''Section'' vous devez le faire manuellement). | A tout moment, vous pouvez restaurer les paramètres de ces onglets à leur valeur par défaut en cliquant sur le bouton ''Rétablir'' (remarquez cependant que vous ne pouvez pas restaurer l'onglet ''Section''. Si vous souhaitez annuler des modifications faites dans l'onglet ''Section'' vous devez le faire manuellement). | ||
| − | == | + | == Utiliser l'onglet Section == |
| − | + | Utilisez l'onglet ''Section'' pour définir les attributs de la section active. | |
| − | [[Image:InsertSection.png|thumb|none|500px|'' | + | [[Image:InsertSection.png|thumb|none|500px|''Insérer une section en utilisant la boîte de dialogue Insérer une section.'']] |
| − | === | + | === Nommer les sections === |
| − | Writer | + | Writer saisie automatiquement un nom pour la section active dans le champ en haut de la zone ''Nouvelle section''. Pour modifier le nom, sélectionnez le et taper par dessus. Le nom est affiché dans la catégorie ''Sections'' de la fenêtre du Navigateur. Si vous donnez aux sections des noms significatifs, vous pourrez naviguer entre elles plus facilement. |
| − | === | + | === Lier des sections === |
| − | + | Vous pouvez insérer le contenu d'un autre document dans la section active et laisser Writer actualiser la section lorsque l'autre document est actualisé. Cela s'appelle ''lier'' la section à un autre document. | |
| − | + | Pour lier la section active à un autre document, suivez ces étapes : | |
| − | # | + | # Dans la zone ''Lier'', cochez la case à cocher '''Lier'''. |
| − | # | + | # Cliquez sur le bouton ('''...''') à la droite du champ ''Nom de fichier''. La boite de dialogue Insérer s'ouvre |
| − | # | + | # Cherchez et sélectionnez le document que vous souhaitez insérer et cliquez ensuite sur le bouton '''Insérer'''. La boîte de dialogue Insérer se ferme et le nom du document sélectionné apparaît dans le champ ''Nom de ficher''. |
| − | # | + | # Si vous souhaitez insérer seulement une section du document sélectionné, sélectionnez la section désirée à partir de la liste déroulante ''Section''. |
| − | [[Image:LinkSection.png|thumb|none|500px|'' | + | [[Image:LinkSection.png|thumb|none|500px|''Lier une section.'']] |
| − | {{Documentation/Note| | + | {{Documentation/Note|La section doit déjà exister dans le document sélectionné. Vous ne pouvez pas créer une section dans le document sélectionné à ce moment.}} |
| − | + | Vous pouvez actualiser les liens automatiquement ou manuellement. Voir [[#Actualiser les liens|Actualiser les liens]]. | |
=== Write-protecting sections === | === Write-protecting sections === | ||
Revision as of 18:13, 14 April 2009
- Choix d'une méthode de mise en page
- Définition d'une mise en page de base avec des styles
- Modification des marges de la page
- Utilisation de colonnes pour la mise en page
- Utilisation de cadres pour la mise en page
- Utilisation de tableaux pour la mise en page
- Utilisation de sections pour la mise en page
- Création d'en-têtes et de pieds de page
- Numérotation des pages
Introduction aux sections
Une section est un bloc de texte qui a des attributs spéciaux et du formatage. Vous pouvez utiliser les sections pour :
- Protéger un texte en écriture
- Masquer du texte
- Insérer dynamiquement du contenu d'un autre document
- Ajouter des colonnes, des retraits de marge, une couleur d'arrière-plan ou une image d'arrière-plan à un portion du document
- Personnaliser les notes de bas de page et de fin pour une portion du document.
Créer des sections
Pour créer une section:
- Placez le curseur à l'endroit de votre document où vous souhaitez insérer la nouvelle section. Ou sélectionnez le texte que vous voulez placer dans une nouvelle section.
- À partir du menu principal, choisissez Insertion > Section. La boîte de dialogue Insérer une section s'ouvre.
- Cliquez sur l'onglet Section, s'il n'est pas déjà affiché. (Voir Utiliser l'onglet Section).
La boîte de dialogue Insérer une section a cinq onglets :
- Utilisez l'onglet Section pour définir les attributs de la section
- Utilisez l'onglet Retraits pour définir des retraits dans les marges de droite et de gauche de la section
- Utilisez l'onglet Arrière-plan pour ajouter de la couleur ou une image à l'arrière-plan de la section
- Utilisez l'onglet Notes de bas de page/de fin pour personnaliser les notes de bas de section ou de fin.
A tout moment, vous pouvez restaurer les paramètres de ces onglets à leur valeur par défaut en cliquant sur le bouton Rétablir (remarquez cependant que vous ne pouvez pas restaurer l'onglet Section. Si vous souhaitez annuler des modifications faites dans l'onglet Section vous devez le faire manuellement).
Utiliser l'onglet Section
Utilisez l'onglet Section pour définir les attributs de la section active.

Nommer les sections
Writer saisie automatiquement un nom pour la section active dans le champ en haut de la zone Nouvelle section. Pour modifier le nom, sélectionnez le et taper par dessus. Le nom est affiché dans la catégorie Sections de la fenêtre du Navigateur. Si vous donnez aux sections des noms significatifs, vous pourrez naviguer entre elles plus facilement.
Lier des sections
Vous pouvez insérer le contenu d'un autre document dans la section active et laisser Writer actualiser la section lorsque l'autre document est actualisé. Cela s'appelle lier la section à un autre document.
Pour lier la section active à un autre document, suivez ces étapes :
- Dans la zone Lier, cochez la case à cocher Lier.
- Cliquez sur le bouton (...) à la droite du champ Nom de fichier. La boite de dialogue Insérer s'ouvre
- Cherchez et sélectionnez le document que vous souhaitez insérer et cliquez ensuite sur le bouton Insérer. La boîte de dialogue Insérer se ferme et le nom du document sélectionné apparaît dans le champ Nom de ficher.
- Si vous souhaitez insérer seulement une section du document sélectionné, sélectionnez la section désirée à partir de la liste déroulante Section.

Vous pouvez actualiser les liens automatiquement ou manuellement. Voir Actualiser les liens.
Write-protecting sections
To write-protect the current section so that its contents cannot be edited, check the Protect checkbox in the Write protection area.

Password-protecting sections
To prevent others from editing the section's attributes or format, protect the section with a password, as follows:
- Check the With password checkbox. The Enter Password dialog box opens.
- Type a password in the Password field and then confirm the password by typing it again in the Confirm field.
- Click OK. The Enter Password dialog box closes. Anyone who tries to edit the section's attributes or format will be prompted to enter the password.

Hiding sections
You can hide the current section so that it will not be displayed on the screen or printed. You can also specify conditions for hiding the section. For example, you can hide the section only from certain users.
To hide a section, check the Hide checkbox in the Hide area.

To hide the section only under certain conditions, enter the desired conditions in the With Condition field. The syntax and operators that you use to enter conditions are the same ones that you use to enter formulas. For syntax and a list of operators, see Writer's online help under "conditions".
If the section is write-protected with a password, the password must be entered to hide or reveal the text.
Using the Columns page
Use the Columns page of the Insert Section dialog box to format the current section into columns. This page is very similar to the Columns dialog box shown in Defining the number of columns on a page. Please refer to that topic for details.
Using the Indents page
Use the Indents page, pictured below, to set indents in the right and left margins of the current section. Enter the desired left-margin indent in the Before section box. Enter the desired right-margin indent in the After section box. The preview box on the right-hand side of the page shows you how the section will look with the indents applied.

Using the Footnotes/Endnotes page
Use the Footnotes/Endnotes page, pictured below, to customize the current section's footnotes and endnotes.

Customizing footnotes
If you want the current section's footnotes to appear separately from the other footnotes in the document, check the Collect at end of text check box in the Footnotes area.
To number the current section's footnotes separately from the other footnotes in the document, follow these steps:
- In the Footnotes area, make sure that the Collect at end of text check box is checked.
- Check the Restart numbering checkbox.
- If you want the section's footnotes to start at a number other than 1, enter the desired starting number in the Start at spin box.
To edit the format of the section's footnotes, follow these steps:
- In the Footnotes area, make sure that the Collect at end of text and Restart numbering checkboxes are checked.
- Check the Custom format checkbox.
- From the drop-down list under and to the right of the Custom format checkbox, select a numbering format for the footnotes.
- To add text to the selected numbering format, use the Before and After fields. For example, if you want the footnote numbers to be preceded by the word "Note" and followed by a colon, fill the Before and After fields like this:

Customizing endnotes
If you want the current section's endnotes to appear at the end of the section rather than at the end of the document, check the Collect at end of section checkbox in the Endnotes area.
To number the current section's endnotes separately from the other endnotes in the document, follow these steps:
- In the Endnotes area, make sure that the Collect at end of section checkbox is checked.
- Check the Restart numbering checkbox.
- If you want the section's endnotes to start at a number other than 1, enter the desired starting number in the Start at spin box.
To edit the format of the section's endnotes, follow these steps:
- In the Endnotes area, make sure that the Collect at end of section and Restart numbering checkboxes are checked.
- Check the Custom format checkbox.
- From the drop-down list under and to the right of the Custom format checkbox, select a numbering format for the endnotes.
- To add text to the selected numbering format, use the Before and After fields, as shown above for footnotes.
Using the Background page
Use the Background page to add color or a graphic to the background of the current section. This page is similar to the Background pages for paragraphs, frames, tables, and other objects in OOo. For more information, refer to Chapter 7 (Working with Styles).
Saving a new section
To save a new section so that it appears in your document, click the Insert button. The Insert Section dialog box closes and the new section appears in your document.
Editing and deleting sections
You can edit a section's attributes and formatting, and you can also delete sections.
Selecting a section
To select the section that you want to edit or delete, follow these steps:
- From the main menu, choose Format > Sections. The Edit Sections dialog box opens.
- The name of the current section appears in the Section area, in the field above the list box. If you want to edit or delete a different section, click the name of the desired section in the list. The selected section becomes the current section, and its name appears in the field above the list box.

Editing section attributes
To rename the current section, simply type over its name in the Section area.
From the Edit Sections dialog box, you can also edit the current section's link, write-protect, and hide attributes. To learn how to edit these attributes, see:
Deleting sections
To delete the current section, click the Remove button.
Editing the format of a section
To edit the format of the current section, click the Options button. The Options dialog box opens.

The Options dialog box has four tabbed pages: Columns, Indents, Background, and Footnotes/Endnotes. To learn how to use these pages, see:
- Using the Columns page
- Using the Indents page
- Using the Background page
- Using the Footnotes/Endnotes page
To reset a page to its most recently saved settings, click the Reset button.
To save your Options settings and return to the Edit Sections dialog box, click OK.
Updating links
You can have Writer update linked sections automatically, and you can also update links manually.
Updating links automatically
The default behavior, whenever you open a document that contains links, is for Writer to prompt you to update the links. To have Writer update links without prompting you or to turn off automatic updating, follow these steps:
- Choose Tools > Options > OpenOffice.org Writer > General. The dialog box displays general text document settings.
- In the Update area, under Update links when loading, select one of the following three options:
- Select Always if you want Writer to update links automatically, without prompting you, whenever you open a document that contains links.
- Select On request if you want Writer to prompt you before updating links.
- Select Never if you do not want Writer to update links.
- Click OK to save your settings. The Options dialog box closes.
-
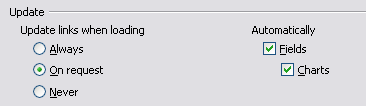 Writer > General Options settings.

Updating links manually
To update a link manually:
- Open the document that contains the link.
- Choose Edit > Links. The Edit Links dialog box opens.
- The list in the Edit Links dialog box displays the names of all the files that are linked to the current document. Click the file that corresponds to the link that you want to update.
- Click the Update button. The most recently saved contents of the linked file appear in the current document.
- To close the Edit Links dialog box, click Close.
-
 Edit links dialog box.

| Content on this page is licensed under the Creative Common Attribution 3.0 license (CC-BY). |