Inserting a chart
Contents
Inserting a chart
To add a chart to a slide, select the corresponding layout in the list of predefined layouts in the task pane or use the Insert Chart feature.
Creating a chart in AutoLayout
- In the Tasks pane, choose a layout that contains a chart (look for the vertical bars).
- Double-click the chart icon in the center of the chart area. A full-sized chart appears that has been created using sample data.
- To enter your own data in the chart, see Entering chart data.

Examples of AutoLayout templates with charts.

Chart made with sample data.
Creating a chart using the Insert chart feature
- Select Insert > Chart, or click the Insert Chart icon [[Image:]] on the Standard toolbar. A chart appears that has been created using sample data. See Figure 7.
- To enter your own data in the chart, see Entering chart data.
Choosing a chart type
- Double-click the chart. It should now have a gray border. The main toolbar has now changed to show tools specifically for charts. (If the main toolbar is not showing, select View > Toolbars > Main Toolbar.)
- Click the Chart Type icon
 or select Format > Chart Type. The Chart Type dialog appears.
 - In the section Chart category, select either 2D or 3D to see the different types of charts.
- In the section Chart type, click one of the icons to select it and see the different variants of the selected chart type in the Variants section.
- Choose a chart variant.
- Click OK. The chart in the presentation reflects the new type selected.

Chart Type dialog showing 2-dimensional charts.
Entering chart data
Opening a chart data window
- Double-click the chart. It should now have a gray border. The main toolbar has now changed to show tools specifically for charts.
- Click the Chart Data icon
 or select Edit > Chart Data. The Chart Data window appears. (If the main toolbar is not showing, select View > Toolbars > Main Toolbar.)

Chart Data area.
Entering data
Enter data in the Chart Data window.
- Insert buttons insert a row or column.
- Delete buttons remove the information from a selected row or column.
- Switch buttons exchange the contents of the selected row with the contents of the row below it, or the contents of a column with those of the column to the right.
- Sort buttons organize the content in ascending order. You can sort data within a selected row or column, or sort the rows or columns themselves.
- Apply to Chart transfers the data from the table to the chart.
- Input fields are where you insert data. Enter information in the boxes within the desired rows and columns.
Formatting the chart
The format menu has many options for formatting and fine-tuning the look of your charts.
Double-click the chart so that it is enclosed by a gray border. Click Format in the main menu list.

Chart format menu.
- Title formats the titles of the chart, the x axis and y axis.
- Legend formats the location, borders, background, and type of the legend.
- Axis formats the lines that create the chart as well as the font of the text that appears on both the X and Y axes.
- Grid formats the lines that create a grid for the chart.
- Chart Wall, Chart Floor, and Chart Area are described in the following sections.
- Chart Type changes what kind of chart is displayed and whether it is two- or three-dimensional.
- Auto Format takes you through the AutoLayout feature.
- 3D Effects formats various elements of a 3D chart.
- 3D View formats the various viewing angles of 3D chart.
The two main areas of the chart control different settings and attributes for the chart.

The Chart wall and Chart area.
- Chart wall contains the graphic of the chart displaying the data.
- Chart area is the area surrounding the chart graphic. The main title and the key are in the chart area.
Knowing the difference between the chart wall and chart area is helpful when formatting a chart.
Resizing the chart
- Click on the chart to select it. Green sizing handles appear around the chart.
- To increase or decrease the size of the chart, click and drag one of the markers in one of the four corners of the chart. To maintain the correct ratio of the sides, hold the Shift key down while you click and drag.
Moving chart elements
- Double-click the chart so that is enclosed by a gray border.
- Click any of the elements—the title, the key, or the chart graphic—to select it. Green resizing handles appear.
- Move the pointer over the selected element. When it becomes a four-headed arrow, click and drag to move the element.
- Release the mouse button when the element is in the desired position.
Changing the chart area background
- The chart area is the area surrounding the chart graphic, including the main title and key.
- Double-click the chart so that it is enclosed by a gray border.
- Select Format > Chart Area. The Chart Area dialog appears.
- Choose the desired format settings.
-
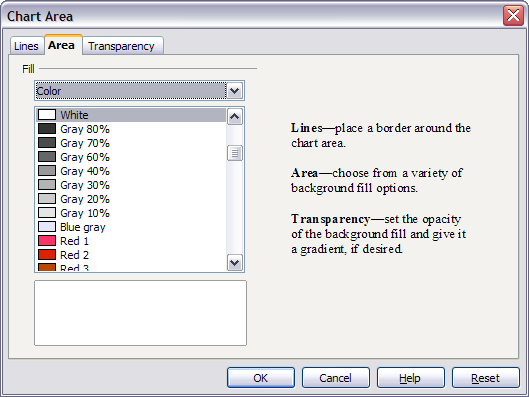
Chart Area dialog.

Changing the chart graphic background
The chart wall is the area that contains the chart graphic.
- Double-click the chart so that it is enclosed by a gray border.
- Select Format > Chart Wall. The Chart Wall dialog appears. It has the same formatting options as described in Changing the chart area background.
- Choose your settings and click OK.
| Content on this page is licensed under the Creative Common Attribution 3.0 license (CC-BY). |