Creating a database form
Databases are used to store data. But, how is the data put into the database? Forms are used to do this. In the language of databases, a form is a front end for data entry and editing.
A simple form consists of the fields from a table (Figure 19). More complex forms can contain much more. These can contain additional text, graphics, selection boxes and many other elements. Figure 20 is made from the same table with a text label (Fuel Purchases), a list box placed in PaymentType, and a graphic background.


Using the Wizard to create a form
We will use the Wizard to create two forms: Fuel and Vacations. The Fuel form will be a simple form while the Vacations form will contain a form and a subform. We will create the Vacations form with its subform and let you modify the Fuel form using the same process.
In the main database window (Figure 2), click the Form icon. Double-click Use Wizard to Create Form to open the wizard (Figure 21). Simple forms use only require some of these steps while more complex forms may use all of them.
Step 1: Select fields.
- Under Tables or queries, select Vacations as the table. Available fields lists the fields for the Vacations table.
- Click the right double arrow to move all of these fields to the Fields in the form list. Click Next.
-
 Figure 21: Form Wizard steps.
-

Step 2: Set up a subform.
Since we have already created a relationship between the Fuel and Vacations tables, we will use that relationship. If no relationship had been defined, this would be done in step 4.
- Click the box labeled Add Subform.
- Click the radio button labeled Subform based upon existing relation.
- Fuel is listed as a relation we want to add. So, click Fuel to highlight it as in Figure 22. Click Next.
-
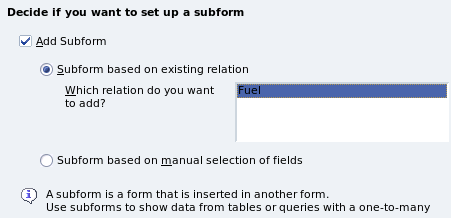 Figure 22: Adding a subform.
-

Step 3: Add subform fields.
This step is exactly the same as step 1. The only difference is that not all fields will be used in the subform.
- Select Fuel under Tables or queries.
- Use the >> button to move all the fields to the right.
- Click the FuelID field to highlight it.
- Use the < button to move the FuelID to the left (Figure 23).
- Click Next .
-
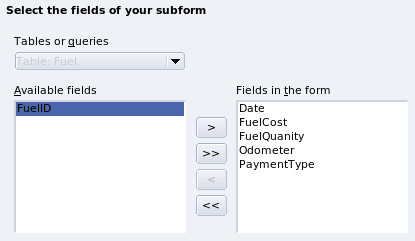 Figure 23: Selecting fields of a subform.
-

Step 4: Get joined fields.
This step is for tables or queries for which no relationship has been defined. Since we want to list all expenses by the day they occur in both the form and subform, we will join the Date fields of these two tables (Figure 24).
-
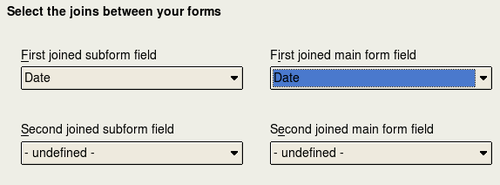 Figure 24: Selection of joined subform and main form fields.

- Select Date from the First joined subform field dropdown list. This is the Date field in the Fuel table. This is not the Primary key for the Fuel table, but it is known as a Foreign key.
- Select Date from the First joined main form field dropdown list. This is the Date field in the Vacations table. This is the Primary key for the Vacations table. Click Next .
| It is possible to create a relationship between two tables that is based upon more than one pair of fields. How to do that and why is discussed in the Base Guide (not yet written). |
| When selecting a pair of fields from two tables to use as a relationship, they have to have the same field type. That is why we used the Date field from both tables: both their field types are Date[DATE]. Whether a single pair of fields from two tables are chosen as the relationship or two or more pairs are chosen, certain requirements must be met for the form to work.
|
Step 5: Arrange controls.
| Each control in a form consists of two parts: label and field. This step in creating the form determine where a control's label and field are placed in relationship with each other. The four choices from left to right are Columnar left, Columnar - Labels on top, As Data Sheet, and In Blocks - Labels Above (Figure 25). |
- Arrangement of the main form: Click Columnar - Labels on top. (The labels will be placed above their field.
- Arrangement of the subform: Click As Data Sheet. (The labels are column headings and the field entries are in spreadsheet format.) Click Next .
-
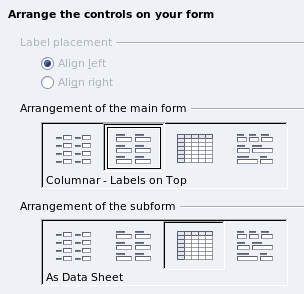 Figure 25: Control arrangements.
-

Step 6: Set data entry.
Unless you have a need for any of these entries to be checked, accept the default settings. Click Next .
Step 7: Apply styles.
- Select the color you want in the Apply Styles list. (I chose the beige which is Orange 4 in the Color table.)
- Select the Field border you want. (I prefer the 3-D look. You might want to experiment with the different possible settings.)
- Click Next.
Step 8: Set name.
- Enter the name for the form. In this case, it is Fuel.
- Click the circle in from of Modify the form. (This circle is called a radio button.)
- Click Next . The form opens in Edit mode.
Modifying a form
We will be moving the controls to different places in the form and changing the background to a picture. We will also modify the label for the PaymentType field as well as change the field to a list box.
First, we must decide what we want to change and to what. The discussion will follow this ten step outline.
- The Date field in the main form needs a dropdown capability. It also needs to be lengthened to show the day of the week, month, day, and year.
- Shorten the length of the payment fields (all fields containing the word payment).
- The controls need to be move into groups: food, fuel subform, and miscellaneous.
- Some of the labels need to have their wording changed. Some single words should be two words. Some abbreviations should be used if possible (Misc. for miscellaneous).
- The widths of several fields and labels need to be changed. Only Lunch, Supper, Motel, and Tolls have acceptable lengths. But for a better appearance, changes will be made to these as well.
- All the fields whose label ends in Payment will be replaced with a list box. This box contains the entries from the Payment Type table.
- The Note field needs to be lengthened vertically and a scroll bar added. It also needs to be moved.
- Changes need to be made in the Date and PaymentType columns of the subform that are similar to the changes in the main form.
- Headings need to be added for each group in the main form.
- The background needs to be changed to a picture. Some of the labels will have to be modified so that they can be read clearly. The font color of the headings need to be changed as well.
Here are some pointers that we will be using in these steps. The controls in the main form consists of a label and its field. Sometimes we want to work with the entire control, and other times we want to work with only the label or field. There are times when we want to work with a group of controls.
- Clicking a label or field selects the entire control. A border appears around the control with eight green handles (Figure 26). You can then drag and drop it where you want.
-
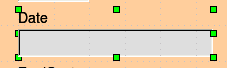 Figure 26: A selected control.
-

- Control+click a label or field selects only the label or field (Figure 27).
- By using the Tab key, you can change the selection from the field to the label or the label to the field.
-
 Figure 27: Selecting a field of a control.
-

- Moving a group of controls is almost as easy as moving one of them.
- Click the field of one of the top left control to be moved to select it.
- Move the cursor to just above and to the left of the selected control.
- Drag the cursor to the bottom right of the group of controls and release the mouse button.
- As you drag the cursor, a dashed box appears showing what is contained in your selection. Make sure it is big enough to include the entire length of all the controls.
- When you release the mouse button, a border with its green handles appears around the controls you selected (Figure 28).
- Move the cursor over one of the fields. It changes to a double arrow (Figure 29).
- Drag the group of controls to where you want them.
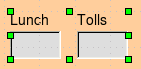 Figure 28: Selecting multiple controls.

 Figure 29: Double arrow.

Before changing the Date field, we will move the Lunch and Tolls controls to the right 5 cm (2 inches).
| When either changing a size or moving a control, two properties of the Form Design toolbar should be selected: Snap to Grid, and Guides when Moving. Your controls will line up better, and an outline of what you are moving moves as the cursor moves. You should also have both rulers active (Tools → Options → OpenOffice Writer → View). Since the form is created in Writer, that is where you have to make sure both horizontal and vertical rulers have a check in the box in front of them. |
| I use centimeters when making changes in a form because centimeters are more accurate than inches. When moving controls (fields and their labels), placement is also more accurate. You can change your rulers from inches to centimeters by right-clicking each ruler and selecting centimeter from the context menu. You do not have to understand what centimeters are. You only have to match your controls, labels, or fields to specific numerals on a ruler. |
Step 1: Change the Date field.
- Control+click the Date field to select it (Figure 27).
- Move the cursor over the middle green handle on the right side. It should change to a single arrow (Figure 30).
-
 Figure 30. Single arrow.
-
- Hold the left mouse button down as you drag the cursor to the right until the length is 6 cm. The vertical dashed line is lined up with the 6. (This is approximately 2.4 inches.) Release the mouse button.
- Click the Control icon in the Form Controls toolbar (Figure 31). It is the one circled in red. The Properties: Date Field window opens. Each line contains a property of the field.
-
 Figure 31: Form Controls toolbar.
-
- Go to the Date format property. This is a dropdown list with Standard (short) as the default setting.
- Click the default Standard (short) to open the list.
- Click the Standard (long) entry to select it.
- Scroll down to the Dropdown property. Its default setting is No. It is also a dropdown list.
- Click the default No setting to open the list.
- Click Yes to select it.
| To see what the Date field will look like, click the Form Mode On/Off icon (the second icon from the left in Figure 31). You can do this any time you want to see the form with the changes you have made. |
Step 2: Shorten the width of a field.
All of the fields whose label contains the word payment are too wide. They need shortening before the controls are moved.
- Control+click the BPayment field (Figure 32).
- Move the cursor over the middle green handle on the right. The cursor becomes a single arrow.
- Drag the cursor to the left until the field is 2.5 cm wide (1 inch).
- Repeat these steps to shorten these fields: Lpayment, SPayment, SnPayment, Mpayment, and MiscPayment.
-
 Figure 32: Selecting a field.
-
| If you have the Snap to Grid and Guides when moving icons selected in the Design Format toolbar, you will see how wide the field is as you shorten it. |
Step 3: Move the controls to group them by category.
We want to move the controls so that they look like Figure 33.
-
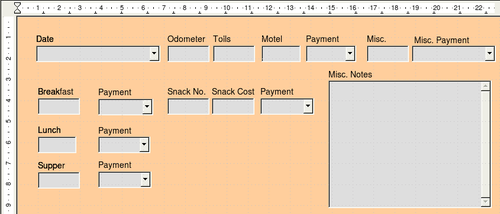 Figure 33: Positioning of controls.
- Click the first control you want to move. A border appears around the control with eight green handles.
- Move the cursor over the label or field of the control. It becomes a double arrow (Figure 29).
- Drag and drop the control to where you want it.
- Use the same steps to move the rest of the controls to where they belong.
| Do not use Control+click when moving a field. It moves either the field or the label but not both. To move both, use a mouse click and drag to the desired spot. |
| The only way to learn to do these two steps well is to practice them. Another way exists which will place controls where you want them, but this is a more advanced feature and will be explained in the Base Guide. |
Step 4: Change the label wording.
Field names need to be single words. However, the labels for the fields can be more than one word. So, we will change them. To do so, we will be editing the text in the label.
- Control+click the SnackNo label. Do one of the following:
- Right-click the SnackNo label.
- Select Control from the context menu (Figure 34). The window that opens is labeled Properties: Label field. It contains all of the properties of the selected label.
-
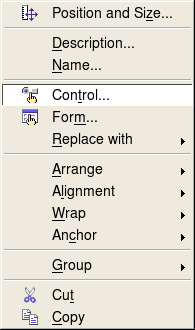 Figure 34: Context menu.
 - In the Label selection, click between the k and N in SnackNo.
- Use the spacebar to make SnackNo into two words.
-
 Figure 35: Multi-word label.
 - Place a . (period) after the No.
- Close the Properties window.
- Or, click the Control icon in the Form Controls toolbar (Figure 36). The Properties window opens. The rest of the steps are the same.
- Figure 36: Form Controls toolbar.
-
- Use the same procedure to change these labels as well: BPayment to Payment, LPayment to Payment, SPayment to Payment, Miscellaneous to Misc., SnackCost to Snack Cost, MPayment to Payment, MiscPayment to Misc. Payment, and MiscNotes to Misc. Notes.


| All of the listings in the Properties window can be modified by you. For example, by changing the Alignment from Left to Center, the word or words in the label are centered within the Label. When you have some time, you might want to experiment with different settings just to see the results you get. |
Step 5: Change the widths of the labels and fields.
We want the following controls to be 2 cm wide (0.8 inches): Breakfast, Lunch, Supper, Odometer, Snack No., Tolls, Snack Cost, Motel, and Misc. All of the payment fields were changed in step 2, but Misc. Payment needs to be changed to 3 cm (1.2 inches).
- Click Breakfast. The border around it appears with eight green handles.
- Move the cursor over the middle green handle on the right. The cursor changes into a single arrow.
- Drag and drop the cursor to the left to shorten the control or to the right to lengthen the control. Use the guide lines to determine the width.
- Repeat for the other listed controls.
Step 6: Replace fields with other fields.
We want to replace the PaymentType field with a List Box. Then we can choose the type of payment from the Payment Type table rather than having to manually enter the type. In my case, each of my payment types begins with a different letter. If I enter the first letter of the payment type, the rest of the word automatically appears. I can then go to the next field.
- Control+click the Payment field for Breakfast. The green handles appear around the field but not around the Label.
-
 Figure 37: Selecting a field of a control.
 - Right-click within the green handles and select Replace with > List Box. (Figure 34 is the context menu which contains the Replace with select, and Figure 38 is the list of replacement fields.)
-
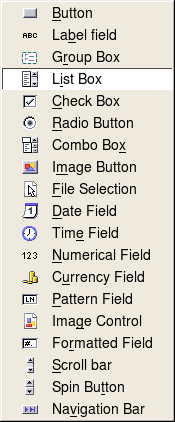 Figure 38: Replacement fields.
 - Click the Control icon in the Form Controls toolbar (Figure 36) to open the Properties window.
- On the General tab, scroll down to the Dropdown selection. Change the No to Yes in this dropdown list.
-
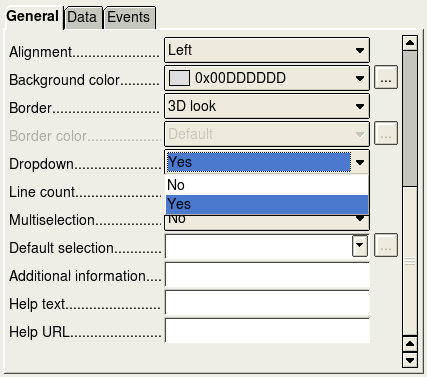 Figure 39: Dropdown list open to reveal choices.
 - Click the Data tab.
-
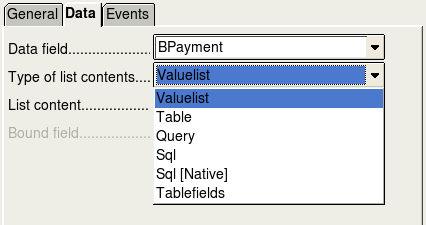 Figure 40: Type of list contents dropdown list.
 - Type of list contents is a dropdown list. Change it to Sql.
- Type the following exactly as it is in the List contents box:
- SELECT "Type", "Type" FROM "Payment Type"
-
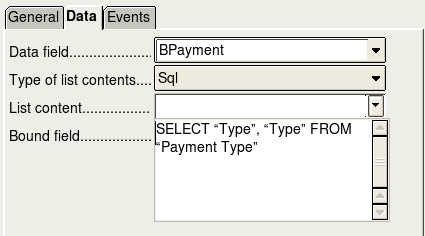 Figure 41: List content for payment type fields.
 - Repeat these steps for the payment fields for Lunch, Supper, Motel, Snacks, and Misc. The main form should look like Figure 42 as far as where the controls are located. It also shows what the Note control should look like. Those changes are explained in the next step.
- Close the Properties window.


| You should be able to copy and paste SELECT "Type", "Type" FROM "Payment Type" from above directly into the List content box. Just make sure you copy from the S in SELECT to the double quotation mark after the phrase Payment Type and no more than this. |

| What you wrote is called an SQL command. The words SELECT and FROM are written in capital letters because they are commands. When the command SELECT is used, it requires a field name within quotation marks and then the field's alias, also within quotation marks. In this case, the field and its alias are the same. The FROM command requires the name of the table which contains the field. Single-word table names do not require quotation marks, but multiple-word table names do. |

Step 7: Change the Note field.
We want the Note control where it is located in Figure 42. Since it has a memo field type, it needs a vertical scrollbar for additional text space if desired.
- Click the Note control.
- Control+click the Note field. The green handles should surround the Note field but not its label.
- Click the Control icon to open the Properties window (Figure 43).
- Scroll down to the Scrollbars setting. Change the selection from None to Vertical in this dropdown list.
- Close the Properties window.
- Lengthen the Note field.
- Move the cursor over the middle green handle at the bottom of the Note field. It becomes a vertical single arrow.
- Drag the cursor down until the length is 6 cm (2.4 inches).
-
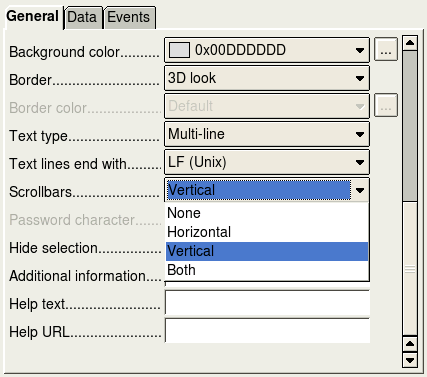 Figure 43: Scrollbar selections in Properties window.

Step 8: Change labels and fields in a subform.
The Date column needs to be widened. The field in the PaymentType column needs to be changed to a list box. The label for PaymentType column needs to be two words.
- Change the PaymentType column.
- Right-click the label PaymentType to open a context menu (Figure 44).
-
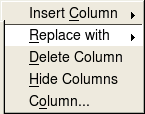 Figure 44: Choices for modifying a control in a subform.
 - Select Replace with, and then select List box from the context menu.
- Again right-click the label PaymentType to open a context menu.
- Select Column. This opens the Properties window. (Figure 45)
- In the Label box, change PaymentType to Payment Type.
-
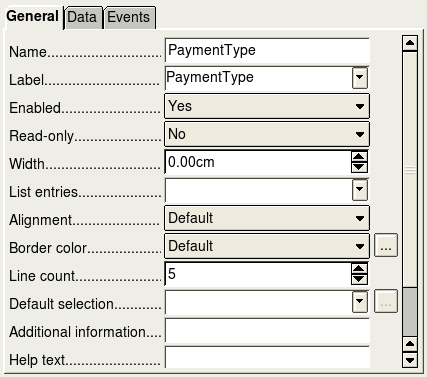 Figure 45: Properties window for control in a subform.
 - Click the Data tab.
- From the Type of list contents dropdown list, select sql.
- Type the following exactly as it is written:
- SELECT "Type", "Type" FROM "Payment Type"
- Close the Properties window.


| Step 6: Replace fields with other fields, beginning with part 5, contains more detailed instruction. |
Step 9: Add headings to groups.
- Make sure the cursor in in the upper left corner. If it is not, click in that corner to move it there.
- Use the Enter key to move the cursor to the fifth line from the top.
- Change the Apply Styles dropdown list from Default to Heading 2 (Figure 46).
- Use the spacebar to move the cursor to where you want the heading to start.
- Type the heading Meals.
- Use the spacebar to move the cursor to the center of snack area.
- Type the heading Snacks.
- Use the Enter key to move the cursor between the Supper control and the subform.
- Use the spacebar to move the cursor to the center of the subform.
- Type the heading Fuel Data.
-
 Figure 46: Apply Styles list.
-
| If you know how to use styles, you can open the Styles and Formatting window using F11. Right-clicking the Heading 2 paragraph style allows you to modify the appearance of all three headings. See the Writer Guide Chapter 6 (Introduction to Styles). |
Step 10: Change the background of a form.
The background for a form can be a color, or a graphic (picture). You can use any of the colors in the Color Table at Tools > Options > OpenOffice.org > Colors. If you know how to create custom colors, you can use them. You can also use a picture (graphic file) as the background. We will use a picture found in OOo: sky.gif (Figure 47). Since the background is dark in places, many of the labels and headings will need changing in order to be seen.
-
 Figure 47: background graphic.

- Select the labels of the top row of controls.
- Control+click the Date label.
- Control+shift+click the rest of the labels of the top row. The border will gradually grow to the right as you do this until all the labels are enclosed in it.
- Click the Control icon in the Design Form toolbar to open the Properties window.
- Change the Background selection from Default to Light cyan. (This is a dropdown list.)
- Select the other labels in the same way and then change their background color.
- Close the Properties window.
- Press the F11 key to open the Styles and Formatting window (Figure 49). Notice the left icon has a black outline around it. This is the Paragraph Styles icon. Below it is a list of paragraph styles including headings.
-
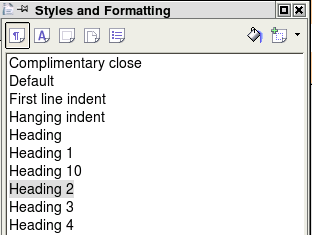 Figure 49: Top portion of the Styles and Formatting window.
 - Right-click Heading 2 and select Modify from the context menu.
- On the Paragraph Style dialog (Figure 50), click the Font Effects tab.
- Change the Font color dropdown list to Light cyan.
- Click OK to close the Paragraph Style: Heading 2 dialog.
- Press the F11 key to close the Formatting and Styles window.
- Right-click the background and select Page from the context menu.
- Click the Background tab (Figure 52).
- Change the As dropdown list from Color to Graphic.
- Search for this file: sky.gif. It is located in the Gallery folder of OOo.
- Click the Browse button in the File section. Browse to the folder containing sky.gif.
- Select this file and click Open.
- In the Type section, select Area.
- Click OK to close the Page Style: Default window.
| I have chosen to use Light cyan as the background color for my labels. You are free to choose whatever color you wish including a custom color you earlier created. |


| Learning how to use styles can be very helpful at times. By using styles, we changed the font color for all three headings at one time. There are other methods of changing the font color, but they require repeating the same steps for each heading. |

The form should look like Figure 53.

Step 11: Change the tab order.
The Tab key moves the cursor from field to field. This is much easier to do than to click each field to enter data into it. It also permits us to group our expenses into areas before we begin entering data. For example, all of our meal receipts can be grouped together as can our snacks and also our fuel purchases.
- Control+click the Date field.
- Click the Form Design icon in the Form Controls toolbar (Figure 54) to open the Form Design toolbar (Figure 55).
- Click the Activation Order icon (Figure 55).
- Rearrange the order of the fields in the Tab Order window (Figure 56).
- Find the txtMPayment listing near the bottom of the list and click it.
- Click the Move Up button until txtPayment is just below fmtMotel.
- Use the same two steps to put the fields in the same order as in Figure 57.
- Click OK.
- Save and close the form.
- Save the database.


Creating forms in Design View
This method requires using the Form Controls and Form Design toolbars extensively. These techniques are beyond the scope of this document. Instructions for creating forms using Design view will be described in the Database Guide.
Creating subforms in Design View
Again, this is beyond the scope of this document. Creation of subforms in Design View will be described in the Database Guide.
| Content on this page is licensed under the Creative Common Attribution 3.0 license (CC-BY). |