Difference between revisions of "Documentation/OOoAuthors User Manual/Getting Started/Applying styles"
| (7 intermediate revisions by 2 users not shown) | |||
| Line 1: | Line 1: | ||
| − | {{GSStylesTOC| | + | {{Documentation/GSStylesTOC |
| − | | | + | |ShowPrevNext=block |
| − | | | + | |PrevPage=Documentation/OOoAuthors User Manual/Getting Started/Working with Styles |
| − | + | |NextPage=Documentation/OOoAuthors User Manual/Getting Started/Modifying styles | |
| − | + | }} | |
| + | __NOTOC__ | ||
=Applying styles= | =Applying styles= | ||
| − | |||
OpenOffice.org provides several ways for you to select styles to apply. | OpenOffice.org provides several ways for you to select styles to apply. | ||
| Line 14: | Line 14: | ||
# To apply an existing style (except for character styles), position the insertion point in the paragraph, frame, or page, and then double-click on the name of the style in one of these lists. To apply a character style, select the characters first. | # To apply an existing style (except for character styles), position the insertion point in the paragraph, frame, or page, and then double-click on the name of the style in one of these lists. To apply a character style, select the characters first. | ||
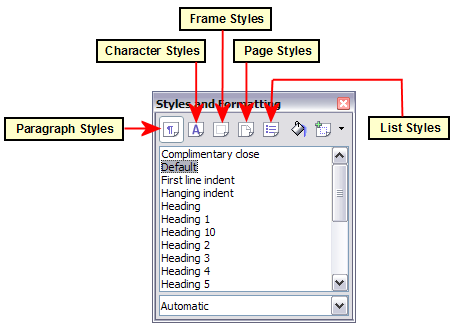
| − | + | {{Tip|At the bottom of the Styles and Formatting window is a dropdown list. In Figure 1 the window shows ''Automatic'', meaning the list includes only styles applied automatically by OOo. You can choose to show all styles or other groups of styles, for example only custom styles.}} | |
| − | [[Image: | + | [[Image:StylesFormatWindow2.png|thumb|none|500px|Figure 1. The Styles and Formatting window for Writer, showing paragraph styles.]] |
[[#top|Top of page]] | [[#top|Top of page]] | ||
==Using Fill Format mode== | ==Using Fill Format mode== | ||
| − | + | {{:Using Fill Format mode}} | |
| − | + | ||
| − | + | ||
| − | + | ||
| − | + | ||
| − | + | ||
| − | + | ||
| − | + | ||
| − | + | ||
| − | + | ||
| − | + | ||
| − | + | ||
==Using the Apply Style list== | ==Using the Apply Style list== | ||
| Line 40: | Line 29: | ||
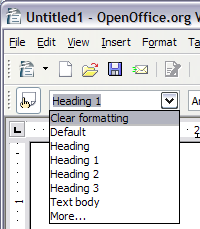
You can open this list and click once on the style you want, or you can use the up and down arrow keys to move through the list and then press ''Enter'' to apply the highlighted style. | You can open this list and click once on the style you want, or you can use the up and down arrow keys to move through the list and then press ''Enter'' to apply the highlighted style. | ||
| − | [[Image:ApplyStyleList.png| | + | [[Image:ApplyStyleList.png|thumb|none|500px|Figure 2: The Apply Style list on the Formatting toolbar.]] |
| − | + | {{Tip|Select '''More...''' at the bottom of the list to open the Styles and Formatting window.}} | |
[[#top|Top of page]] | [[#top|Top of page]] | ||
| Line 58: | Line 47: | ||
# Make any other required changes and then click '''OK''' to save these settings and close the dialog. | # Make any other required changes and then click '''OK''' to save these settings and close the dialog. | ||
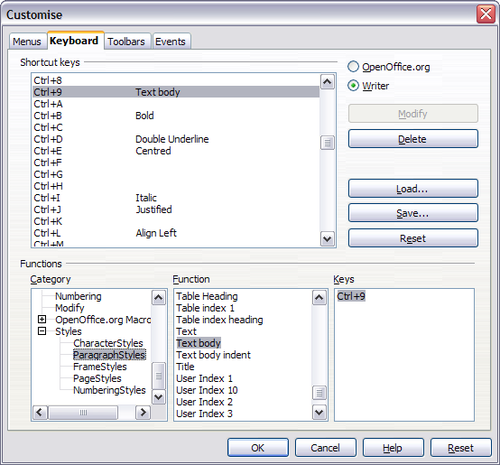
| − | [[Image:StylesKeybdSC.png| | + | [[Image:StylesKeybdSC.png|thumb|none|500px|Figure 3: Defining keyboard shortcuts for applying styles.]] |
| − | + | ||
[[#top|Top of page]] | [[#top|Top of page]] | ||
| + | |||
{{Manual}} | {{Manual}} | ||
| + | [[Category:Getting Started (Documentation)]] | ||
Latest revision as of 19:44, 14 July 2018
Applying styles
OpenOffice.org provides several ways for you to select styles to apply.
Using the Styles and Formatting window
- Click the Styles and Formatting icon
 located at the left-hand end of the object bar, or click Format > Styles and Formatting, or press F11. The Styles and Formatting window shows the types of styles available for the OOo component you are using. Figure 1 shows the window for Writer, with Page Styles visible. You can move this window to a convenient position on the screen or dock it to an edge (hold down the Ctrl key and drag it by the title bar to where you want it docked).
- Click on one of the icons at the top left of the Styles and Formatting window to display a list of styles in a particular category.
- To apply an existing style (except for character styles), position the insertion point in the paragraph, frame, or page, and then double-click on the name of the style in one of these lists. To apply a character style, select the characters first.
Using Fill Format mode
Use Fill Format to apply a style to many different areas quickly without having to go back to the Styles and Formatting window and double-click every time. This method is useful when you need to format many scattered paragraphs, words, or other items with the same style, and it may be easier to use than making multiple selections first and then applying a style to all of them.
- Open the Styles and Formatting window and select the style you want to apply.
- Click the Fill Format mode icon
 . The mouse pointer changes to this icon.
- To apply a paragraph, page, or frame style, hover the mouse over the paragraph, page, or frame and click. To apply a character style, hold down the mouse button while selecting the characters, Clicking on a word applies the character style for that word. Repeat this step until you made all the changes for that style.
- To quit Fill Format mode, click the Fill Format mode icon again or press the Esc key.
| When this mode is active, a right-click anywhere in the document undoes the last Fill Format action. Be careful not to accidentally right-click and thus undo actions you want to keep. |
Using the Apply Style list
After you have used a style at least once in a document, the style name appears on the Apply Style list (Figure 2) at the left-hand end of the Formatting toolbar, next to the Styles and Formatting icon.
You can open this list and click once on the style you want, or you can use the up and down arrow keys to move through the list and then press Enter to apply the highlighted style.
Assigning styles to shortcut keys
OOo provides a set of predefined keyboard shortcuts that allow you to quickly apply styles while typing in a document. You can redefine these shortcuts or define your own.
- Click Tools > Customize > Keyboard. The Keyboard page of the Customize dialog (Figure 3) opens.
- To have the shortcut key assignment available only with one component (for example, Writer), select that component's name in the upper right corner of the page; otherwise select OpenOffice.org button to make it available to every component.
- Choose the shortcut keys you want to define. In this example we have chosen Ctrl+9.
- In the Functions section at the bottom of the dialog, scroll down in the Category list to Styles and click the + sign.
- Choose the type of style (our example uses a paragraph style). The Function list will display the names of the available styles for the selected type. The example shows some of OOo's predefined styles.
- To set Ctrl+9 to be the shortcut key combination for the Text Body style, select Text Body in the Function list, and then click Modify. Ctrl+9 now appears in the Keys list.
- Make any other required changes and then click OK to save these settings and close the dialog.
| Content on this page is licensed under the Creative Common Attribution 3.0 license (CC-BY). |


