Difference between revisions of "Documentation/OOoAuthors User Manual/Migration Guide 2006/Impress and PowerPoint"
(→Differences in Use between Impress and PowerPoint) |
|||
| (6 intermediate revisions by 4 users not shown) | |||
| Line 1: | Line 1: | ||
| − | |||
{{Documentation/MigrationTOC|Migration=block|PrevNext=block|Prev=Documentation/OOoAuthors User Manual/Migration Guide/Calc and Excel|Next=Documentation/OOoAuthors User Manual/Migration Guide/Customizing}} | {{Documentation/MigrationTOC|Migration=block|PrevNext=block|Prev=Documentation/OOoAuthors User Manual/Migration Guide/Calc and Excel|Next=Documentation/OOoAuthors User Manual/Migration Guide/Customizing}} | ||
| − | + | {{DISPLAYTITLE:Differences in Use between Impress and PowerPoint}} | |
| − | + | ||
| − | + | ||
This document builds on the information given in ''General Differences in Use between OpenOffice.org and Microsoft Office'' by describing specific differences in use between Impress and PowerPoint. | This document builds on the information given in ''General Differences in Use between OpenOffice.org and Microsoft Office'' by describing specific differences in use between Impress and PowerPoint. | ||
| − | {{ | + | {{Note|Impress has undergone a complete overhaul between OOo 1.1.x and OOo 2.0.}} |
== Accessing different views == | == Accessing different views == | ||
| Line 19: | Line 16: | ||
In PowerPoint the buttons for quickly changing the view are in the bottom left corner. In Impress the equivalent buttons are in the top center of the screen. | In PowerPoint the buttons for quickly changing the view are in the bottom left corner. In Impress the equivalent buttons are in the top center of the screen. | ||
| − | {{ | + | {{Note|The view buttons have moved for OOo 2.0. They are now directly over the main editing area.}} |
In PowerPoint the ''Notes view'' is only accessible from the ''View'' menu. In OOo, the ''Notes view'' is accessible at the top of the editing area. | In PowerPoint the ''Notes view'' is only accessible from the ''View'' menu. In OOo, the ''Notes view'' is accessible at the top of the editing area. | ||
| Line 26: | Line 23: | ||
| − | {{ | + | {{Note|In previous versions of OOo, the master view could be accessed easily from a button on the bottom of the window. Now, the only way to access and edit the master slide is to select '''View > Master > Slide Master'''.}} |
| − | {{ | + | {{Note|The easy access button for layers is no longer present in OOo 2.0. Arranging objects between different layers is accomplished from the context menu.}} |
Impress provides a ''Handout view ''for fine-tuning how handouts look. This is equivalent to (but more flexible than) PowerPoint's ''Handout Master'' option. | Impress provides a ''Handout view ''for fine-tuning how handouts look. This is equivalent to (but more flexible than) PowerPoint's ''Handout Master'' option. | ||
| Line 96: | Line 93: | ||
A feature in OOo 2.0 can be selected from '''Insert > Animated Image''' to help in the creation of chart animations. It also allows you to group several still images into one animated image. | A feature in OOo 2.0 can be selected from '''Insert > Animated Image''' to help in the creation of chart animations. It also allows you to group several still images into one animated image. | ||
| − | {{ | + | {{Note|'''Insert > Animated Image''' is a new feature that allows you to group several still images into one animated image.}} |
| Line 116: | Line 113: | ||
Impress has custom animations that are equivalent to custom animations in PowerPoint. Applying animations in Impress is very similar to PowerPoint. | Impress has custom animations that are equivalent to custom animations in PowerPoint. Applying animations in Impress is very similar to PowerPoint. | ||
| − | {{ | + | {{Note|In OOo 2.0 the terminology for animations has changed. What were ''Effects'' in OOo 1.1.x are now called ''Custom Animations'' in OOo 2.0.}} |
To access custom animations select either '''Slide Show > Custom Animation''' or click on the words ''Custom Animation ''in the task pane. | To access custom animations select either '''Slide Show > Custom Animation''' or click on the words ''Custom Animation ''in the task pane. | ||
| Line 122: | Line 119: | ||
To add an animation, select the object to be animated and then click '''Add'''. A dialog box, shown in Figure 2, appears. | To add an animation, select the object to be animated and then click '''Add'''. A dialog box, shown in Figure 2, appears. | ||
| − | {{ | + | {{Note|OOo Impress 2.0 now has a task pane. From the task pane many of the common formatting options can be accesseds: Master Pages (Slide Designs in PowerPoint), Layouts, Custom Animation, and Slide Transition.}} |
| − | + | [[Image:Doc_mig_customanimation.png|'''Figure 2:''' Slide show custom animation dialog]] | |
You can choose between Entrance, Emphasis, Exit, and Motion Paths effects. If you scroll down the list you will find Basic, Moderate, Exciting, and Special as categories effects. | You can choose between Entrance, Emphasis, Exit, and Motion Paths effects. If you scroll down the list you will find Basic, Moderate, Exciting, and Special as categories effects. | ||
| Line 132: | Line 129: | ||
| − | {{ | + | {{Note|In OOo Impress 2.0, you can have multiple animation types in one text box. In OOo Impress 1.1.x, you were limited to only one animation type per text box.}} |
{| border=1 style="border-collapse:collapse;" cellpadding=3 | {| border=1 style="border-collapse:collapse;" cellpadding=3 | ||
| Line 350: | Line 347: | ||
# Click on the text frame to select it. | # Click on the text frame to select it. | ||
| − | # Right-click on the text area and select''' Text''' in the pop up menu. The''' Text '''dialog opens | + | # Right-click on the text area and select''' Text''' in the pop up menu. The '''Text''' dialog opens.<br>[[Image:Doc_mig_fittoframe.png|'''Figure 3:''' Changing the "Fit to frame" property''']] |
| − | + | # On the '''Text''' tab are options to automatically adjust frame size or font size as follows: | |
| − | < | + | #* ''Fit width to text'' resizes the text to fit the width of the drawing or the text object. |
| − | + | #* ''Fit height to text'' resizes the text to fit the height of the drawing or text object. | |
| − | * ''Fit width to text'' resizes the text to fit the width of the drawing or the text object. | + | #* ''Fit to frame'' resizes the text to fit the entire area of the drawing or text object. To be able to check this option the other two options must be unchecked. |
| − | * ''Fit height to text'' resizes the text to fit the height of the drawing or text object. | + | |
| − | * ''Fit to frame'' resizes the text to fit the entire area of the drawing or text object. To be able to check this option the other two options must be unchecked. | + | |
{{CCBY}} | {{CCBY}} | ||
Latest revision as of 16:03, 3 July 2018
- Introduction
- Sharing Files with Microsoft Office Users
- Importing other Microsoft Office Files
- General Differences in Use between OpenOffice.org and Microsoft Office
- Differences in Use between Writer and Word
- Differences in Use between Calc and Excel
- Differences in Use between Impress and PowerPoint
- Customizing OpenOffice.org
This document builds on the information given in General Differences in Use between OpenOffice.org and Microsoft Office by describing specific differences in use between Impress and PowerPoint.
| Impress has undergone a complete overhaul between OOo 1.1.x and OOo 2.0. |
Accessing different views
Impress provides equivalent views to those provided by PowerPoint. The main difference is that Impress gives you quick access to all of its views from the main window.
The main window has three parts: the Slides pane, Workspace, and Tasks pane. The Slides pane allows you to do specific things to individual slides. The Workspace is where most of the work is done to create individual slides. The Tasks pane contains a group of four tasks which affect styles, the layout, animation, and transitions between slides in your presentation.

The views are summarized in Table 19.
In PowerPoint the buttons for quickly changing the view are in the bottom left corner. In Impress the equivalent buttons are in the top center of the screen.
| The view buttons have moved for OOo 2.0. They are now directly over the main editing area. |
In PowerPoint the Notes view is only accessible from the View menu. In OOo, the Notes view is accessible at the top of the editing area.
To quickly access the Master Slide view in PowerPoint, you hold down the Shift key while clicking on the Normal View button. This action can not be performed in OOo.
| In previous versions of OOo, the master view could be accessed easily from a button on the bottom of the window. Now, the only way to access and edit the master slide is to select View > Master > Slide Master. |
| The easy access button for layers is no longer present in OOo 2.0. Arranging objects between different layers is accomplished from the context menu. |
Impress provides a Handout view for fine-tuning how handouts look. This is equivalent to (but more flexible than) PowerPoint's Handout Master option.
| PowerPoint name | Impress name | Main use |
| Normal | Normal | To edit the contents of the slide; both text and formatting. |
| Slide Sorter | Slide Sorter | To arrange the order of the slide show |
| Slide Show | Slide Show | Starts the presentation from the current slide |
| Outline | Outline | To edit the text, but none of the formatting. |
| Notes Page | Notes Page | To append notes to a slide |
| Master > Handout | Handout Page | To change the number and position of multiple slides to be printed on a page |
| Master > Slide | Master > Slide | To place and modify those things that are consistent in all slides in the presentation |
Color gradients and borders
Impress does not support some of the formatting features that PowerPoint does. For example it does not support three-color gradients, double and triple borders, or round-dotted borders.
When importing PowerPoint slides, Impress changes three-color gradients to two-color, double or triple borders to single and round-dotted borders to square dots.
To improve the results of the import, make any necessary adjustments in PowerPoint before importing files into Impress. Change three-color gradient fills to two-color. Change double or triple border lines to a single border line with suitable width. The round-dotted border lines that are mapped to rectangle-border lines, during import, will closely resemble the original line style in PowerPoint so that manual editing should not be necessary.
Multimedia
Narration
Voice-over narration is not supported by Impress.
There are no settings for multimedia custom animations, such as the ability to play a sound for the next few slides.
Sound
Sounds can be added in Impress using Insert > Movies & Sound, however sounds only play for the slide they associated with. You can not insert background music for the whole presentation in Impress.
Chart animations
There is no facility in Impress for Chart Effects, as there is in PowerPoint, such as presenting a series or category at a time. On import the charts simply appear. A workaround is to have multiple copies of the chart with each one set up to display as desired.
A feature in OOo 2.0 can be selected from Insert > Animated Image to help in the creation of chart animations. It also allows you to group several still images into one animated image.
| Insert > Animated Image is a new feature that allows you to group several still images into one animated image. |
Pack and Go
This feature in PowerPoint allows a PowerPoint file to be saved to a CD, or split up over several floppy disks, and assures that all related files are included. This feature does not exist in Impress, nor can Impress open such files.
Impress can export a show to a Flash file. PowerPoint can not.
Fields
Impress date fields are exported as text, so they do not automatically update.
Fields are shown with a gray background when editing so that they are recognizable as fields.
Action settings and interaction
PowerPoint provides action settings (jump to slide, run program) for mouse overs. Impress does not have that option except on mouse click. Therefore PowerPoint mouse overs get mapped to mouse clicks. PowerPoint has an option for highlighting the object on mouse click or mouse over; Impress does not have that so it gets ignored on import. However you can click on Internet hyperlinks during a presentation.
Animating a slide show
Custom animations
Impress has custom animations that are equivalent to custom animations in PowerPoint. Applying animations in Impress is very similar to PowerPoint.
| In OOo 2.0 the terminology for animations has changed. What were Effects in OOo 1.1.x are now called Custom Animations in OOo 2.0. |
To access custom animations select either Slide Show > Custom Animation or click on the words Custom Animation in the task pane.
To add an animation, select the object to be animated and then click Add. A dialog box, shown in Figure 2, appears.
| OOo Impress 2.0 now has a task pane. From the task pane many of the common formatting options can be accesseds: Master Pages (Slide Designs in PowerPoint), Layouts, Custom Animation, and Slide Transition. |

You can choose between Entrance, Emphasis, Exit, and Motion Paths effects. If you scroll down the list you will find Basic, Moderate, Exciting, and Special as categories effects.
Differences in animation effects
On export or import of either Impress or PowerPoint files the names of the effects change. However, the result and appearance are essentially the same. See Table 20.
| In OOo Impress 2.0, you can have multiple animation types in one text box. In OOo Impress 1.1.x, you were limited to only one animation type per text box. |
| PowerPoint | Impress |
|---|---|
| Appear | Appear |
| Blinds | Venetian Blinds |
| Box | Box |
| Checkerboard | Checkerboard |
| Diamond | Diamond |
| Crawl | Fly In Slow |
| Dissolve | Dissolve |
| Flash once | Flash Once |
| Peek | Peek |
| Random Bars | Random Bars |
| Spiral | Spiral In |
| Split | Split |
| Stretch | Stretchy |
| Strips | Diagonal Squares |
| Swivel | Swivel |
| Wipe | Wipe |
| Zoom | Zoom |
| Random effects | Random Effects |
Slide transition effects
In the same way that object animations have a mapping between PowerPoint and Impress, slide transitions also have different names between the programs as summarized in Table 21.
Table 21. Comparison of slide transition names between PowerPoint and Impress.
| PowerPoint | Impress |
|---|---|
| Blinds Horizontal | Venetian Blinds Horizontal |
| Blind Vertical | Venetian Blinds Vertical |
| Box In | Box In |
| Box Out | Box Out |
| Checkerboard Across | Checkerboard Down |
| Checkerboard Down | Checkerboard Across |
| Cover Down | Cover Down |
| Cover Left | Cover Right |
| Cover Right | Cover Left |
| Cover Up | Cover Up |
| Cover Left Down | Cover Left Down |
| Cover Right Down | Cover Right Down |
| Cover Left Up | Cover Left Up |
| Cover Right Up | Cover Right Up |
| Cut | No equivalent transition |
| Cut through Black | No equivalent transition |
| Dissolve** | Dissolve |
| Fade Through Black | Fade Through Black |
| Random Bars Horizontally | Random Bars Horizontal |
| Random Bars Vertically | Random Bars Vertical |
| Split Vertical In | Split Vertical In |
| Split Vertical Out | Split Vertical Out |
| Strips Left Down | Random Bars Vertical |
| Strips Left Up | Random Bars Vertical |
| Strips Right Down | Random Bars Vertical |
| Strips Right Up | Random Bars Vertical |
| Uncover Down | Uncover Down |
| Uncover Left | Uncover Left |
| Push Right | Push Right |
Fitting text to a frame
Fitting text to the frame, or a text box, in the two programs behaves differently. In PowerPoint, the program automatically resizes the font proportionally as the text exceeds the size of the text box.
In Impress, if the option Fit to frame has been selected, the program allows text to be typed outside of the text box. When you select another object, signifying that typing has finished, Impress resizes the text as if it were resizing a picture. This often leads to compressed and unattractive text.
The best way to avoid this effect is to keep the text within the text box.
To change the Fit to frame property in Impress:
- Click on the text frame to select it.
- Right-click on the text area and select Text in the pop up menu. The Text dialog opens.
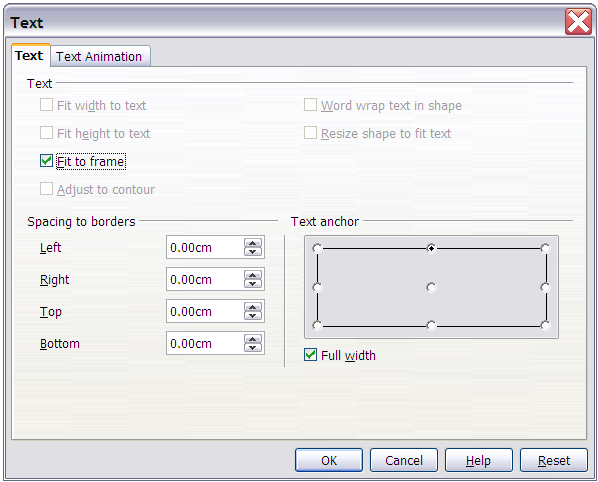
- On the Text tab are options to automatically adjust frame size or font size as follows:
- Fit width to text resizes the text to fit the width of the drawing or the text object.
- Fit height to text resizes the text to fit the height of the drawing or text object.
- Fit to frame resizes the text to fit the entire area of the drawing or text object. To be able to check this option the other two options must be unchecked.

| Content on this page is licensed under the Creative Common Attribution 3.0 license (CC-BY). |