Difference between revisions of "Documentation/OOo3 User Guides/Writer Guide/Developing conditional content"
(New page: {{DISPLAYTITLE:Developing conditional content - DRAFT}} {{Documentation/WG3FieldsTOC |ShowPrevNext=block |PrevPage=Documentation/OOo3_User_Guides/Writer Guide/Tricks for working with field...) |
|||
| (14 intermediate revisions by 4 users not shown) | |||
| Line 1: | Line 1: | ||
| − | {{DISPLAYTITLE:Developing conditional content | + | {{DISPLAYTITLE:Developing conditional content}} |
{{Documentation/WG3FieldsTOC | {{Documentation/WG3FieldsTOC | ||
|ShowPrevNext=block | |ShowPrevNext=block | ||
| Line 13: | Line 13: | ||
== Choose the types of conditional content to use == | == Choose the types of conditional content to use == | ||
This section describes several Writer features that can help you design and maintain conditional content. You can use one or any combination of these features in the same document. | This section describes several Writer features that can help you design and maintain conditional content. You can use one or any combination of these features in the same document. | ||
| − | |||
=== Conditional text === | === Conditional text === | ||
With conditional text, you can have two alternative texts (a word, phrase, or sentence). One text will be displayed and printed if the condition you specify is met, and the other will be displayed and printed if the condition is not met. You cannot include graphics or edit the text except in the field dialog (not in the body of the document). You also cannot format part of the text (for example, bolding one word but not the others), but you can format the field to affect all of the field contents (for example, bolding all of the words). You cannot include a cross-reference or other field in the text. | With conditional text, you can have two alternative texts (a word, phrase, or sentence). One text will be displayed and printed if the condition you specify is met, and the other will be displayed and printed if the condition is not met. You cannot include graphics or edit the text except in the field dialog (not in the body of the document). You also cannot format part of the text (for example, bolding one word but not the others), but you can format the field to affect all of the field contents (for example, bolding all of the words). You cannot include a cross-reference or other field in the text. | ||
| Line 52: | Line 51: | ||
== Create the variable == | == Create the variable == | ||
| − | To create your variable, click '''Insert > Fields > Other'''. You can use choices found on the ''DocInformation'', ''Variables'', and ''Database'' | + | To create your variable, click '''Insert > Fields > Other'''. You can use choices found on the ''DocInformation'', ''Variables'', and ''Database'' pages. |
=== DocInformation fields === | === DocInformation fields === | ||
| Line 62: | Line 61: | ||
<ol> | <ol> | ||
<li>Place the cursor where you want the field to be inserted.</li> | <li>Place the cursor where you want the field to be inserted.</li> | ||
| − | <li>On the Fields dialog box, select the ''Variables'' tab | + | <li>On the Fields dialog box, select the ''Variables'' tab.</li> |
<li>Select '''Set variable''' in the ''Type'' list and '''Text '''in the ''Format'' list. Type a name for the variable in the ''Name'' box, and a value in the ''Value'' box. I have chosen “'''ProLite'''” for the name (to remind me that this variable is related to the two product versions), and I set the value as “'''Lite'''” because I can remember “If it is the Lite version, then this text should be hidden.”</li> | <li>Select '''Set variable''' in the ''Type'' list and '''Text '''in the ''Format'' list. Type a name for the variable in the ''Name'' box, and a value in the ''Value'' box. I have chosen “'''ProLite'''” for the name (to remind me that this variable is related to the two product versions), and I set the value as “'''Lite'''” because I can remember “If it is the Lite version, then this text should be hidden.”</li> | ||
<li>Select '''Invisible '''so the field does not show in the document. Click '''Insert''', then click '''Close'''.</li> | <li>Select '''Invisible '''so the field does not show in the document. Click '''Insert''', then click '''Close'''.</li> | ||
| Line 71: | Line 70: | ||
</ol> | </ol> | ||
| − | {{ | + | {{Tip| Because the gray mark is so small, you may have trouble finding it again, especially if you have other fields in the document. You may prefer to leave the variable field visible while you work, and change it to invisible just before you create final copy. |
| − | At any time, you can place the insertion point just before the field and click '''Edit > Fields''' or right-click the field, and then click '''Fields '''on the pop-up menu. On the Edit Fields dialog box, select or deselect the '''Invisible''' | + | At any time, you can place the insertion point just before the field and click '''Edit > Fields''' or right-click the field, and then click '''Fields '''on the pop-up menu. On the Edit Fields dialog box, select or deselect the '''Invisible''' option.}} |
== Apply the condition to the content == | == Apply the condition to the content == | ||
| Line 85: | Line 84: | ||
<li>Open the Fields dialog box by clicking '''Insert > Fields > Other''', select the ''Functions'' tab, and select '''Conditional text '''in the ''Type'' list.</li> | <li>Open the Fields dialog box by clicking '''Insert > Fields > Other''', select the ''Functions'' tab, and select '''Conditional text '''in the ''Type'' list.</li> | ||
<li>As shown below, type '''ProLite EQ "Lite"''' in the ''Condition'' box, '''Great Product Lite '''in the ''Then'' box, and '''Great Product Pro '''in the ''Else'' box.</li> | <li>As shown below, type '''ProLite EQ "Lite"''' in the ''Condition'' box, '''Great Product Lite '''in the ''Then'' box, and '''Great Product Pro '''in the ''Else'' box.</li> | ||
| − | + | {{Note| These fields are case-sensitive, and quotation marks are required around a text value such as '''Lite'''.}} | |
| − | {{ | + | <li>Click '''Insert '''to insert the field, then click '''Close'''. You should see '''Great Product Lite''' in your text.</li> |
| + | </ol> | ||
[[Image:WG3-14-15.png|thumb|none|500px|''Inserting conditional text.'']] | [[Image:WG3-14-15.png|thumb|none|500px|''Inserting conditional text.'']] | ||
| − | + | {{Tip| If you want to insert this field into your text in many places (as you probably would for a product name), create an AutoText entry for it. See [[Documentation/OOo3_User_Guides/Writer Guide/Using AutoText to insert fields|Using AutoText to insert often-used fields]] for instructions.}} | |
| − | |||
| − | |||
| − | {{ | ||
=== Hidden text === | === Hidden text === | ||
| Line 100: | Line 97: | ||
To create a hidden text field: | To create a hidden text field: | ||
| − | # Click '''Insert > Fields > Other '''and select the ''Functions'' | + | # Click '''Insert > Fields > Other '''and select the ''Functions'' page. |
# Select '''Hidden text '''in the ''Type'' list, as shown below. | # Select '''Hidden text '''in the ''Type'' list, as shown below. | ||
# Type '''ProLite EQ "Lite"''' in the ''Condition'' box and type the required text in the ''Hidden text'' box. Remember, this is the text that is ''hidden ''if the condition is true. | # Type '''ProLite EQ "Lite"''' in the ''Condition'' box and type the required text in the ''Hidden text'' box. Remember, this is the text that is ''hidden ''if the condition is true. | ||
| Line 109: | Line 106: | ||
=== Hidden paragraphs === | === Hidden paragraphs === | ||
| − | {{ | + | {{Tip| To enable hidden paragraphs, remove the check mark from '''View > Hidden Paragraphs'''. When this option is selected, any hidden paragraph you create will always be visible, whether its condition is true or not.}} |
A paragraph is hidden if the condition is true. To hide a paragraph: | A paragraph is hidden if the condition is true. To hide a paragraph: | ||
# Click in the paragraph to be hidden. | # Click in the paragraph to be hidden. | ||
| − | # Click '''Insert > Fields > Other''' and select the ''Functions'' | + | # Click '''Insert > Fields > Other''' and select the ''Functions'' page. |
# Select '''Hidden paragraph''' in the ''Type'' list. | # Select '''Hidden paragraph''' in the ''Type'' list. | ||
# For this example, type '''ProLite EQ "Lite"''' in the ''Condition'' box. | # For this example, type '''ProLite EQ "Lite"''' in the ''Condition'' box. | ||
| Line 122: | Line 119: | ||
* Select '''View > Hidden Paragraphs''' from the menu bar, so it is checked (shows all hidden paragraphs). | * Select '''View > Hidden Paragraphs''' from the menu bar, so it is checked (shows all hidden paragraphs). | ||
| − | * On the '''Tools > Options > OpenOffice.org Writer > Formatting Aids''' page, select the Fields: Hidden paragraphs option (shows all hidden paragraphs). | + | * On the '''Tools > Options > OpenOffice.org Writer > Formatting Aids''' page, select the ''Fields: Hidden paragraphs'' option (shows all hidden paragraphs). |
* Double-click in front of the variable that you used to define the condition for hiding the text, and enter a different value for the variable (shows all hidden paragraphs). | * Double-click in front of the variable that you used to define the condition for hiding the text, and enter a different value for the variable (shows all hidden paragraphs). | ||
* Double-click in front of the hidden text field or the hidden paragraph field, and change the condition statement (changes only the selected hidden paragraph). | * Double-click in front of the hidden text field or the hidden paragraph field, and change the condition statement (changes only the selected hidden paragraph). | ||
| Line 132: | Line 129: | ||
# Click '''Insert > Section'''. On the Insert Section dialog box, select the '''Hide''' checkbox and enter the condition in the ''with Condition'' box. You can also give the section a name, if you wish (strongly recommended, so you can find it again easily if you have several sections in your document). | # Click '''Insert > Section'''. On the Insert Section dialog box, select the '''Hide''' checkbox and enter the condition in the ''with Condition'' box. You can also give the section a name, if you wish (strongly recommended, so you can find it again easily if you have several sections in your document). | ||
# Click '''Insert''' to insert the section into your document. | # Click '''Insert''' to insert the section into your document. | ||
| − | |||
| − | |||
To show a hidden section so you can edit it: | To show a hidden section so you can edit it: | ||
| Line 142: | Line 137: | ||
To show all the hidden sections so you can edit them, change the value of the variable to something that the conditions will not recognize. In our example, you could change the value to '''1'''. | To show all the hidden sections so you can edit them, change the value of the variable to something that the conditions will not recognize. In our example, you could change the value to '''1'''. | ||
| + | |||
| + | [[Image:WG14-17.png|thumb|none|500px|''Creating a section to be hidden when a specified condition is met.'']] | ||
To make the hidden section a normal part of the document (that is, to remove the section markers, but not the contents of the section): | To make the hidden section a normal part of the document (that is, to remove the section markers, but not the contents of the section): | ||
| Line 155: | Line 152: | ||
# If you have set fields to update automatically, all of the conditional and hidden text that uses this variable as a condition will change. | # If you have set fields to update automatically, all of the conditional and hidden text that uses this variable as a condition will change. | ||
| − | {{ | + | {{Tip|Conditional text and hidden text can only be edited in the Edit Fields dialog box.}} |
| − | [[Image:WG14-18.png| | + | [[Image:WG14-18.png|thumb|none|500px|''Changing the value of the variable.'']] |
| − | {{ | + | {{Tip| To turn on automatic updating of fields, click '''Tools > Options > OpenOffice.org Writer > General''', and select '''Fields '''under '''Update: Automatically'''.}} |
{{CCBY}} | {{CCBY}} | ||
[[Category: Writer Guide (Documentation)]] | [[Category: Writer Guide (Documentation)]] | ||
Latest revision as of 20:58, 15 July 2018
- Using document properties to hold information that changes
- Using other fields to hold information that changes
- Using AutoText to insert often-used fields
- Defining your own numbering sequences
- Using automatic cross-references
- Using fields in headers and footers
- Using fields instead of outline numbering for chapter numbers
- Tricks for working with fields
- Developing conditional content
- Using placeholder fields
- Using input fields and input lists
Conditional content is text and graphics that are included or excluded depending on a condition you specify.
A simple example is a reminder letter for an overdue account. The first and second reminders might have a subject line of “Reminder Notice”, but the third reminder letter might have the subject “Final Notice” and a different final paragraph.
A more complex example is a software manual for a product that comes in two versions, Pro and Lite. Both product versions have much in common, but the Pro version includes some features that are not in the Lite version. If you use conditional content, you can maintain one file containing information for both versions and print (or create online help) customized for each version. You do not have to maintain two sets of the information that is the same for both versions, so you will not forget to update both versions when something changes.
Choose the types of conditional content to use
This section describes several Writer features that can help you design and maintain conditional content. You can use one or any combination of these features in the same document.
Conditional text
With conditional text, you can have two alternative texts (a word, phrase, or sentence). One text will be displayed and printed if the condition you specify is met, and the other will be displayed and printed if the condition is not met. You cannot include graphics or edit the text except in the field dialog (not in the body of the document). You also cannot format part of the text (for example, bolding one word but not the others), but you can format the field to affect all of the field contents (for example, bolding all of the words). You cannot include a cross-reference or other field in the text.
Hidden text
With hidden text (a word, phrase, or sentence), you have only two choices: show or hide. If the condition you specify is met, the text is hidden; if the condition is not met, the text is displayed. The disadvantages are the same as for conditional text: you cannot include graphics, edit the text in the body of the document, format part of the text, or include a field.
Hidden paragraphs
Hidden paragraphs are like any other paragraphs, but you can specify a condition under which the paragraph is not displayed or printed. A blank paragraph can also be hidden — for example, if a database field has no content for the current record. This is very useful when merging an address into a letter: if you allow two lines for the street address and the database record uses only one line, you can prevent the blank line from appearing in your document. You can include graphics, edit the text in the body of the document, format any part of the text, and include fields.
Hidden sections
Hidden sections are like hidden paragraphs, but they can include more than one paragraph—for example, a heading plus one or more paragraphs. However, a section cannot contain less than a paragraph, so you cannot use this method for single words or phrases. The contents of a hidden section behave just like the contents of any other part of the document, but you can specify a condition under which the section is not displayed or printed. In addition, you can password protect a section.
Plan your conditional content
Conditions are what programmers call logical expressions. You must formulate a logical expression for each condition because a condition is always either true (met) or false (not met). You can use the same condition in many places in your document, for different types of conditional content.
To make conditional content work, you need to:
- Choose or define a variable.
- Define a logical expression (condition) involving the selected variable.
Choose or define a variable
You can use the following variables in your condition:
- User-defined variables
- Predefined OpenOffice.org variables, which use statistical values from the document properties
- User data
- Database field contents—for example from your address book
You cannot use internal variables (for example, page number or chapter name) to formulate conditions.
The examples in this chapter use user-defined variables.
Define a logical expression (condition) involving the selected variable
The condition compares a specified fixed value with the contents of a variable or database field.
To formulate a condition, use the same elements as you would to create a formula: operators, mathematical and statistical functions, number formats, variables, and constants. The possible operators are given in the online help; look in the index under “operators: in formulas”. You can define quite complex expressions, but in most cases a simple condition will do the job.
Create the variable
To create your variable, click Insert > Fields > Other. You can use choices found on the DocInformation, Variables, and Database pages.
DocInformation fields
Using document properties to hold information that changes described how to set up a user-defined document property. You can use that document property as the variable in your condition statement, or you can create another document property field specifically for conditions.
User-defined variable field
To set up a variable or user field:
- Place the cursor where you want the field to be inserted.
- On the Fields dialog box, select the Variables tab.
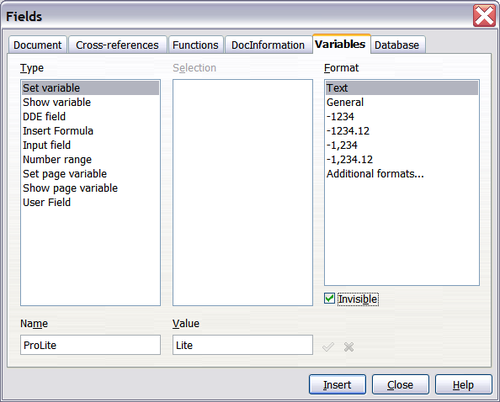
- Select Set variable in the Type list and Text in the Format list. Type a name for the variable in the Name box, and a value in the Value box. I have chosen “ProLite” for the name (to remind me that this variable is related to the two product versions), and I set the value as “Lite” because I can remember “If it is the Lite version, then this text should be hidden.”
- Select Invisible so the field does not show in the document. Click Insert, then click Close.
- A small gray mark should be visible where you inserted the field. Hover the mouse pointer over this mark and you will see the field formula ProLite = Lite. We will come back to this field later.
Apply the condition to the content
Now that you have defined the variable, you can use it in a condition statement. This topic describes some of the possibilities.
Conditional text
First, let us set up some conditional text that will insert the words “Great Product Lite” into the Lite version and “Great Product Pro” into the Pro version of the manual. You would use this field whenever you want to mention the name of the product.
- Place the cursor where you want one of these phrases to appear. (You can move or delete it later, if you wish.)
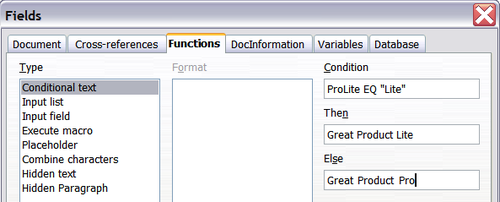
- Open the Fields dialog box by clicking Insert > Fields > Other, select the Functions tab, and select Conditional text in the Type list.
- As shown below, type ProLite EQ "Lite" in the Condition box, Great Product Lite in the Then box, and Great Product Pro in the Else box.
- Click Insert to insert the field, then click Close. You should see Great Product Lite in your text.
| If you want to insert this field into your text in many places (as you probably would for a product name), create an AutoText entry for it. See Using AutoText to insert often-used fields for instructions. |
Hidden text
You might use hidden text for words or short phrases that describe features of Great Product Pro that are not found in the Lite version. You can reuse the same field in several places in your document—for example, by copying and pasting it.
To create a hidden text field:
- Click Insert > Fields > Other and select the Functions page.
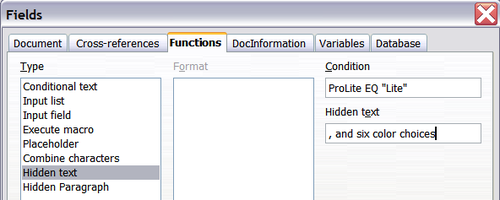
- Select Hidden text in the Type list, as shown below.
- Type ProLite EQ "Lite" in the Condition box and type the required text in the Hidden text box. Remember, this is the text that is hidden if the condition is true.
- Click Insert to create and insert the field.
Hidden paragraphs
A paragraph is hidden if the condition is true. To hide a paragraph:
- Click in the paragraph to be hidden.
- Click Insert > Fields > Other and select the Functions page.
- Select Hidden paragraph in the Type list.
- For this example, type ProLite EQ "Lite" in the Condition box.
- Click Insert to create and insert the field. If an extra paragraph mark appears, delete it.
To show hidden paragraphs so you can edit them, do one of the following:
- Select View > Hidden Paragraphs from the menu bar, so it is checked (shows all hidden paragraphs).
- On the Tools > Options > OpenOffice.org Writer > Formatting Aids page, select the Fields: Hidden paragraphs option (shows all hidden paragraphs).
- Double-click in front of the variable that you used to define the condition for hiding the text, and enter a different value for the variable (shows all hidden paragraphs).
- Double-click in front of the hidden text field or the hidden paragraph field, and change the condition statement (changes only the selected hidden paragraph).
Hidden sections
A conditional section is hidden if the condition is true. To create a conditional section:
- Select the text that you want to be included in the conditional section. (You can edit this text later, just as you can edit any other text.)
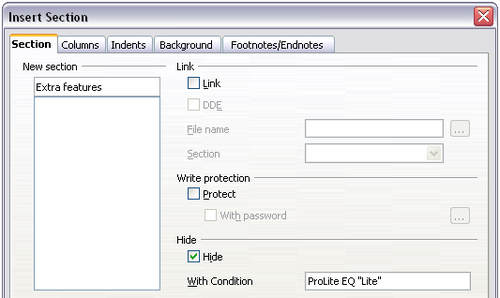
- Click Insert > Section. On the Insert Section dialog box, select the Hide checkbox and enter the condition in the with Condition box. You can also give the section a name, if you wish (strongly recommended, so you can find it again easily if you have several sections in your document).
- Click Insert to insert the section into your document.
To show a hidden section so you can edit it:
- Click Format > Sections.
- On the Edit Sections dialog box, select the section from the list.
- Deselect Hide, and then click OK. You can now edit the contents of the section. Afterwards, you can click Format > Sections again and select Hide to hide the section again.
To show all the hidden sections so you can edit them, change the value of the variable to something that the conditions will not recognize. In our example, you could change the value to 1.
To make the hidden section a normal part of the document (that is, to remove the section markers, but not the contents of the section):
- Show the hidden section, as described above.
- On the Edit Sections dialog box, select the section from the list.
- Click Remove. The contents of the section are now a normal part of the document.
Change the value of the variable
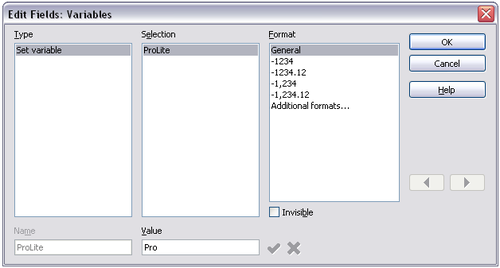
- Find the variable field you created in Create the variable.
- Click once just in front of this field, then right-click and click Fields on the pop-up menu.
- On the Edit Fields: Variables dialog box, change the value of the variable to Pro.
- If you have set fields to update automatically, all of the conditional and hidden text that uses this variable as a condition will change.
| To turn on automatic updating of fields, click Tools > Options > OpenOffice.org Writer > General, and select Fields under Update: Automatically. |
| Content on this page is licensed under the Creative Common Attribution 3.0 license (CC-BY). |
