Difference between revisions of "VCLTesttool/Introduction"
(→Run a Batch with Testcases) |
(→Testing a Non-Product Version) |
||
| Line 232: | Line 232: | ||
= Testing a Non-Product Version = | = Testing a Non-Product Version = | ||
| − | + | * Define the files where you want to store the debug-settings for OpenOffice.org by inserting the following section into the '''''win.ini''''' file (If you don't have access to the file, you may use environment variables.): | |
| − | + | <nowiki>[SV]</nowiki> | |
| − | + | dbgsv<nowiki>=c:\</nowiki>dbgsv.ini | |
| − | + | dbgsvlog<nowiki>=c:\</nowiki>dbgsv.log | |
| − | <nowiki>[SV]</nowiki> | + | * On Linux/Unix/Win32 Platforms you have to set an environment variable to control where the debug-settings are stored: |
| − | + | DBGSV_INIT=/some/path/dbgsv.ini | |
| − | dbgsv<nowiki>=c:\</nowiki>dbgsv.ini | + | DBGSV_LOG=/some/path/dbgsv.log |
| − | + | * In OpenOffice.org, press '''Shift+Ctrl+Alt+D''', and then select ''TestTool'' in the '''Error '''list box. | |
| − | dbgsvlog<nowiki>=c:\</nowiki>dbgsv.log | + | * In the TestTool, assertions are indicated by light blue. To manually reproduce an assertion, select ''MessageBox'' in the '''Error '''list box''.'' |
| − | + | ||
| − | + | ||
| − | + | ||
| − | In the TestTool, assertions are indicated by light blue. | + | |
| − | + | ||
| − | + | ||
| − | + | ||
=The TestTool Environment= | =The TestTool Environment= | ||
Revision as of 11:09, 20 February 2010
- Introduction for First Time Users
- Introduction for Test Developer
- Introduction for Localisation Tester
- Appendix A: Command Reference
Contents
- 1 Tool for Automated Testing of OpenOffice.org
- 2 About the TestTool
- 3 Location of the TestTool
- 4 Installing the TestTool
- 5 Setting up the TestTool
- 6 Automated Crashreports
- 7 Selecting the OpenOffice.org Installation
- 8 TestTool Editor
- 9 Starting a TestTool Script
- 10 Result File
- 11 Starting a Test Script From the Command Line
- 12 Run a Batch with Testcases
- 13 Testing a Non-Product Version
- 14 The TestTool Environment
- 15 CVS information
- 16 Configuration file entries
Tool for Automated Testing of OpenOffice.org
About the TestTool
The TestTool is a program that is used for the automated testing of OpenOffice.org. The TestTool communicates with the TCP/IP-Interface of OpenOffice.org and can test each installation of OpenOffice.org on a PC. The current TestTool can be used on OpenOffice.org 3.0 and higher. However, as there can be some incompatible changes in future OpenOffice.org builds you may need to use a newer version of the TestTool.
The TestTool communicates with OpenOffice.org using SlotIDs, UniqueIDs, and HelpIDs that are associated with each menu item, window, dialog, and window or dialog control in OpenOffice.org. The IDs are automatically generated during the OpenOffice.org build-process or are assigned by developers.
| SlotIDs: Each menu item has a SlotID that is used, for example, to open a dialog or perform an action. |
| HelpIDs: Each control, window, or dialog automatically receives a HelpID for the internal Help-System. The TestTool uses HelpIDs to identify specific controls, windows, or dialogs. |
| UniqueIDs: A developer can assign a UniqueID to a control that does not have a HelpID so that the TestTool can identify the control. |
You can create test scripts for the TestTool in the programing language StarBasic (like VisualBasic). Several commands are available for the TestTool, for example, to get or put information into OpenOffice.org controls. For a complete list of the available commands, see: Internal Commands, Methods and Functions for TestTool.You can simulate most mouse or keyboard actions with the TestTool as well as gather information from controls or change the default settings in OpenOffice.org. In other words, the TestTool lets you simulate an OpenOffice.org user.
Location of the TestTool
The TestTool Environment can be checked out via Mercurial on openoffice.org, and will be found in the directory: testautomation; Or it is available as a seperate package at: http://ooopackages.good-day.net/pub/OpenOffice.org/qa/testautomation/
The TestTool application is available at http://qa.openoffice.org/ooQAReloaded/AutomationTeamsite/ooQA-TeamAutomationBin.html ; On other platforms in the installation set (see setup). Just use the binary from the .../{officepath}/program-directory. Start the program testtool.bin respectively testtool.exe. Just for Mac OS X: Copy the script soffice to testtool and run it.
Installing the TestTool
To install the TestTool, extract the contents of the downloaded TestTool archive to your local disk. If more than one user will use the TestTool, copy the contents of the extracted archive to a network drive.
When you run the TestTool executable file, the testtool.ini and .testtoolrc control files are created on Win32 and UNIX, respectively.
If you place a TestTool control file in the directory that contains the TestTool executable file, the control file is automatically copied to the profile directory on Win32, and the user's home directory on UNIX.
Linux only: If you get a message similar to "Couldn't bootstrap uno servicemanager for reason : Couldn't create registry file ...services.rdb for writing", ensure that you are using 'nfslock'. For example, on Linux run /etc/init.d/nfslock status. If it is not running, switch to root and run '/etc/init.d/nfslock start' and 'chkconfig nfslock on'. This is necessary for the TurboLinux and the SuSe 8.1 Linux distributions.
Setting up the TestTool
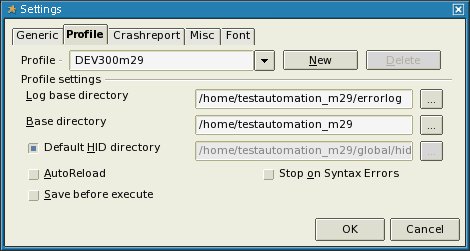
Choose Extra - Settings - Profile.
If you want, you can also edit these settings in the .testtoolrc / testtool.ini files.
CurrentProfile=_profile_Default
(...)
[_profile_Default]
LogBaseDir=/opt/qa/qatesttool/errorlog/mymachine
BaseDir=/opt/qa/qatesttool
HIDDir=/opt/qa/qatesttool/global/hid
Automated Crashreports
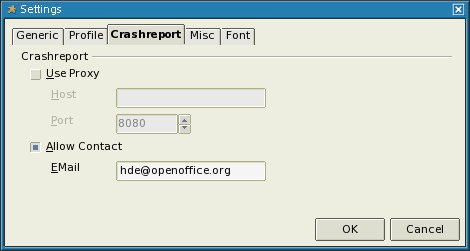
- Choose Extra - Settings - Crashreport.
- If you want, you can also edit these settings in the .testtoolrc / testtool.ini files.
- [Crashreporter]
- UseProxy=true
- ProxyServer=proxy.somewhere.de
- ProxyPort=8080
- AllowContact=true
- ReturnAddress=you@somewhere.de
Selecting the OpenOffice.org Installation
There are two choices:
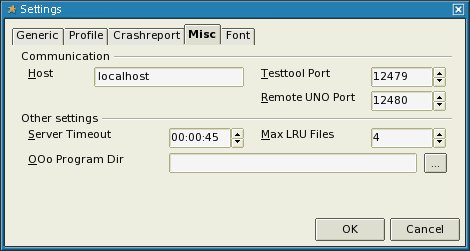
Choose Extra - Settings - Misc.
|
If you want, you can also edit these settings in the .testtoolrc / testtool.ini files.
[OOoProgramDir]
Type=Path
Current=/Volumes/OpenOffice.org 2.0.app/Contents/MacOS
All=/Volumes/OpenOffice.org 2.0.app/Contents/MacOS
TestTool Editor
The TestTool uses syntax highlighting for all BASIC, StarBasic, and internal TestTool commands (For more information, see: Internal Commands, Methods and Functions for TestTool). Highlighting can increase the load time for large files.
Starting a TestTool Script
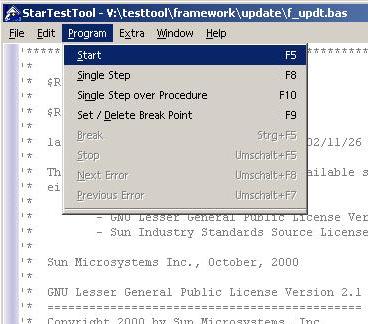
Start local OpenOffice.org installations using the TestTool command line parameter -enableautomation. In the TestTool Environment, executable scripts use the *.bas extension. To run a script, load a *.bas-file, and then run the script from the menu or with a shortcut.
Result File
The TestTool automatically saves a result file during a test script is run. The name of the result file is the name of the script *.bas-file that generated the result, but with the *.res extension (For example: first.bas - first.res). To set the path for saving the result file, choose Extra - Settings - Profile and enter the path in the Log Base directory box.
If a result file already exists, the file is opened and the new result is added at the beginning of the file.
The results are presented as a hierarchical tree list where you can click plus sign (+) or minus sign (-) to expand or collapse the outputs.
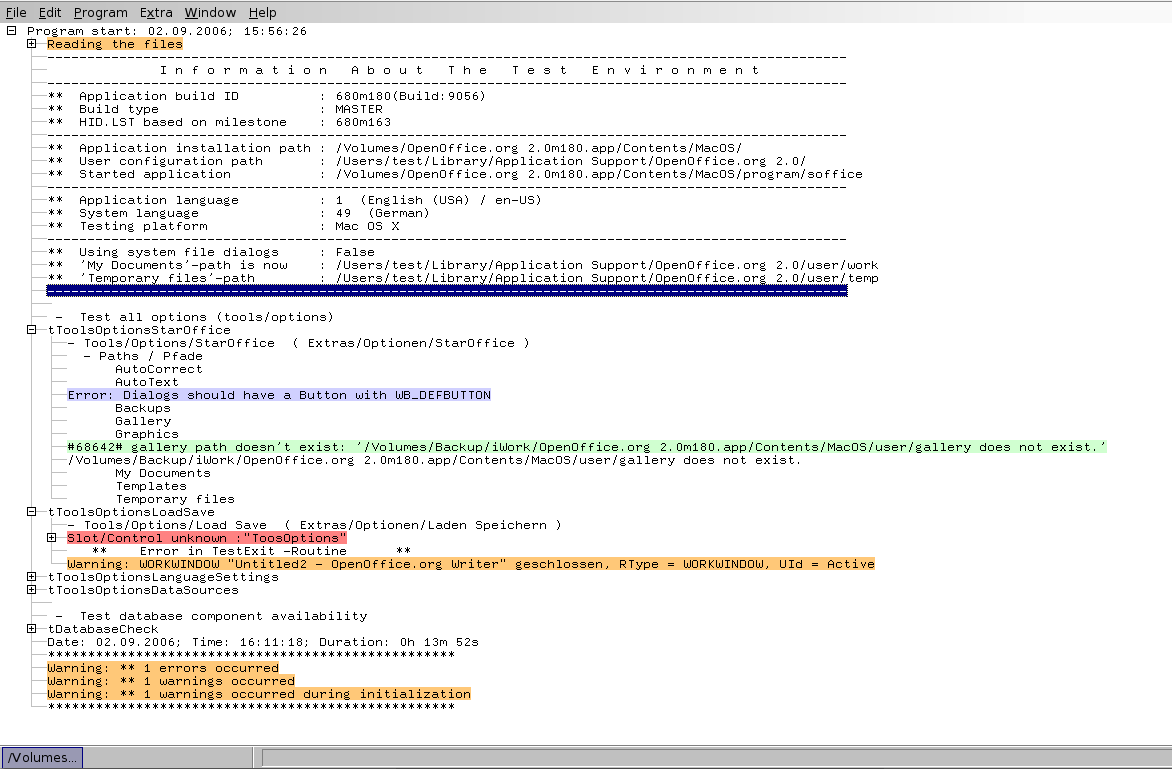
- The first output is Reading the files. Expand this entry to see the declaration files. If the entry is orange, the declaration files (*.win / *.sid) contain errors. The sum of the errors is displayed at the end of a test as Warnings occurred during initialization.
- The next output is a short entry that is generated automatically by the start up routines. The entry displays information about the TestTool version, the paths where OpenOffice.org is installed, and where the application was started. The office- and the system language is also displayed.
- Each entry that has a [+] in front of it is a testcase. If the testcase entry is a color other than black, the test contains errors.
- An orange testcase indicates that one or more warnings are present. To see where the error occurred, expand the entry and examine the warnlogs, which are the outputs from the developer of the test script. To jump directly to the place in the test script where a warning occurred, double-click the warning.
- A light green testcase indicates a QAErrorLog entry that was inserted by the developer of the testcase to give the tester some information (for example, about an existing bug or workaround)
- A light blue testcase indicates an Assertion that gives selectable informatoins when testing a debug build of OpenOffice.org.
- A red testcase indicates that one or more errors are present. The tree is expanded to display the error(s). In the example result file, the error occurred when the TestTool did not find the slot. That is because there is a typo in it – it should be ToolsOptions.
- When you expand a red entry by clicking the plus sign (+) in front of the entry, a level by level (sub main - testcase ... - subroutine ... - .....) view of the error is displayed. You can also see what the TestTool did to return OpenOffice.org to a defined base state so that the TestTool can run the next testcase without any open windows or dialogs.For example:
- the WORKINGWINDOW "Untitled2 - OpenOffice.org Writer" is closed (geschlossen = closed)
- Explanation:
- the working document is closed
- The TestTool then started the next testcase at the base state of OpenOffice.org (that is, with one open document and no open dialog).
- At the end of a test, the number of errors and warnings is displayed
Starting a Test Script From the Command Line
To start a test-script from the command line, use the following syntax:
| testtool.exe [/port=xxx /host=xxx] startprogram /run [/result xxx] [/printlog] | |
| /Port
|
The com port on the machine that the TestTool uses to communicate with OpenOffice.org. If you do not include this parameter, the TestTool looks for relevant information in the .testtoolrc or testtool.ini files. |
| /Host
|
The hostname of the machine that contains the OpenOffice.org installation that you want to test. If the installation is on the same machine as the TestTool, enter localhost. If you do not include this parameter, the TestTool looks for relevant information in the .testtoolrc or testtool.ini files.(only localhost is supported) |
| Startprogram
|
The *.bas-file that contains the main-routine. |
| /run
|
Runs the test script, writes the result to the result file, and exits the TestTool at the end of the test. |
| /result
|
Limits the number of testruns to xxx excluding the current one in the resultfile (0,1,2,...). The action gets executed on running the testcase. |
/printlog
|
write the information written to logs on stdout ***** UNIX only ! ***** |
| Example: | testtool.exe /port=12481 /host=localhost /opt/qatesttool/writer/update/w_update.bas /run |
| The TestTool runs the w_update.bas-test on the local machine through port 12481, and exits the TestTool when the test is done. |
Run a Batch with Testcases
- There are examples for Win32 and Unix at http://hg.services.openoffice.org/DEV300/file/1467f46f8817/testautomation/tools/run_tests.
Testing a Non-Product Version
- Define the files where you want to store the debug-settings for OpenOffice.org by inserting the following section into the win.ini file (If you don't have access to the file, you may use environment variables.):
 [SV]
 dbgsv=c:\dbgsv.ini
 dbgsvlog=c:\dbgsv.log
- On Linux/Unix/Win32 Platforms you have to set an environment variable to control where the debug-settings are stored:
 DBGSV_INIT=/some/path/dbgsv.ini
 DBGSV_LOG=/some/path/dbgsv.log
- In OpenOffice.org, press Shift+Ctrl+Alt+D, and then select TestTool in the Error list box.
- In the TestTool, assertions are indicated by light blue. To manually reproduce an assertion, select MessageBox in the Error list box.
The TestTool Environment
The structure of the TestTool Environment was changed after the release of source SRC641 (OpenOffice.org 1.0, StarOffice 6.0 / StarSuite 6.0). The following description of paths is only valid for source versions SRX641 and higher.
The TestTool Environment contains the start scripts, the test scripts, and the libraries (include files) that are required to automatically test OpenOffice.org. The TestTool Environment is modular, so that a module exits for each application or area that you want to test in OpenOffice.org. To test a single OpenOffice.org application, such as Writer, you only need the “application module” and the “global” module.
| module name / path name | Description |
|---|---|
application modules | |
| base | Database / Data source functionality in OpenOffice.org |
| calc | Calc (spreadsheet) |
| chart | Chart, the functionality of charts in a spreadsheet |
| graphics | Impress (presentation application) and Draw (drawing application) |
| math | Math (formula) |
| setup | Installation |
| writer | Writer (text document, HTML document, master document) |
| xml | XML file format for all of the OpenOffice.org applications |
general modules | |
| framework | General functionality for all applications (for example, galleries and extras) |
| global | All general routines (for example, startup, tooling, declaration files) |
| errorlog | Output directory for all result files |
| tools | Useful standalone applications (hid.lst perl script) |
| documentation | The files you just read |
| scripts | Batch files to run all available test scripts |
The following subcategories are defined for the TestTool Environment modules:
| module name / path name | Description |
|---|---|
| update | Resource test: Activates all menu items and opens all dialogs of the tested application. |
| loadsave | Loads, saves, or exports tests |
| options | Tests all of the settings in the Tools - Options area of the tested application. |
| level1 | Performs a general functionality test for each feature in the tested application, including each menu item. |
| level2 | Performs intensive tests for separate areas in the tested application |
special modules |
|
| input | Includes general input files that are required by all tests |
| tools | Includes libraries that contain the general subroutines that are required by all test scripts in the module or application. |
These are only the defined name, you can also find other subcategories in the paths. Mostly the named of the directory mirror the tested area.
If you find a *.bas-file in one of these directories you are in a test-module. Those module should include the following directories/files:
| module name / path name | Description |
|---|---|
| *.bas | Indicates executable test scripts. To run the script, open the *.bas file in TestTool, and then press [[Image:]] or choose Program - Start. |
| inc | Includes the libraries and any associated files that are required for a test (included by use-method in the *.bas-file) |
| input | Inputs the files that are required for the test. |
| tools | Includes libraries that have general subroutines that are required by test scripts (*.bas). The libraries must be in the same directory as the test script. |
global-Module
The global-directory is required for each test. The directory contains the main routines for running a test script, including the hid.lst, the declaration files that identify menu items, dialogs and controls in OpenOffice.org, and general tooling routines.
| directory name | description |
|---|---|
| hid | Contains the hid.lst file. |
| input | Contains common files that are required by the TestTool.
|
| sid | Includes all SlotID declarations. |
| system | Contains the routines to start a test script in these inc-files. |
| tools | Contains general tooling routines in these inc-files (for example, declare.bas). |
| update | Contains general resource-test routines in these files (options-dialog and autopilots) |
| win | Contains all HelpID declarations. |
CVS information
The complete TestTool Environment is checked into a CVS-tree under the module name qa/qatesttool. You can then check out the module or the global-module along with the application or module that you want to test. Since the content (such as global routines and the hid.lst) of the global-module can change, update the global-module regularly.
The commandline looks like:
cvs -d :pserver:anoncvs@anoncvs.services.openoffice.org:/cvs -z3 co -P qa/qatesttool
Configuration file entries
The configuration file (UNIX: .testtoolrc, Win32: testtool.ini) contains several sections.The section name is surounded by '[', ']' and contains several entries like: EntryName=Value.
GUI Platform
Current= depends on the Platform.
| UNIX | Win32 | ||
| Subsystem | Current | Subsystem | Current |
| Solaris SPARC | 01 | Win 95 | 100 |
| SCO UNIX | 02 | Win 98 | 395 |
| Linux | 03 | Win NT 3 | 351 |
| AIX | 04 | Win NT 4 | 400 |
| Solaris x86 | 05 | Win SE | 410 |
| Irix | 06 | Win ME | 490 |
| HP | 07 | Win 2000 | 500 |
| FreeBSD | 08 | Win XP | 501 |
| Mac OS X | 12 | Win Server 2003 | 502 |
| Linux PPC | 13 | ||
| NetBSD | 14 | ||
| Linux 64 bit | 15 | ||
| Linux SPARC | 16 | ||
| eComStation | 17 | ||
