Difference between revisions of "User:Foral/JavaEclipseTutorial"
(→Eclipseとプラグイン) |
(→Eclipseとプラグイン) |
||
| Line 36: | Line 36: | ||
次の頁には、''update sites''の一覧表が表示されます。プラグインの説明や資料が掲載されたディレクトリのURLが表示されます。”Add remote site”ボタンをクリックするとリストやURLに名前を入力するための小さな画面が開きます。OpenOffice.org plugin updateのサイトは次の通りです。 | 次の頁には、''update sites''の一覧表が表示されます。プラグインの説明や資料が掲載されたディレクトリのURLが表示されます。”Add remote site”ボタンをクリックするとリストやURLに名前を入力するための小さな画面が開きます。OpenOffice.org plugin updateのサイトは次の通りです。 | ||
| − | |||
http://cedric.bosdonnat.free.fr/ooeclipseintegration | http://cedric.bosdonnat.free.fr/ooeclipseintegration | ||
Revision as of 14:09, 24 March 2006
Contents
EclipseでJavaコンポーネントを作る
導入
この文書は、UNO初心者向けにJavaコンポーネントを作成する方法を説明したチュートリアルで、EclipseとOpenOffice.org開発のためのプラグインを使います。どの手順も詳しく解説していますが、すでにUNOプログラムを作っている人は、次のページを斜め読みし、その後のEclipseのプラグインの使い方の説明をよく読んでください。
UNOコンポーネント
この章ではUNOコンポーネントの基本的なことについて説明します。もうすでにUNOについて知っているのであれば、ここは読み飛ばしてもかまいません。この章では、まず最初にコンポーネントとは何か、その主な役割が何かを説明します。次に、UNOコンポーネントを作るのにどのようなツールが必要かを説明し、それらのツールの用途を完全に理解する手助けをします。
コンポーネントの内部構造
Wikipedia (Fr)((英語のWikipediaにもありますが、私はフランス語の網羅している説明のほうがよいと思います))には、"コンポーネントは所定のサービスを提供し、他のコンポーネントと通信をするシステムの構成要素"と書かれています。UNOの場合、コンポーネントはライブラリ(C++の共有ライブラリもしくはJavaのjarファイル)を含んだパッケージとして提供されます。UNOでは、コンポーネントは仕様と実装の2つの異なるものにより構成されています。
- 仕様: メタ言語によりコンポーネントが何をすべきかを規定している。UNOでは、このメタ言語はUNO-IDLと呼ばれ、Corba IDLによく似ている。コンポーネントを利用するためのAPIとして文書化されている部分が仕様である。従って、仕様はそれだけで完結しており、かつ、実装に依存しない。
- 実装: 実装とは、仕様により規定されたものを実現するためのコードである。C++、Java、Pythonなどのプログラミング言語のいずれかで実装することができる。実装はコンポーネントの内部にあり、他のコンポーネントから利用できない。
実装と実装の対応付けのために、コンポーネントはレジストリデータベース(訳者注:Windowsのレジストリとは違います)を使います。レジストリデータベースは2つあり、そのうちの1つであるtypes.rdbには全てのコンポーネントの仕様が記録され、もう片方のservices.rdbには実装と仕様の対応が記録されていて、後者は実装により生成されます。
コンポーネントの作成手順
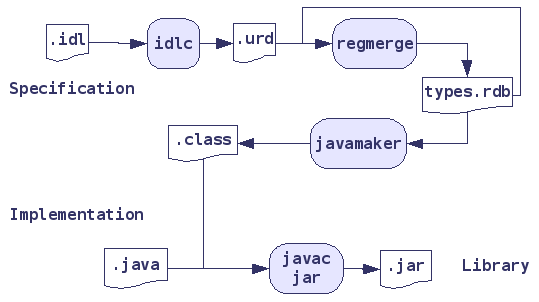
図1では、仕様とソースからどのようにしてコンポーネントが生成されているのかを図で表しています。見てのとおり、仕様はコンパイルされtypes.rdbレジストリデータベースに取り込まれています。仕様をJavaのクラス定義ファイルに変換するために、types.rdbレジストリデータベースからClassファイルが生成されます。そして、そのClassファイルと実装を合わせてjavaコンパイラーによりクラスファイルを生成します。これら全てのクラスファイルは、このチュートリアルの後で説明するマニフェストとともにjarファイルにまとめられます。これだけでは、OpenOffice.orgはコンポーネントを使えないので、types.rdbとjarファイルとまた別のマニフェストがzip圧縮され.uno.pkgにまとめられます。
この後で説明するEclipseのプラグインはこれらの操作の一部を隠蔽しますが、コンポーネントを作成する手順と次のステップで行うことを完全に理解するためには、この一連の流れを知っておく必要があります。
開発ツールのインストール
これから何をするのか大体理解したはずですので、これらの開発を支援するツールをセットアップしましょう。セットアップはとても簡単です。しかし、どの開発ツールもまだインストールされていないことを前提に説明するので、この前提条件が満たされていない場合は何か問題が起こるかもしれません。
OpenOffice.org
最初に作業用のOpenOffice.org2.0とSoftware Development Kit (SDK)を手に入れてください。最新のバージョンはOpenOffice.org download pagesで手に入れることができます。
もし、他の方法でOpenOffice.orgを手に入れた場合は、開発用パッケージもあることを確認してください。このチュートリルは、このプロジェクトのウエッブサイトから正規のOpenOffice.orgの配布物を使っていることを前提としています。
Eclipseとプラグイン
Eclipseのダウンロードページから、最新版のEclipse SDKをダウンロードしてください。EclipseとSDKが手に入ります。バイナリランタイムだけダウンロードしたいかもしれませんが、その場合もっと他のリンクをたどらなければいけません。Eclipseをダウンロードしたら、zip解凍するだけです。EclipseはJavaでプログラムするためのJavaプラグインがデフォルトで入っています。
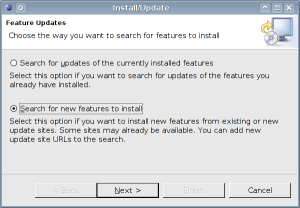
次に、Eclipseのソフトウェアアップデート機能を使って、Eclipse用のOpenOffice.org開発プラグインをインストールします。 次の順序でメニューを進んでください:Help>Software updates>Find and Installと進むと図2の画面になるので、2番目のラジオボタンをチェックし、Nextボタンをクリックします。
次の頁には、update sitesの一覧表が表示されます。プラグインの説明や資料が掲載されたディレクトリのURLが表示されます。”Add remote site”ボタンをクリックするとリストやURLに名前を入力するための小さな画面が開きます。OpenOffice.org plugin updateのサイトは次の通りです。 http://cedric.bosdonnat.free.fr/ooeclipseintegration
Eclipse and the plugin
To get Eclipse, just get to their download pages and download the last Eclipse SDK. You will have Eclipse and its SDK. Of course, you might want to download only the binary runtime, but you will have to follow more links. Once you have Eclipse, unzip it on your computer and that's it: eclipse has a Java plugin to help you program in Java.
Now we will install the OpenOffice.org development plugin for Eclipse using the Eclipse software update system. Select the menu: Help > Software updates > Find and install, you should get the window of the illustration 2. Check the second option on this window and click on the "Next" button.
On the following page, you will see a list of "update sites". These are URLs pointing to directories containing plugins informations and archives. Now click on the "Add remote site" button to get a small window asking for a name that will be displayed in the list and an URL. The URL of OpenOffice.org plugin update site is:
http://cedric.bosdonnat.free.fr/ooeclipseintegration
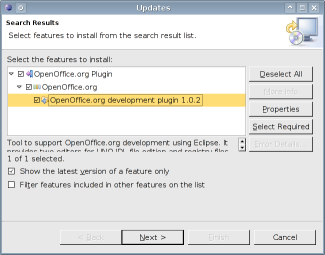
Then validate the new update site parameters and be sure that the OpenOffice.org site is checked before clicking on the "Finish" button. You should now see a window like the one of the illustration 3. Select the OpenOffice.org plugin as shown on the screen-shot and click next and follow the indications. You will be asked to accept the plugin licence and validate the installation the archive are not signed.
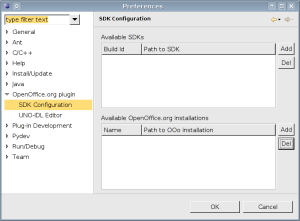
Congratulations, you have installed the OpenOffice.org plugin successfully, there is now to configure it. The following steps will guide you through this task. Go to the Eclipse options via the Window > Preferences... menu. In the list on the left, select the OpenOffice.org plugin > SDK configuration item to get a window like the one shown by the illustration 4.
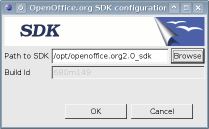
In this window you will have to configure the path to your OpenOffice.org and to it's SDK. So let us begin with the SDK path: click on the "Add" button next to the SDKs list. You will have a window like the illustration 5, browse to your OpenOffice.org 2.0 SDK and validate. Then you will have to do the same for the OpenOffice.org path using the other "Add" button.
Now your OpenOffice.org plugin is ready to work: you can begin to create your new component. If there was any problem during the plugin installation, do not hesitate to report it to the dev@api.openoffice.org mailing-list.
Creating a new component
For the Eclipse plugin, an UNO component is a UNO project. Thus the first step will consist in creating the project. Next, you will need to write the UNO-IDL specifications of your component and then implement them.
This tutorial will guide you in the "Hello world" component creation. The component you are about to create just says hello when you ask him to do so.
Creating the project
There are several ways to create a UNO project using the plugin:
- the first one is the File > New > Project menu entry and choose the UNO > UNO-IDL Project item as shown by the illustration 6.
- the second one is the icon in the toolbar representing a blue folder with a star as shown by the illustration 7.
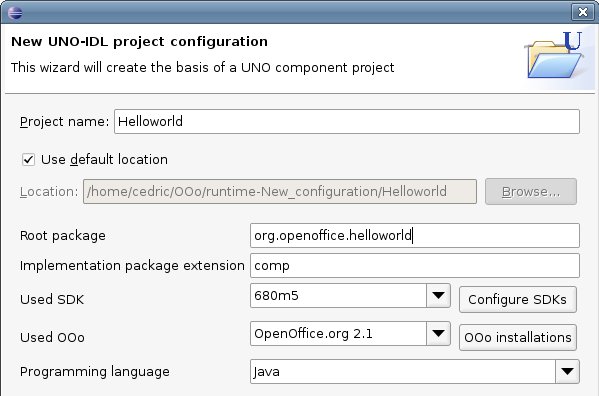
Next you have to fill in a form (see illustration 8) to configure your project: the next lines will describe the different fields and their meaning to help you fill them.
- Project name: is the component name, in our case, it will be "Helloworld"
- Directory: is the directory on your computer where the project will be created. You can change the default one by deselecting the "Use default" check box. The default location of each Eclipse project is a directory with your project name in the current Eclipse workspace.
- Root package: is the name of the first module of your component. It generally composed of two parts: the vendor name (here org.openoffice) and the project name (here helloworld).
- Used SDK: selects the OpenOffice.org SDK which will be used to develop the component. You generally will have only one SDK in the list, but you can add others in the preferences or by clicking on the "Configure SDKs" button.
- Used OOo: selects the version of OpenOffice.org to use to develop the component. As for the SDK, you will generally have only one entry in the list, but you can add others in the preferences or by clicking on the "OOo Installations" button.
- Programming language: selects the programming language for the component implementation. For the moment, there is only Java available, however C++ and python are planned.
You can now click on the "Finish" button or "Next" if you are eager to know a bit more on what will happen during the project's creation. For this tutorial we will go further to better understand what you will get after the wizard. In fact the next step in the wizard will consist in configuring an empty service for the component. The default name of this service is the project name and it implements the com.sun.star.uno.XInterface interface. However you can change the default interface by clicking on the "Browse" button which will provide you a list of the known interfaces.
As we will define a new interface for our Helloworld service, we will keep the default values and change the interface name when we will have created it.
Writing the specification
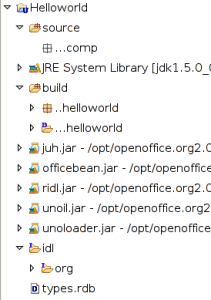
Now you should have a new UNO-IDL project like the one presented by the illustration 9. It is made of several folders and files which you will have to know:
- source: contains you Java implementation classes
- build: contains all the generated temporary files, such as the results of the specification files (.idl files) compilation (.urd files) or the class files corresponding to the specifications (.class files)
- idl: contains the specifications of the component
- types.rdb: is the generated UNO types registry from which the class files will be generated
- JRE and the jars: are describing the classpath of the component. They are visible only in the Java package explorer. The OpenOffice.org jars are changed if the OpenOffice.org version associated to the project is changed. In a future version, they will be packed in a user library to take less space in the tree.
Some other folders will be added in this tutorial because the plugin does not support all the build chain currently. However, this feature will be added in a next version of the plugin and will simplify your task: so do not worry.
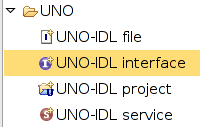
We will now have to write a new XHelloworld interface to the component. This interface will define a sayHello() method that will return a hello message. To launch the interface creation wizard, select a file in your project before selecting the File > New > Other menu item and select the UNO > UNO-IDL interface wizard as shown by the illustration 10. Note that if you didn't select something in the UNO component project, you will not be able to click on the next button.
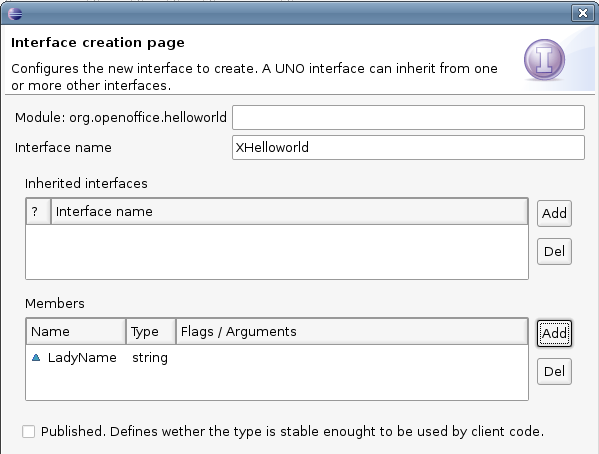
The new interface wizard presents you several fields to fill as you can see it on the illustration 11. We will now see what these fields means and what you could do with them.
- Package: corresponds to the UNO-IDL module where to add the interface. If the text field is left empty, the interface will be added in the root module of the component (filled in the project wizard). This field would be renamed in "module" in a next version
- Interface name: is the interface name. By convention, we generally name a interface beginning with an "X". In this tutorial case, the interface will be named XHelloworld
- Published: specifies if the interface is published or not. The published notion is translated into a keyword in UNO-IDL language. Declaring a UNO-IDL type as published means that it will not change in future releases: we will check it because this is far too complex for our example
- Inherited interfaces: is a list of all the interfaces from which the one that is about to be created will inherit. This is one of the changes in UNO-IDL between OpenOffice.org 1.1.x and 2.0: that is why the plugin does not support OpenOffice.org version prior to 2.0. All the UNO-IDL interfaces are inheriting directly or not from the com::sun::star::uno::XInterface type. As the XHelloworld interface is very easy, there will be only this mother interface
- "?" column: specifies if the interface inheritance is mandatory or not. If the box is checked, thus the interface inheritance is optional and may not be implemented.
- "Add" and "Del" buttons: allows to add an interface to the inherited ones or removing the selected interface.
Clicking one the "Finish" button will add a new UNO-IDL file named Xhelloworld.idl and a UNO-IDL text editor should be opened with the created file. There is now to add the sayHello() method to make the new interface ready for use. Of course you can add some Javadoc like comments to document your component API, but this will not be discussed in this tutorial. You will better have to look at the links section to go further on this point.
To add the sayHello() method, you just have to change the XHelloworld code into the following:
[unoidl]
published interface XHelloworld{
interface com::sun::star::uno::XInterface;
/** is just saying hello to the caller.
      @return
          a string to say hello
   */
   string sayHello();
};
The interface is now correct, but do you remember that the service was exporting the XInterface interface ? You will now have to change the interface to make the service exports the fresh XHelloworld interface. For this, just double-click on the Helloworld.idl file to edit it and change the code into the following:
[unoidl]
- include <org/openoffice/helloworld/XHelloworld.idl>
module org {
   module openoffice {
       module helloworld {
           published service Helloworld : XHelloworld {
           };
       };
   };
};
Note that we have changed the UNO-IDL interface after the ":" of the service definition which corresponds to the exported interface. Since OpenOffice.org 2.0, a service can export only one interface, but this will be more detailed in the "Going further" section. We had to change the include line too: this works exactly as the C++ pre-compilation directives and has the same role as the Java imports.
Writing the implementation
You now have complete specifications for your component, but there is still the implementation to do. For the moment, the plugin doesn't assist you enough and you will have to copy-paste some code that could be automatically generated in next version. The tutorial will now assume that you know how to handle Java code in Eclipse, otherwise it would be too long to read.
Implementing the code
To implement the code, you will create a new Java class named HelloworldImpl in the implementation package, that is: org.openoffice.helloworld.comp. This class will extend com.sun.star.lib.uno.helper.WeakBase and implement XHelloworld. This is a quite difficult part to understand: the UNO-IDL interface is translated into a Java interface and we implement the interfaces. The mapping between the UNO-IDL service and its implementation will be done in the next chapter of this tutorial.
The WeakBase class which is extended is a helper to implement some other basic interfaces. In our tutorial, we will need it only to implement the com.sun.star.lang.XTypeProvider interface used by OpenOffice.org basic to get an access to the component's methods and attributes.
If you checked the "Inherit abstract methods" box in the class wizard, you can note that the XHelloworld method sayHello() is added to the generated code. The implementation will just consist in filling the empty body of this method. Thus you can change the code to the following:
[java]
public String sayHello() {
return "Hello UNO world from Java";
}
Of course, serious components will have more complex specifications and implementations, but it is a beginning: just a simple standard "Hello world".
The registration class
Now that our interface is implemented, we will need to make the link between the service and its implementation. This would perhaps be performed automatically in future versions of the plugin, but we still have to do it now. You will just have to copy the following code in your HelloworldImpl class. I will not explain this code here, because it should be created automatically and is only a rearranged copy-paste from the OpenOffice.org Developer's Guide. If you are interested in this topic, please report to the "Going further" section of this tutorial. You just have to remember that the class containing this code is named "Registration class" because you will need to give its name to package the component.
[java]
/** is used by the registration methods to return the implemented
*  service name.
*/
final static String __serviceName = "org.openoffice.helloworld.Helloworld";
public static XSingleServiceFactory __getServiceFactory(
               String implName,
               XMultiServiceFactory multiFactory,
               XRegistryKey regKey){
XSingleServiceFactory xSingleServiceFactory = null;
   if (implName.equals(HelloworldImpl.class.getName())) {
       xSingleServiceFactory = FactoryHelper.getServiceFactory(
                HelloworldImpl.class, __serviceName,
                multiFactory, regKey);
   }
return xSingleServiceFactory;
}
public static boolean __writeRegistryServiceInfo(
XRegistryKey regKey) {
   boolean b = FactoryHelper.writeRegistryServiceInfo(
                   HelloworldImpl.class.getName(),
                   __serviceName, regKey);
   return b;
}
Testing the component
There is now to package and test our component. This part will be a bit more hard because the plugin does not support these features for the moment. The following lines will not explain all the code in details because this should be done by the plugin in future versions. However it is necessary now to test our work.
Packaging the component
The package component is a zip containing the UNO-IDL types registry (types.rdb) and a jar with the compiled classes. To generate this, we will create an Ant build file (build.xml) with the following code:
[xml]
<?xml version="1.0"?>
<project name="Helloworld" default="package">
   <description>
           This ant file is only to package the Helloworld component
   </description>
<property name="out.path" value="bin/ant"/>
   <target name="package" depends="purge">

   	<mkdir dir="${out.path}" />
   	<copy todir="${out.path}" file="types.rdb">
   		<fileset dir="bin">
   			<include name="**/*.class" />
   		</fileset>
   		<fileset dir="build">
<include name="**/*.class" />
   		</fileset>
   	</copy>

   	<jar basedir="${out.path}" includes="**/*"
   		excludesfile="types.rdb"
   		destfile="${out.path}/Helloworld.jar">
   		<manifest>
   			<attribute name="RegistrationClassName"
   				value="org.openoffice.helloworld.comp.HelloworldImpl"/>
   		</manifest>
   	</jar>

   	<mkdir dir="${out.path}/META-INF" />
   	<copy todir="${out.path}/META-INF" file="manifest.xml" />

   	<zip destfile="${out.path}/helloworld.uno.pkg" basedir="${out.path}"
   		includes="Helloworld.jar,META-INF/manifest.xml,types.rdb" />

   </target>
   <target name="purge">
       <delete dir="${out.path}" />
   </target>
</project>
You will also need to create a manifest.xml file containing a description of the zip file. The syntax of these files is detailed in the OpenOffice.org Developer's Guide and will not be explained here. You just have to create the file at the project's root with the following XML code:
[xml]
<?xml version="1.0" encoding="UTF-8"?>
<!DOCTYPE manifest:manifest PUBLIC "-//OpenOffice.org//DTD Manifest 1.0//EN" "Manifest.dtd">
<manifest:manifest>
  <manifest:file-entry
          manifest:full-path="Helloworld.jar"
          manifest:media-type="application/vnd.sun.star.uno-component;type=Java"/>
  <manifest:file-entry
          manifest:full-path="types.rdb"
          manifest:media-type="application/vnd.sun.star.uno-typelibrary;type=RDB"/>
</manifest:manifest>
You are now ready to execute the newly created ant script to generate the package bin/ant/helloworld.uno.pkg. To perform this action, you will have to open the Ant view by selecting the Window > Show View > Ant menu item. You now have a tab like the one presented by the illustration 12. In this view, click on the ant icon to add your build.xml file to the list of ant files. You can now execute the package target by double-clicking on it in the Ant view. The build output is also shown in the Eclipse console view.
If the console show you a result similar to the one below, then your component has been successfully generated. To see the generated files you can switch to the Resource perspective: they are generated in the bin/ant folder which is hidden in the Java package explorer.
Buildfile: /home/chef/develOOoppement/eclipse/Helloworld/build.xml
purge:
package:
    [mkdir] Created dir: /home/chef/develOOoppement/eclipse/Helloworld/bin/ant
     [copy] Copying 4 files to /home/chef/develOOoppement/eclipse/Helloworld/bin/ant
      [jar] Building jar: /home/chef/develOOoppement/eclipse/Helloworld/bin/ant/Helloworld.jar
    [mkdir] Created dir: /home/chef/develOOoppement/eclipse/Helloworld/bin/ant/META-INF
     [copy] Copying 1 file to /home/chef/develOOoppement/eclipse/Helloworld/bin/ant/META-INF
      [zip] Building zip: /home/chef/develOOoppement/eclipse/Helloworld/bin/ant/helloworld.uno.pkg
BUILD SUCCESSFUL
Total time: 1 second
Testing using OpenOffice.org macros
You will now have to test the component using OpenOffice.org macros. There are two steps for this:
- Add the component to the package manager. In OpenOffice.org 2.0 open the package manager using the tools > package manager menu item. Next select the "My Packages" category and click on the "Add" button. You just have to select the bin/ant/helloworld.uno.pkg file in your project and check that the package is activated.
- Writing and executing a basic macro call the sayHello() method.
Now you will create and execute a basic macro containing the code below. You should see a small window with the "Hello UNO world from Java" or whatever text you returned in your implementation.
[oobas]
Sub TestHelloworld
	helloworld = createUnoService("org.openoffice.helloworld.Helloworld")
	print helloworld.sayHello()
End Sub
Going further
This chapter is only for those who enjoyed this tutorial and want to know more about the UNO component creation in Java or other languages. You will have a list of useful links for any UNO developer in the next line.
- OpenOffice.org developer's guide is a huge source of documentation for any OpenOffice.org developer. You should probably have a look at the chapters 3 and 4 for UNO components informations.
- OOo Java reference is the UNO binding for Java reference.
- OOo C++ reference is the UNO binding for C++ reference.
- OOo Developer's Wiki is the wiki for all the OpenOffice.org developers. It contains very useful informations even for people who just begin with UNO.
- http://udk.openoffice.org/common/man/draft/multinherit.html for further informations on what changes in UNO-IDL between OpenOffice.org 1.1.x and 2.0
- Autodoc IDL reference is the reference for javadoc like comments in UNO-IDL files.
- Autodoc C++ documentation is the reference for javadoc like comments in C++ components.
- URE C++ application tutorial explains how to create a C++ application based on the URE, that is a UNO C++ component that does not need OpenOffice.org.
Public Documentation License Notice
The contents of this Documentation are subject to the Public Documentation License Version 1.0 (the "License"); you may only use this Documentation if you comply with the terms of this License. A copy of the License is available at http://www.openoffice.org/licenses/PDL.html.
The Original Documentation is "UNO Java component creation explained". The Initial Writer of the Original Documentation is (JCA) Cédric Bosdonnat (C) 2006. All Rights Reserved. (Initial Writer contact(s): cedricbosdo@openoffice.org.)
日本語への翻訳は中本崇志(bluedwarf@openoffice.org)が行いました。英語の原文はJavaEclipseTutoです。
Note: The text of this Appendix may differ slightly from the text of the notices in the files of the Original Documentation. You should use the text of this Appendix rather than the text found in the Original Documentation for Your Modifications.
