Difference between revisions of "User:Foral/JavaEclipseTutorial"
m (moved Broken/ja:JavaEclipseTutorial to User:Foral/JavaEclipseTutorial: It was broken and we do not want to del this page so I will move it under User page) |
|||
| (25 intermediate revisions by 6 users not shown) | |||
| Line 8: | Line 8: | ||
====コンポーネントの内部構造==== | ====コンポーネントの内部構造==== | ||
| − | [http://fr.wikipedia.org/wiki/composant Wikipedia (Fr)](( | + | [http://fr.wikipedia.org/wiki/composant Wikipedia (Fr)]((英語のWikipediaにもありますが、私はフランス語の網羅的な説明のほうがよいと思います))には、''"コンポーネントは所定のサービスを提供し、他のコンポーネントと通信をするシステムの構成要素''"と書かれています。UNOの場合、コンポーネントはライブラリ(C++の共有ライブラリもしくはJavaのjarファイル)を含んだパッケージとして提供されます。UNOでは、コンポーネントは仕様と実装の2つの異なるものにより構成されています。 |
* '''仕様: ''' メタ言語によりコンポーネントが何をすべきかを規定している。UNOでは、このメタ言語はUNO-IDLと呼ばれ、[http://en.wikipedia.org/wiki/Corba Corba] IDLによく似ている。コンポーネントを利用するためのAPIとして文書化されている部分が仕様である。従って、仕様はそれだけで完結しており、かつ、実装に依存しない。 | * '''仕様: ''' メタ言語によりコンポーネントが何をすべきかを規定している。UNOでは、このメタ言語はUNO-IDLと呼ばれ、[http://en.wikipedia.org/wiki/Corba Corba] IDLによく似ている。コンポーネントを利用するためのAPIとして文書化されている部分が仕様である。従って、仕様はそれだけで完結しており、かつ、実装に依存しない。 | ||
| Line 32: | Line 32: | ||
Eclipseのダウンロードページから、最新版のEclipse SDKをダウンロードしてください。EclipseとSDKが手に入ります。バイナリランタイムだけダウンロードしたいかもしれませんが、その場合もっと他のリンクをたどらなければいけません。Eclipseをダウンロードしたら、zip解凍するだけです。EclipseはJavaでプログラムするためのJavaプラグインがデフォルトで入っています。 | Eclipseのダウンロードページから、最新版のEclipse SDKをダウンロードしてください。EclipseとSDKが手に入ります。バイナリランタイムだけダウンロードしたいかもしれませんが、その場合もっと他のリンクをたどらなければいけません。Eclipseをダウンロードしたら、zip解凍するだけです。EclipseはJavaでプログラムするためのJavaプラグインがデフォルトで入っています。 | ||
| − | + | 次に、Eclipseのソフトウェア更新機能を使って、Eclipse用のOpenOffice.org開発プラグインをインストールします。 | |
| − | + | 次の順序でメニューを進んでください: '''ヘルプ > ソフトウェア更新 > 検索とインストール (Help > Software updates > Find and Install)'''と進むと図2の画面になるので、2番目のラジオボタンをチェックし、"次へ(Next)"ボタンをクリックします。 | |
| − | + | ||
| − | + | ||
| − | + | ||
| − | + | ||
[[Image:InstallWindow.png|center|"Find & Install" window]] | [[Image:InstallWindow.png|center|"Find & Install" window]] | ||
| − | + | 次の頁には、''検索に含めるサイト (update sites)''のリストが表示されます。これらはプラグインの説明やアーカイブのあるディレクトリのURLを表しています。"新規リモート・サイト (Add remote site)”ボタンをクリックするとリストに表示される名前とURLを入力するための小さなウィンドウが開きます。OpenOffice.orgプラグイン更新サイトは次の通りです。 | |
http://cedric.bosdonnat.free.fr/ooeclipseintegration | http://cedric.bosdonnat.free.fr/ooeclipseintegration | ||
| − | + | 更新サイトのURLが正しく入力されたことを確認し、OpenOffice.orgプラグイン更新サイトのチェックボタンにチェックをしたら、"終了 (Finish)"ボタンをクリックしてください。図3の画面になります。図3のスクリーンショットのようにOpenOffice.orgプラグインを選択し、"次へ (Next)"をクリックし、この後はEclipseの指示にしたがってください。プラグインのライセンスに同意するよう求められ、デジタル署名されていないアーカイブをインストールするかどうかの確認を求められるでしょう。 | |
[[Image:PluginUpdates.png|center|OpenOffice.org update site contents]] | [[Image:PluginUpdates.png|center|OpenOffice.org update site contents]] | ||
| − | + | これでOpenOffice.orgプラグインはインストールできました。次に設定をしなければいけませんので、以下の手順に従ってください。まず、'''ウィンドウ (Window) > 設定... (Preferences...)'''メニューを選択し、Eclipseの設定ウィンドウを開きます。このウィンドウの左側のリストから'''OpenOffice.org plugin > SDK configuration'''を選択すると、図4のような画面が表示されます。 | |
[[Image:UnoProperties.png|center|SDK configuration window]] | [[Image:UnoProperties.png|center|SDK configuration window]] | ||
| − | + | この画面では、OpenOffice.orgとSDKのパスを設定します。それでは、まず最初にSDKのパスを設定しましょう。SDKsリストの隣にある"Add"ボタンをクリックしてください。図5のような画面になるので、OpenOffice.org 2.0 SDKの位置を指定し確認してください。次に、別の"Add"ボタンをクリックして、同じようにしてOpenOffice.orgのパスを設定します。 | |
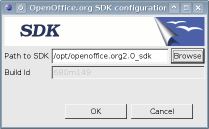
[[Image:SdkConfig.png|center|New SDK path window]] | [[Image:SdkConfig.png|center|New SDK path window]] | ||
| − | + | これで、OpenOffice.orgプラグインの設定は完了したので、新しくコンポーネントを作ることができます。プラグインをインストールする過程で何か問題があれば、遠慮なく[mailto:dev@api.openoffice.org dev@api.openoffice.org]メーリングリストに報告してください。 | |
| − | + | ||
| − | + | ||
| − | + | ||
| − | + | ==新しいコンポーネントを作る== | |
| + | Eclipseプラグインでは、UNOコンポーネント一つにつきUNOプロジェクトを一つ作ります。なので、まず最初のステップとしてプロジェクトを作成します。そして、コンポーネントのUNO-IDL仕様を書いて実装する必要があります。 | ||
| + | このチュートリアルでは"Hello World"コンポーネントを作ります。これから作ろうとしているコンポーネントは、命令をしたら、ただ"Hello"というだけのものです。 | ||
| − | === | + | ===プロジェクトを作る=== |
| − | + | プラグインを使ってUNOプロジェクトを作成する方法はいくつかあります: | |
| − | * | + | *1つ目は、'''ファイル (File) > 新規 (New) > プロジェクト (Project)'''メニューを選択し、図6で示されているとおりに'''UNO > UNO-IDL project'''という項目を選択する方法です。 |
[[Image:NewUnoProjectsItems.png|center|New UNO-IDL project item]] | [[Image:NewUnoProjectsItems.png|center|New UNO-IDL project item]] | ||
| − | * | + | *2つ目は、図7で示されている、ツールバー上の星マークが付いた青いフォルダを表すアイコンをクリックする方法です。 |
[[Image:NewUnoProjectIcon.png|center|New UNO-IDL project icon]] | [[Image:NewUnoProjectIcon.png|center|New UNO-IDL project icon]] | ||
| − | + | そしたら、次に図8にあるようなプロジェクトの設定項目を埋めなければいけません。それぞれの項目の説明と目的を以下に列挙したので、それを参考に項目を埋めてください。 | |
[[Image:NewUnoProject.jpg|center|New UNO-IDL project wizard page]] | [[Image:NewUnoProject.jpg|center|New UNO-IDL project wizard page]] | ||
| − | * '''Project name | + | * '''プロジェクト名 (Project name)'''はコンポーネント名になりますので、ここでは"''Helloworld''"と入力します。 |
| − | * ''' | + | * '''ディレクトリ''' ではどこにプロジェクトを作るのかを指定します。"''デフォルトの使用 (Use default)''"のチェックを外すことで、これを変えることができます。各Eclipseのプロジェクトのデフォルトの保存場所は、現在のEclipseのワークスペースディレクトリの中の、プロジェクト名と同じ名前のディレクトリになります。 |
| − | * '''Root package | + | * '''Root package''' はコンポーネントのモジュール名です。モジュール名は一般的に、ベンダー名(ここでは''org.openoffice'')とプロジェクト名(ここでは''helloworld'')という2つの部分からなります。 |
| − | * '''Used SDK | + | * '''Used SDK''' ではコンポーネントの開発にどのOpenOffice.org SDKを使用するのかを選択します。リストの中にはSDKは一つしかないと思いますが、先ほどの設定から、または"''Configure SDKs''"ボタンをクリックすることにより、別のバージョンのSDKを追加することもできます。 |
| − | * '''Used OOo | + | * '''Used OOo''' はコンポーネントの開発をするのに使用するOpenOffice.orgのバージョンを選択します。SDKと同じで、リストには一つしか項目がないはずですが、先ほどの設定から、または"''OOo installations''"ボタンをクリックすることにより、別のバージョンのOpenOffice.orgを選択することができます。 |
| − | * '''Programming language | + | * '''Programming language''' ではコンポーネントを実装するプログラミング言語を選択します。今のところJavaしか使えませんが、C++やPythonにも対応する予定です。 |
| − | + | ||
| − | + | それでは"''終了 (Finish)''"ボタンをクリックします。もしプロジェクト作成で何が起こるのか知したければ、"''次へ (Next)''"ボタンをクリックしてもらっても構いません。このチュートリアルでは、このウィザードが終わった後にどうなるのかを理解するために次へ進んでもらいます。次のステップでは、コンポーネントのための何も実体の無いサービスについて設定をしています。サービス名はデフォルトでプロジェクト名と同じになっていて、''com.sun.star.uno.XInterface''インターフェースを実装しています。しかし、"''Browse''"ボタンをクリックすると、既知のインターフェースのリストが表示されるので、これにより実装するインターフェースを変えることができます。 | |
| + | 後でHelloworldサービスのために新しいインターフェースを定義するので、インターフェースはそのままにしておき、後で変えることにしましょう。 | ||
| − | === | + | ===仕様を書く=== |
| − | + | これで、図9のように新しいUNO-IDLプロジェクトができたはずです。このプロジェクトはいくつかのフォルダとファイルから構成されているので、中を見てみましょう。 | |
[[Image:ProjectTree.png|center|The created UNO-IDL project]] | [[Image:ProjectTree.png|center|The created UNO-IDL project]] | ||
| − | * '''source:''' | + | * '''source:''' Javaで実装されたクラスをここに置きます。 |
| − | * '''build:''' | + | * '''build:''' 一時的に生成されるファイルは全てここに置かれます。例えば、仕様ファイル(''.idl''ファイル)をコンパイルして生成されるファイル(''.urd''ファイル)とか、仕様に対応したクラスファイル(''.class''ファイル)などです。 |
| − | * '''idl:''' | + | * '''idl:''' コンポーネントの仕様はここに置きます。 |
| − | * '''types.rdb:''' | + | * '''types.rdb:''' UNOの型に関する情報が格納されたレジストリで、クラスファイルはこのレジストリから生成されます。 |
| − | * ''' | + | * '''JREとjarファイル:''' コンポーネントのクラスパスを表しています。これらは、パッケージ・エクスプローラー(Java packages explorer)に表示されているだけです。OpenOffice.orgのjarファイルは、プロジェクトに関連づけられたOpenOffie.orgのバージョンに対応して変わります。''将来的にこれらのファイルは、ディスクスペース節約のためにユーザライブラリに置かれるようにする予定です。''このチュートリアルでは他にもいくつかのフォルダを追加しますが、今のところこのプラグインがまだビルドプロセスの全てをサポートしているわけではないからです。しかし、プラグインの次のバージョンではこれらの機能を追加し、みなさんの手間を簡単にするつもりですので、安心してください。 |
| − | + | ||
| − | + | ||
| − | + | ||
| + | さて、新しく''XHelloworld''インターフェースを書かなければいけません。このインターフェースではHelloというメッセージを返す''sayHello()''メソッドを定義します。インターフェース作成ウィザードを開くには、プロジェクトの適当なファイルを選択し、'''ファイル (File) > 新規 (New) > その他 (Other)'''メニューを選択し、さらに図10にあるように'''UNO > UNO-IDL interface'''ウィザードを選択します。UNOコンポーネントプロジェクトのファイルのどれかを選択していないと、次のボタンがクリックできないので注意してください。 | ||
[[Image:UnoWizardItems.png|center|UNO-IDL wizards list]] | [[Image:UnoWizardItems.png|center|UNO-IDL wizards list]] | ||
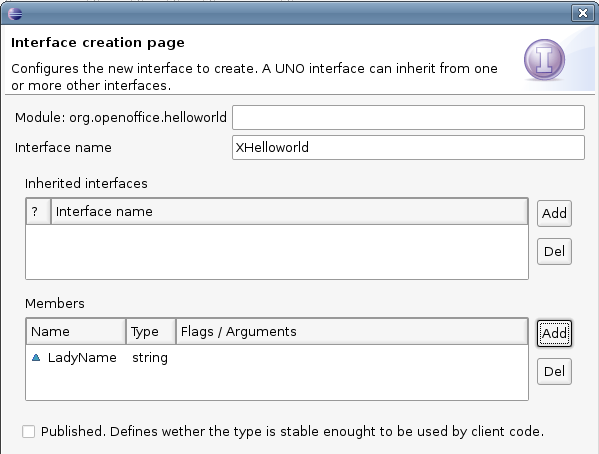
| − | + | 新たに表示されたインターフェースウィザードでは、図11を見れば分かるとおり、いくつかの埋めなければいけないフィールドがあります。これらのフィールドの意味と効果を以下で説明します。 | |
| − | * '''Package:''' | + | * '''Package:''' このインターフェースが追加されるUNO-IDLモジュールに対応しています。このフィールドを空白にしておけば、インターフェースは(ウィザードに表記されている)コンポーネントのルートモジュールに追加されます。''このフィールドは今後のバージョンアップにより"module"という名前に変更されるかもしれません'' |
| − | * '''Interface name:''' | + | * '''Interface name:''' ここにはインターフェース名を入力します。慣例により、インターフェース名の一文字目は"X"にします。このチュートリアルでは、インターフェース名を''XHelloworld''とします。 |
| − | * '''Published:''' specifies if the interface is published or not. The published notion is translated into a keyword in UNO-IDL language. Declaring a UNO-IDL type as published means that it will not change in future releases: we will check it because this is far too complex for our example | + | * '''Published:''' specifies if the interface is published or not. The published notion is translated into a keyword in UNO-IDL language. Declaring a UNO-IDL type as published means that it will not change in future releases: we will check it because this is far too complex for our example (訳者注: ここの段落の意味が分からないので原文のままにしておきます) |
| − | * '''Inherited interfaces:''' | + | * '''Inherited interfaces:''' これから生成されるインターフェースが継承する全てのインターフェースの一覧です。OpenOffice.org 1.1.x と 2.0では継承に関してUNO-IDLに変更点があるため、このプラグインは2.0よりも前のバージョンのOpenOffice.orgをサポートしていません。全てのUNO-IDLインターフェースは直接または間接的に''com::sun::star::uno::XInterface''を継承します。''XHelloworld''の場合はとても単純で、このインターフェースを一つだけ継承するだけです。 |
| − | ** '''"?" column:''' | + | ** '''"?" column:''' このインターフェースの継承が必須かどうかを指定します。このボックスにチェックを入れると、インターフェースを継承するかどうかは任意であり、このインターフェースが実装されないかもしれません。 |
| − | ** '''"Add" | + | ** '''"Add" と "Del" buttons:''' 継承されるインターフェースを追加したり、選択しているインターフェースを削除することができます。 |
[[Image:NewInterfacePage.png|center|UNO-IDL interface creation wizard]] | [[Image:NewInterfacePage.png|center|UNO-IDL interface creation wizard]] | ||
| − | + | "''Finish''"ボタンをクリックすると、''XHelloworld.idl''という新しいUNO-IDLファイルが生成され、UNO-IDLテキストエディタ起動し、生成されたファイルを表示しているはずです。それでは、''sayHello()''メソッドを追加し、新しいインターフェースを使えるようにしてみます。Javadocのようなコメントを挿入し、独自のコンポーネントAPIドキュメントを作ることができますが、このチュートリアルではそのことについては説明しません。このことについて詳しく知りたい場合は、リンク集の部分を見てください。 | |
| − | + | ''sayHello()''メソッドを追加するには、''XHelloworld''を以下のように変更するだけです。 | |
<code>[unoidl] | <code>[unoidl] | ||
| Line 134: | Line 127: | ||
};</code> | };</code> | ||
| − | + | これでインターフェースは正しく書けました。ちなみに、先ほど作成したサービスは''XInterface''インターフェースをエクスポートしていたことを覚えていますか?このサービスが新しく作った''XHelloworld''インタフェースもエクスポートするようにします。そのためには、''Helloworld.idl''ファイルをダブルクリックし、以下のように編集します。 | |
<code>[unoidl] | <code>[unoidl] | ||
| Line 149: | Line 142: | ||
</code> | </code> | ||
| − | + | サービスの定義の":"の後に続く、エクスポートするUNO-IDLインターフェースを変更したことに注意してください。OpenOffice.org 2.0からは、サービスは一つのインターフェースだけをエクスポートができなくなりましたが、このことについての詳しい解説は"Going further"の章を参照してください。また、インクルード行も変更しなければいけません。これはまさしくC++のプリプロセッサ制御文のように動作し、Javaのimport文と同じような働きをします。 | |
| + | ===実装=== | ||
| + | ちゃんと仕様が書けたでしょうか?しかし、まだ実装をしなければいけません。今のところ、このプラグインは十分な支援機能を備えておらず、あるコードをコピー&ペーストする必要がありますが、今後のバージョンではこれらのコードは自動的に生成されるようになっているかもしれません。このチュートリアルでは、EclipseでJavaのコードをどのように書くのかを前提にしています。そうでなければ、このチュートリアルが長くなりすぎてしまうので。 | ||
| − | === | + | ====コードを実装する==== |
| − | + | コードを実装するために、''HelloworldImpl''クラスを''org.openoffice.helloworld.comp''という実装パッケージに作成します。このクラスは''com.sun.star.lib.uno.helper.WeakBase''クラスを継承し、''XHelloworld''を実装するようにします。UNO-IDLインターフェースはJavaインターフェースに変換され、私たちはそのJavaインターフェースを実装します。UNO-IDLサービスとその実装の対応についてはこのチュートリアルの次の章で説明します。 | |
| + | ここで継承される''WeakBase''はその他のさまざまな基本的なインターフェースを実装するためのヘルパークラスです。これによりこのチュートリアルでは、OpenOffice.org BASICからコンポーネントのメソッドやプロパティにアクセスするために使われる''com.sun.star.lang.XTypeProvider''インターフェースさえ実装すればよくなります。 | ||
| − | + | クラス作成ウィザードにて"''Inherit abstract methods''"チェックボックスにチェックを入れておけば、''XHelloworld''の''sayHello()''メソッドが生成されるコードに追加されているのが分かるはずです。実装は、このメソッドの空白の本体さえ埋めればよいのです。というわけで、以下のようにコードを変更してください。 | |
| − | + | ||
| − | + | ||
| − | + | ||
| − | + | ||
| − | + | ||
<code>[java] | <code>[java] | ||
| Line 169: | Line 160: | ||
</code> | </code> | ||
| − | + | もちろん、もっと本格的なコンポーネントでではより複雑な仕様と実装になるでしょう。しかし、これはまだ最初の一歩の"Hello world"ですから。 | |
| + | ====The registration class==== | ||
| − | + | これで私たちのインターフェースは実装されたので、次にサービスと実装の関連付けをしなければいけません。この操作はこのプラグインの将来のバージョンで自動的に行われるようになるかもしれませんが、しかし今ここでは私たちは手動でやらなければいけません。以下のコードを''HellowordImpl''クラスにコピーしてください。ここではこのコードが何をするのかは説明しません。なぜなら、これは自動的に生成されるべきコードですし、OpenOffice.org開発者ガイドからコピペして整形しただけのものですから。もし興味があるのならば、このチュートリアルの"Going further"セクションを参照してください。ここでは、このクラスが"Registration class"と呼ばれるコードを含んでいることだけを覚えておいてください。この名前はコンポーネントをパッケージ化するときに必要になります。 | |
| − | + | ||
<code>[java] | <code>[java] | ||
| Line 207: | Line 198: | ||
</code> | </code> | ||
| − | |||
| − | |||
| + | ==コンポーネントをテストする== | ||
| + | コンポーネントをパッケージ化してテストをしましょう。今のところプラグインがこの機能をサポートしていないため、この操作は少し大変になります。以下の節では全てのコードの詳細を解説しません。これらの操作は将来のバージョンのプラグインで行われるべきだからです。しかし、今は手動でやるしかありません。 | ||
| − | == | + | ==コンポーネントをパッケージ化する== |
| − | + | パッケージコンポーネントはUNO-IDLレジストリ(''types.rdb'')とコンパイルされたクラスが入ったjaraファイルを圧縮したzipファイルです。これを生成するには、以下のようにAntビルドファイル(''build.xml'')を作成します。 | |
<code>[xml] | <code>[xml] | ||
| Line 263: | Line 254: | ||
</code> | </code> | ||
| − | + | zipファイルの説明を含んだ''manifest.xml''も作成しなければいけません。このファイルは記法については、OpenOffice.org開発者ガイドで詳細に述べられているので、ここでは解説しません。このXMLファイルを以下の内容で、プロジェクトのルートに作成してください。 | |
<code>[xml] | <code>[xml] | ||
| Line 279: | Line 270: | ||
</code> | </code> | ||
| − | + | これで、新しく作成したAntビルドファイルを実行し、''bin/ant/helloworld.uno.pkg''パッケージを生成する準備ができました。これを実行するには、メニューから'''ウィンドウ (Window) > ビューの表示 (Show View) > Ant'''を選択し、Antビューを表示してください。図12に示されているようなタブが表示されるはずです。このビューで、アリのアイコンをクリックして''build.xml''をAntファイルリストに追加してください。Antビューでpackageターゲットをダブルクリックすることで、これを実行できます。ビルド中の出力はEclipseのコンソールビューにも表示されます。 | |
[[Image:AntView.png|center|Ant build files view]] | [[Image:AntView.png|center|Ant build files view]] | ||
| − | + | コンソールが以下のような結果を出力したならば、コンポーネントは無事に生成されました。生成されたファイルを見るためには、リソースパースペクティブに切替えなければいけません。''bin/ant''フォルダー以下に生成されるファイルは、Javaパッケージ・エクスプローラには表示されないからです。 | |
<pre> | <pre> | ||
| Line 299: | Line 290: | ||
</pre> | </pre> | ||
| + | ===OpenOffice.orgマクロを使ったテスト=== | ||
| − | + | それではOpenOffice.orgマクロを使ってコンポーネントのテストをしましょう。これには2段階あります。 | |
| − | + | ||
| − | * | + | *パッケージマネージャにコンポーネントを追加します。OpenOffice.org 2.0ではメニューから'''ツール (tools) > パッケージマネージャ (package manager)'''を選択します。次に、"''マイパッケージ (My Packages)''"カテゴリを選択し、"''追加 (Add)''"ボタンをクリックします。プロジェクトにある''bin/ant/helloworld.uno.pkg''を開き、パッケージが有効化されるのを確認してください。 |
| − | * | + | *''sayHello()''メソッドを呼び出すマクロを書き、実行します。以下のコードを含むBasicマクロを作成して、実行してください。"''Hello UNO world from Java''"もしくは実装するときに返り値として指定した文字列が表示された小さなダイアログが表示されます。 |
| − | + | ||
<code>[oobas] | <code>[oobas] | ||
| Line 315: | Line 305: | ||
==Going further== | ==Going further== | ||
| − | + | この章は、このチュートリアルをよく読み、Javaやその他のプログラミング言語でUNOコンポーネントを作成する方法についてもっとよく知りたい人向けのものです。以下は、UNO開発者にとても便利なリンク集です。 | |
*[http://api.openoffice.org/docs/DevelopersGuide/DevelopersGuide.xhtml OpenOffice.org developer's guide] is a huge source of documentation for any OpenOffice.org developer. You should probably have a look at the chapters 3 and 4 for UNO components informations. | *[http://api.openoffice.org/docs/DevelopersGuide/DevelopersGuide.xhtml OpenOffice.org developer's guide] is a huge source of documentation for any OpenOffice.org developer. You should probably have a look at the chapters 3 and 4 for UNO components informations. | ||
| Line 327: | Line 317: | ||
==Public Documentation License Notice == | ==Public Documentation License Notice == | ||
| − | + | この文書は Public Documentation License Version 1.0 (以下、ライセンスと呼ぶ)の元で配布されています。あなたは、このライセンスに合意した場合にのみ、このドキュメントを利用することができます。ライセンスのコピーは | |
| + | [http://www.openoffice.org/licenses/PDL.html http://www.openoffice.org/licenses/PDL.html] | ||
| + | から入手可能です。 | ||
The Original Documentation is ''"UNO Java component creation explained"''. The Initial Writer of the Original Documentation is (JCA) Cédric Bosdonnat (C) 2006. All Rights Reserved. (Initial Writer contact(s): [mailto:cedricbosdo@openoffice.org cedricbosdo@openoffice.org].) | The Original Documentation is ''"UNO Java component creation explained"''. The Initial Writer of the Original Documentation is (JCA) Cédric Bosdonnat (C) 2006. All Rights Reserved. (Initial Writer contact(s): [mailto:cedricbosdo@openoffice.org cedricbosdo@openoffice.org].) | ||
| Line 333: | Line 325: | ||
日本語への翻訳は中本崇志([mailto:bluedwarf@openoffice.org bluedwarf@openoffice.org])が行いました。英語の原文は[[JavaEclipseTuto]]です。 | 日本語への翻訳は中本崇志([mailto:bluedwarf@openoffice.org bluedwarf@openoffice.org])が行いました。英語の原文は[[JavaEclipseTuto]]です。 | ||
| − | ''' | + | '''注意''': このAppendixはオリジナルドキュメントの注意書きと少し違うかもしれません。この文書に対する修正に関して、あなたは、オリジナルドキュメントのAppendixではなく、このAppendixを参照すべきです。 |
| + | |||
| + | [[Category:Eclipse]] | ||
| + | [[Category:Development]] | ||
| + | [[Category:Tutorial]] | ||
| + | [[Category:Java]] | ||
| + | [[Category:Uno]] | ||
Latest revision as of 14:53, 20 June 2010
Contents
EclipseでJavaコンポーネントを作る
導入
この文書は、UNO初心者向けにJavaコンポーネントを作成する方法を説明したチュートリアルで、EclipseとOpenOffice.org開発のためのプラグインを使います。どの手順も詳しく解説していますが、すでにUNOプログラムを作っている人は、次のページを斜め読みし、その後のEclipseのプラグインの使い方の説明をよく読んでください。
UNOコンポーネント
この章ではUNOコンポーネントの基本的なことについて説明します。もうすでにUNOについて知っているのであれば、ここは読み飛ばしてもかまいません。この章では、まず最初にコンポーネントとは何か、その主な役割が何かを説明します。次に、UNOコンポーネントを作るのにどのようなツールが必要かを説明し、それらのツールの用途を完全に理解する手助けをします。
コンポーネントの内部構造
Wikipedia (Fr)((英語のWikipediaにもありますが、私はフランス語の網羅的な説明のほうがよいと思います))には、"コンポーネントは所定のサービスを提供し、他のコンポーネントと通信をするシステムの構成要素"と書かれています。UNOの場合、コンポーネントはライブラリ(C++の共有ライブラリもしくはJavaのjarファイル)を含んだパッケージとして提供されます。UNOでは、コンポーネントは仕様と実装の2つの異なるものにより構成されています。
- 仕様: メタ言語によりコンポーネントが何をすべきかを規定している。UNOでは、このメタ言語はUNO-IDLと呼ばれ、Corba IDLによく似ている。コンポーネントを利用するためのAPIとして文書化されている部分が仕様である。従って、仕様はそれだけで完結しており、かつ、実装に依存しない。
- 実装: 実装とは、仕様により規定されたものを実現するためのコードである。C++、Java、Pythonなどのプログラミング言語のいずれかで実装することができる。実装はコンポーネントの内部にあり、他のコンポーネントから利用できない。
実装と実装の対応付けのために、コンポーネントはレジストリデータベース(訳者注:Windowsのレジストリとは違います)を使います。レジストリデータベースは2つあり、そのうちの1つであるtypes.rdbには全てのコンポーネントの仕様が記録され、もう片方のservices.rdbには実装と仕様の対応が記録されていて、後者は実装により生成されます。
コンポーネントの作成手順
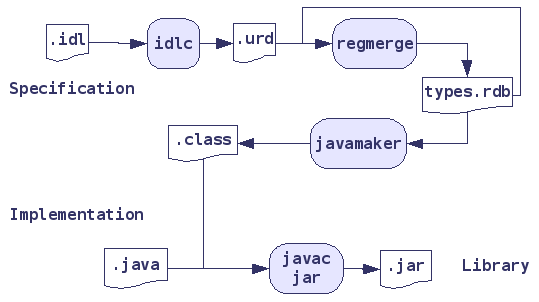
図1では、仕様とソースからどのようにしてコンポーネントが生成されているのかを図で表しています。見てのとおり、仕様はコンパイルされtypes.rdbレジストリデータベースに取り込まれています。仕様をJavaのクラス定義ファイルに変換するために、types.rdbレジストリデータベースからClassファイルが生成されます。そして、そのClassファイルと実装を合わせてjavaコンパイラーによりクラスファイルを生成します。これら全てのクラスファイルは、このチュートリアルの後で説明するマニフェストとともにjarファイルにまとめられます。これだけでは、OpenOffice.orgはコンポーネントを使えないので、types.rdbとjarファイルとまた別のマニフェストがzip圧縮され.uno.pkgにまとめられます。
この後で説明するEclipseのプラグインはこれらの操作の一部を隠蔽しますが、コンポーネントを作成する手順と次のステップで行うことを完全に理解するためには、この一連の流れを知っておく必要があります。
開発ツールのインストール
これから何をするのか大体理解したはずですので、これらの開発を支援するツールをセットアップしましょう。セットアップはとても簡単です。しかし、どの開発ツールもまだインストールされていないことを前提に説明するので、この前提条件が満たされていない場合は何か問題が起こるかもしれません。
OpenOffice.org
最初に作業用のOpenOffice.org2.0とSoftware Development Kit (SDK)を手に入れてください。最新のバージョンはOpenOffice.org download pagesで手に入れることができます。
もし、他の方法でOpenOffice.orgを手に入れた場合は、開発用パッケージもあることを確認してください。このチュートリルは、このプロジェクトのウエッブサイトから正規のOpenOffice.orgの配布物を使っていることを前提としています。
Eclipseとプラグイン
Eclipseのダウンロードページから、最新版のEclipse SDKをダウンロードしてください。EclipseとSDKが手に入ります。バイナリランタイムだけダウンロードしたいかもしれませんが、その場合もっと他のリンクをたどらなければいけません。Eclipseをダウンロードしたら、zip解凍するだけです。EclipseはJavaでプログラムするためのJavaプラグインがデフォルトで入っています。
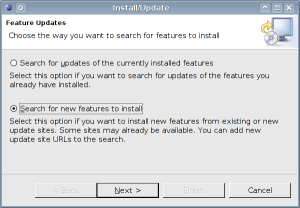
次に、Eclipseのソフトウェア更新機能を使って、Eclipse用のOpenOffice.org開発プラグインをインストールします。 次の順序でメニューを進んでください: ヘルプ > ソフトウェア更新 > 検索とインストール (Help > Software updates > Find and Install)と進むと図2の画面になるので、2番目のラジオボタンをチェックし、"次へ(Next)"ボタンをクリックします。
次の頁には、検索に含めるサイト (update sites)のリストが表示されます。これらはプラグインの説明やアーカイブのあるディレクトリのURLを表しています。"新規リモート・サイト (Add remote site)”ボタンをクリックするとリストに表示される名前とURLを入力するための小さなウィンドウが開きます。OpenOffice.orgプラグイン更新サイトは次の通りです。
http://cedric.bosdonnat.free.fr/ooeclipseintegration
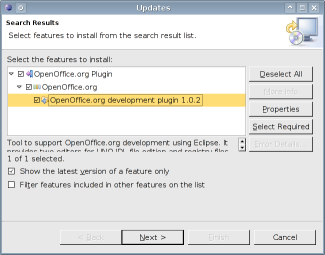
更新サイトのURLが正しく入力されたことを確認し、OpenOffice.orgプラグイン更新サイトのチェックボタンにチェックをしたら、"終了 (Finish)"ボタンをクリックしてください。図3の画面になります。図3のスクリーンショットのようにOpenOffice.orgプラグインを選択し、"次へ (Next)"をクリックし、この後はEclipseの指示にしたがってください。プラグインのライセンスに同意するよう求められ、デジタル署名されていないアーカイブをインストールするかどうかの確認を求められるでしょう。
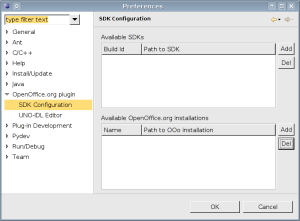
これでOpenOffice.orgプラグインはインストールできました。次に設定をしなければいけませんので、以下の手順に従ってください。まず、ウィンドウ (Window) > 設定... (Preferences...)メニューを選択し、Eclipseの設定ウィンドウを開きます。このウィンドウの左側のリストからOpenOffice.org plugin > SDK configurationを選択すると、図4のような画面が表示されます。
この画面では、OpenOffice.orgとSDKのパスを設定します。それでは、まず最初にSDKのパスを設定しましょう。SDKsリストの隣にある"Add"ボタンをクリックしてください。図5のような画面になるので、OpenOffice.org 2.0 SDKの位置を指定し確認してください。次に、別の"Add"ボタンをクリックして、同じようにしてOpenOffice.orgのパスを設定します。
これで、OpenOffice.orgプラグインの設定は完了したので、新しくコンポーネントを作ることができます。プラグインをインストールする過程で何か問題があれば、遠慮なくdev@api.openoffice.orgメーリングリストに報告してください。
新しいコンポーネントを作る
Eclipseプラグインでは、UNOコンポーネント一つにつきUNOプロジェクトを一つ作ります。なので、まず最初のステップとしてプロジェクトを作成します。そして、コンポーネントのUNO-IDL仕様を書いて実装する必要があります。
このチュートリアルでは"Hello World"コンポーネントを作ります。これから作ろうとしているコンポーネントは、命令をしたら、ただ"Hello"というだけのものです。
プロジェクトを作る
プラグインを使ってUNOプロジェクトを作成する方法はいくつかあります:
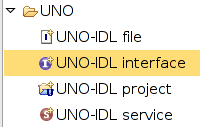
- 1つ目は、ファイル (File) > 新規 (New) > プロジェクト (Project)メニューを選択し、図6で示されているとおりにUNO > UNO-IDL projectという項目を選択する方法です。
- 2つ目は、図7で示されている、ツールバー上の星マークが付いた青いフォルダを表すアイコンをクリックする方法です。
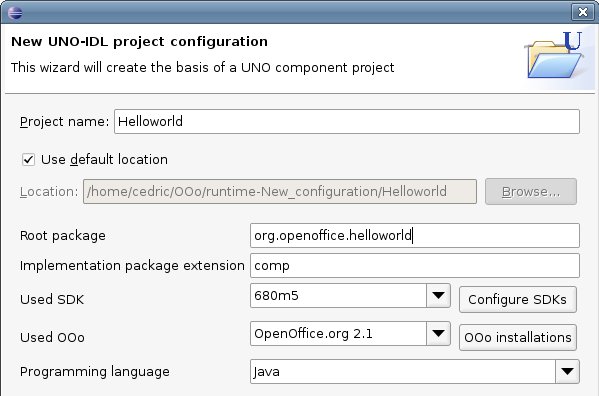
そしたら、次に図8にあるようなプロジェクトの設定項目を埋めなければいけません。それぞれの項目の説明と目的を以下に列挙したので、それを参考に項目を埋めてください。
- プロジェクト名 (Project name)はコンポーネント名になりますので、ここでは"Helloworld"と入力します。
- ディレクトリ ではどこにプロジェクトを作るのかを指定します。"デフォルトの使用 (Use default)"のチェックを外すことで、これを変えることができます。各Eclipseのプロジェクトのデフォルトの保存場所は、現在のEclipseのワークスペースディレクトリの中の、プロジェクト名と同じ名前のディレクトリになります。
- Root package はコンポーネントのモジュール名です。モジュール名は一般的に、ベンダー名(ここではorg.openoffice)とプロジェクト名(ここではhelloworld)という2つの部分からなります。
- Used SDK ではコンポーネントの開発にどのOpenOffice.org SDKを使用するのかを選択します。リストの中にはSDKは一つしかないと思いますが、先ほどの設定から、または"Configure SDKs"ボタンをクリックすることにより、別のバージョンのSDKを追加することもできます。
- Used OOo はコンポーネントの開発をするのに使用するOpenOffice.orgのバージョンを選択します。SDKと同じで、リストには一つしか項目がないはずですが、先ほどの設定から、または"OOo installations"ボタンをクリックすることにより、別のバージョンのOpenOffice.orgを選択することができます。
- Programming language ではコンポーネントを実装するプログラミング言語を選択します。今のところJavaしか使えませんが、C++やPythonにも対応する予定です。
それでは"終了 (Finish)"ボタンをクリックします。もしプロジェクト作成で何が起こるのか知したければ、"次へ (Next)"ボタンをクリックしてもらっても構いません。このチュートリアルでは、このウィザードが終わった後にどうなるのかを理解するために次へ進んでもらいます。次のステップでは、コンポーネントのための何も実体の無いサービスについて設定をしています。サービス名はデフォルトでプロジェクト名と同じになっていて、com.sun.star.uno.XInterfaceインターフェースを実装しています。しかし、"Browse"ボタンをクリックすると、既知のインターフェースのリストが表示されるので、これにより実装するインターフェースを変えることができます。
後でHelloworldサービスのために新しいインターフェースを定義するので、インターフェースはそのままにしておき、後で変えることにしましょう。
仕様を書く
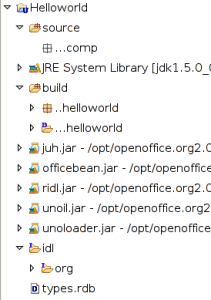
これで、図9のように新しいUNO-IDLプロジェクトができたはずです。このプロジェクトはいくつかのフォルダとファイルから構成されているので、中を見てみましょう。
- source: Javaで実装されたクラスをここに置きます。
- build: 一時的に生成されるファイルは全てここに置かれます。例えば、仕様ファイル(.idlファイル)をコンパイルして生成されるファイル(.urdファイル)とか、仕様に対応したクラスファイル(.classファイル)などです。
- idl: コンポーネントの仕様はここに置きます。
- types.rdb: UNOの型に関する情報が格納されたレジストリで、クラスファイルはこのレジストリから生成されます。
- JREとjarファイル: コンポーネントのクラスパスを表しています。これらは、パッケージ・エクスプローラー(Java packages explorer)に表示されているだけです。OpenOffice.orgのjarファイルは、プロジェクトに関連づけられたOpenOffie.orgのバージョンに対応して変わります。将来的にこれらのファイルは、ディスクスペース節約のためにユーザライブラリに置かれるようにする予定です。このチュートリアルでは他にもいくつかのフォルダを追加しますが、今のところこのプラグインがまだビルドプロセスの全てをサポートしているわけではないからです。しかし、プラグインの次のバージョンではこれらの機能を追加し、みなさんの手間を簡単にするつもりですので、安心してください。
さて、新しくXHelloworldインターフェースを書かなければいけません。このインターフェースではHelloというメッセージを返すsayHello()メソッドを定義します。インターフェース作成ウィザードを開くには、プロジェクトの適当なファイルを選択し、ファイル (File) > 新規 (New) > その他 (Other)メニューを選択し、さらに図10にあるようにUNO > UNO-IDL interfaceウィザードを選択します。UNOコンポーネントプロジェクトのファイルのどれかを選択していないと、次のボタンがクリックできないので注意してください。
新たに表示されたインターフェースウィザードでは、図11を見れば分かるとおり、いくつかの埋めなければいけないフィールドがあります。これらのフィールドの意味と効果を以下で説明します。
- Package: このインターフェースが追加されるUNO-IDLモジュールに対応しています。このフィールドを空白にしておけば、インターフェースは(ウィザードに表記されている)コンポーネントのルートモジュールに追加されます。このフィールドは今後のバージョンアップにより"module"という名前に変更されるかもしれません
- Interface name: ここにはインターフェース名を入力します。慣例により、インターフェース名の一文字目は"X"にします。このチュートリアルでは、インターフェース名をXHelloworldとします。
- Published: specifies if the interface is published or not. The published notion is translated into a keyword in UNO-IDL language. Declaring a UNO-IDL type as published means that it will not change in future releases: we will check it because this is far too complex for our example (訳者注: ここの段落の意味が分からないので原文のままにしておきます)
- Inherited interfaces: これから生成されるインターフェースが継承する全てのインターフェースの一覧です。OpenOffice.org 1.1.x と 2.0では継承に関してUNO-IDLに変更点があるため、このプラグインは2.0よりも前のバージョンのOpenOffice.orgをサポートしていません。全てのUNO-IDLインターフェースは直接または間接的にcom::sun::star::uno::XInterfaceを継承します。XHelloworldの場合はとても単純で、このインターフェースを一つだけ継承するだけです。
- "?" column: このインターフェースの継承が必須かどうかを指定します。このボックスにチェックを入れると、インターフェースを継承するかどうかは任意であり、このインターフェースが実装されないかもしれません。
- "Add" と "Del" buttons: 継承されるインターフェースを追加したり、選択しているインターフェースを削除することができます。
"Finish"ボタンをクリックすると、XHelloworld.idlという新しいUNO-IDLファイルが生成され、UNO-IDLテキストエディタ起動し、生成されたファイルを表示しているはずです。それでは、sayHello()メソッドを追加し、新しいインターフェースを使えるようにしてみます。Javadocのようなコメントを挿入し、独自のコンポーネントAPIドキュメントを作ることができますが、このチュートリアルではそのことについては説明しません。このことについて詳しく知りたい場合は、リンク集の部分を見てください。
sayHello()メソッドを追加するには、XHelloworldを以下のように変更するだけです。
[unoidl]
published interface XHelloworld{
interface com::sun::star::uno::XInterface;
/** is just saying hello to the caller.
      @return
          a string to say hello
   */
   string sayHello();
};
これでインターフェースは正しく書けました。ちなみに、先ほど作成したサービスはXInterfaceインターフェースをエクスポートしていたことを覚えていますか?このサービスが新しく作ったXHelloworldインタフェースもエクスポートするようにします。そのためには、Helloworld.idlファイルをダブルクリックし、以下のように編集します。
[unoidl]
- include <org/openoffice/helloworld/XHelloworld.idl>
module org {
   module openoffice {
       module helloworld {
           published service Helloworld : XHelloworld {
           };
       };
   };
};
サービスの定義の":"の後に続く、エクスポートするUNO-IDLインターフェースを変更したことに注意してください。OpenOffice.org 2.0からは、サービスは一つのインターフェースだけをエクスポートができなくなりましたが、このことについての詳しい解説は"Going further"の章を参照してください。また、インクルード行も変更しなければいけません。これはまさしくC++のプリプロセッサ制御文のように動作し、Javaのimport文と同じような働きをします。
実装
ちゃんと仕様が書けたでしょうか?しかし、まだ実装をしなければいけません。今のところ、このプラグインは十分な支援機能を備えておらず、あるコードをコピー&ペーストする必要がありますが、今後のバージョンではこれらのコードは自動的に生成されるようになっているかもしれません。このチュートリアルでは、EclipseでJavaのコードをどのように書くのかを前提にしています。そうでなければ、このチュートリアルが長くなりすぎてしまうので。
コードを実装する
コードを実装するために、HelloworldImplクラスをorg.openoffice.helloworld.compという実装パッケージに作成します。このクラスはcom.sun.star.lib.uno.helper.WeakBaseクラスを継承し、XHelloworldを実装するようにします。UNO-IDLインターフェースはJavaインターフェースに変換され、私たちはそのJavaインターフェースを実装します。UNO-IDLサービスとその実装の対応についてはこのチュートリアルの次の章で説明します。
ここで継承されるWeakBaseはその他のさまざまな基本的なインターフェースを実装するためのヘルパークラスです。これによりこのチュートリアルでは、OpenOffice.org BASICからコンポーネントのメソッドやプロパティにアクセスするために使われるcom.sun.star.lang.XTypeProviderインターフェースさえ実装すればよくなります。
クラス作成ウィザードにて"Inherit abstract methods"チェックボックスにチェックを入れておけば、XHelloworldのsayHello()メソッドが生成されるコードに追加されているのが分かるはずです。実装は、このメソッドの空白の本体さえ埋めればよいのです。というわけで、以下のようにコードを変更してください。
[java]
public String sayHello() {
return "Hello UNO world from Java";
}
もちろん、もっと本格的なコンポーネントでではより複雑な仕様と実装になるでしょう。しかし、これはまだ最初の一歩の"Hello world"ですから。
The registration class
これで私たちのインターフェースは実装されたので、次にサービスと実装の関連付けをしなければいけません。この操作はこのプラグインの将来のバージョンで自動的に行われるようになるかもしれませんが、しかし今ここでは私たちは手動でやらなければいけません。以下のコードをHellowordImplクラスにコピーしてください。ここではこのコードが何をするのかは説明しません。なぜなら、これは自動的に生成されるべきコードですし、OpenOffice.org開発者ガイドからコピペして整形しただけのものですから。もし興味があるのならば、このチュートリアルの"Going further"セクションを参照してください。ここでは、このクラスが"Registration class"と呼ばれるコードを含んでいることだけを覚えておいてください。この名前はコンポーネントをパッケージ化するときに必要になります。
[java]
/** is used by the registration methods to return the implemented
*  service name.
*/
final static String __serviceName = "org.openoffice.helloworld.Helloworld";
public static XSingleServiceFactory __getServiceFactory(
               String implName,
               XMultiServiceFactory multiFactory,
               XRegistryKey regKey){
XSingleServiceFactory xSingleServiceFactory = null;
   if (implName.equals(HelloworldImpl.class.getName())) {
       xSingleServiceFactory = FactoryHelper.getServiceFactory(
                HelloworldImpl.class, __serviceName,
                multiFactory, regKey);
   }
return xSingleServiceFactory;
}
public static boolean __writeRegistryServiceInfo(
XRegistryKey regKey) {
   boolean b = FactoryHelper.writeRegistryServiceInfo(
                   HelloworldImpl.class.getName(),
                   __serviceName, regKey);
   return b;
}
コンポーネントをテストする
コンポーネントをパッケージ化してテストをしましょう。今のところプラグインがこの機能をサポートしていないため、この操作は少し大変になります。以下の節では全てのコードの詳細を解説しません。これらの操作は将来のバージョンのプラグインで行われるべきだからです。しかし、今は手動でやるしかありません。
コンポーネントをパッケージ化する
パッケージコンポーネントはUNO-IDLレジストリ(types.rdb)とコンパイルされたクラスが入ったjaraファイルを圧縮したzipファイルです。これを生成するには、以下のようにAntビルドファイル(build.xml)を作成します。
[xml]
<?xml version="1.0"?>
<project name="Helloworld" default="package">
   <description>
           This ant file is only to package the Helloworld component
   </description>
<property name="out.path" value="bin/ant"/>
   <target name="package" depends="purge">

   	<mkdir dir="${out.path}" />
   	<copy todir="${out.path}" file="types.rdb">
   		<fileset dir="bin">
   			<include name="**/*.class" />
   		</fileset>
   		<fileset dir="build">
<include name="**/*.class" />
   		</fileset>
   	</copy>

   	<jar basedir="${out.path}" includes="**/*"
   		excludesfile="types.rdb"
   		destfile="${out.path}/Helloworld.jar">
   		<manifest>
   			<attribute name="RegistrationClassName"
   				value="org.openoffice.helloworld.comp.HelloworldImpl"/>
   		</manifest>
   	</jar>

   	<mkdir dir="${out.path}/META-INF" />
   	<copy todir="${out.path}/META-INF" file="manifest.xml" />

   	<zip destfile="${out.path}/helloworld.uno.pkg" basedir="${out.path}"
   		includes="Helloworld.jar,META-INF/manifest.xml,types.rdb" />

   </target>
   <target name="purge">
       <delete dir="${out.path}" />
   </target>
</project>
zipファイルの説明を含んだmanifest.xmlも作成しなければいけません。このファイルは記法については、OpenOffice.org開発者ガイドで詳細に述べられているので、ここでは解説しません。このXMLファイルを以下の内容で、プロジェクトのルートに作成してください。
[xml]
<?xml version="1.0" encoding="UTF-8"?>
<!DOCTYPE manifest:manifest PUBLIC "-//OpenOffice.org//DTD Manifest 1.0//EN" "Manifest.dtd">
<manifest:manifest>
  <manifest:file-entry
          manifest:full-path="Helloworld.jar"
          manifest:media-type="application/vnd.sun.star.uno-component;type=Java"/>
  <manifest:file-entry
          manifest:full-path="types.rdb"
          manifest:media-type="application/vnd.sun.star.uno-typelibrary;type=RDB"/>
</manifest:manifest>
これで、新しく作成したAntビルドファイルを実行し、bin/ant/helloworld.uno.pkgパッケージを生成する準備ができました。これを実行するには、メニューからウィンドウ (Window) > ビューの表示 (Show View) > Antを選択し、Antビューを表示してください。図12に示されているようなタブが表示されるはずです。このビューで、アリのアイコンをクリックしてbuild.xmlをAntファイルリストに追加してください。Antビューでpackageターゲットをダブルクリックすることで、これを実行できます。ビルド中の出力はEclipseのコンソールビューにも表示されます。
コンソールが以下のような結果を出力したならば、コンポーネントは無事に生成されました。生成されたファイルを見るためには、リソースパースペクティブに切替えなければいけません。bin/antフォルダー以下に生成されるファイルは、Javaパッケージ・エクスプローラには表示されないからです。
Buildfile: /home/chef/develOOoppement/eclipse/Helloworld/build.xml
purge:
package:
    [mkdir] Created dir: /home/chef/develOOoppement/eclipse/Helloworld/bin/ant
     [copy] Copying 4 files to /home/chef/develOOoppement/eclipse/Helloworld/bin/ant
      [jar] Building jar: /home/chef/develOOoppement/eclipse/Helloworld/bin/ant/Helloworld.jar
    [mkdir] Created dir: /home/chef/develOOoppement/eclipse/Helloworld/bin/ant/META-INF
     [copy] Copying 1 file to /home/chef/develOOoppement/eclipse/Helloworld/bin/ant/META-INF
      [zip] Building zip: /home/chef/develOOoppement/eclipse/Helloworld/bin/ant/helloworld.uno.pkg
BUILD SUCCESSFUL
Total time: 1 second
OpenOffice.orgマクロを使ったテスト
それではOpenOffice.orgマクロを使ってコンポーネントのテストをしましょう。これには2段階あります。
- パッケージマネージャにコンポーネントを追加します。OpenOffice.org 2.0ではメニューからツール (tools) > パッケージマネージャ (package manager)を選択します。次に、"マイパッケージ (My Packages)"カテゴリを選択し、"追加 (Add)"ボタンをクリックします。プロジェクトにあるbin/ant/helloworld.uno.pkgを開き、パッケージが有効化されるのを確認してください。
- sayHello()メソッドを呼び出すマクロを書き、実行します。以下のコードを含むBasicマクロを作成して、実行してください。"Hello UNO world from Java"もしくは実装するときに返り値として指定した文字列が表示された小さなダイアログが表示されます。
[oobas]
Sub TestHelloworld
	helloworld = createUnoService("org.openoffice.helloworld.Helloworld")
	print helloworld.sayHello()
End Sub
Going further
この章は、このチュートリアルをよく読み、Javaやその他のプログラミング言語でUNOコンポーネントを作成する方法についてもっとよく知りたい人向けのものです。以下は、UNO開発者にとても便利なリンク集です。
- OpenOffice.org developer's guide is a huge source of documentation for any OpenOffice.org developer. You should probably have a look at the chapters 3 and 4 for UNO components informations.
- OOo Java reference is the UNO binding for Java reference.
- OOo C++ reference is the UNO binding for C++ reference.
- OOo Developer's Wiki is the wiki for all the OpenOffice.org developers. It contains very useful informations even for people who just begin with UNO.
- http://udk.openoffice.org/common/man/draft/multinherit.html for further informations on what changes in UNO-IDL between OpenOffice.org 1.1.x and 2.0
- Autodoc IDL reference is the reference for javadoc like comments in UNO-IDL files.
- Autodoc C++ documentation is the reference for javadoc like comments in C++ components.
- URE C++ application tutorial explains how to create a C++ application based on the URE, that is a UNO C++ component that does not need OpenOffice.org.
Public Documentation License Notice
この文書は Public Documentation License Version 1.0 (以下、ライセンスと呼ぶ)の元で配布されています。あなたは、このライセンスに合意した場合にのみ、このドキュメントを利用することができます。ライセンスのコピーは http://www.openoffice.org/licenses/PDL.html から入手可能です。
The Original Documentation is "UNO Java component creation explained". The Initial Writer of the Original Documentation is (JCA) Cédric Bosdonnat (C) 2006. All Rights Reserved. (Initial Writer contact(s): cedricbosdo@openoffice.org.)
日本語への翻訳は中本崇志(bluedwarf@openoffice.org)が行いました。英語の原文はJavaEclipseTutoです。
注意: このAppendixはオリジナルドキュメントの注意書きと少し違うかもしれません。この文書に対する修正に関して、あなたは、オリジナルドキュメントのAppendixではなく、このAppendixを参照すべきです。
