Difference between revisions of "RU/documentation/ooo3 user guides/writer guide/the writer interface"
George Yves (Talk | contribs) (→Toolbars) |
George Yves (Talk | contribs) (→Moving toolbars) |
||
| Line 41: | Line 41: | ||
Отсоединяемая панель инструментов может быть превращена в плавающую или пристыкована либо к краю экрана, либо к другим панелям в окне документа. Чтобы переместить плавающую панель инструментов, перетащите её за строку заголовка. Подробности в разделе [[#Перемещение панели инструментов|Перемещение панели инструментов]]. | Отсоединяемая панель инструментов может быть превращена в плавающую или пристыкована либо к краю экрана, либо к другим панелям в окне документа. Чтобы переместить плавающую панель инструментов, перетащите её за строку заголовка. Подробности в разделе [[#Перемещение панели инструментов|Перемещение панели инструментов]]. | ||
| − | === | + | === Перемещение панели инструментов === |
| − | + | Чтобы переместить пристыкованную панель инструментов, поместите указатель мыши на метку-манипулятор панели, нажмите левую кнопку мыши, перетащите панель в новое место и потом отпустите кнопку мыши. | |
| − | [[Image:Undock-toolbar3.png|thumb|none|500px|'' | + | [[Image:Undock-toolbar3.png|thumb|none|500px|''Перемещение пристыкованной панели инструментов'']] |
| − | + | Чтобы переместить плавающую панель инструментов, нажмите на её строку заголовка и перетащите панель в новое место. | |
| − | [[Image:Floating-toolbar3.png|thumb|none|500px|'' | + | [[Image:Floating-toolbar3.png|thumb|none|500px|''Перемещение плавающей панели инструментов'']] |
=== Floating toolbars === | === Floating toolbars === | ||
Revision as of 14:41, 12 June 2010
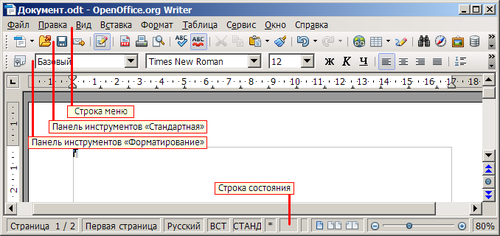
Ниже показана основная рабочая область Writer.
Меню
Строка меню расположена в верхней части окна Writer, сразу под строкой заголовка. Если в строке выбрать одно из меню, то раскроется подменю с соответствующими командами.
- Файл содержит команды, применяемые ко всему документу, например: Открыть, Сохранить, Экспорт в PDF.
- Правка содержит команды для редактирования документов, например: Отменить и Найти и заменить.
- Вид содержит команды для управления отображением документа, например: Масштаб и Режим веб-страницы.
- Вставка содержит команды для вставки в документ таких элементов, как верхние или нижние колонтитулы, и рисунки.
- Формат содержит команды для форматирования contains внешнего вида документа, например: Стили, Абзац и Маркеры и нумерация.
- Таблица содержит все команды, необходимые для вставки и редактирования таблиц в текстовом документе.
- Сервис содержит такие функции, как Орфография и грамматика, Настройка и Параметры.
- Окно содержит команды управления окном документа.
- Справка содержит ссылки на файлы помощи, а также информацию о программе. Подробности в разделе Получение справки.
Панели инструментов
Окно Writer содержит разные типы панелей инструментов: пристыкованные, плавающие и отсоединяемые. Пристыкованные панели можно передвинуть или превратить в плавающие, а плавающие панели, в свою очередь, можно пристыковать.
Самая верхняя пристыкованная панель инструментов (положение по умолчанию) называется Стандартная. Стандартная панель инструментов одинакова для всех приложений OpenOffice.org.
Вторая сверху панель инструментов (положение по умолчанию) называется Форматирование. Это контекстно-зависимая панель, содержание которой зависит от местоположение курсора или выделения в документе. Например, если курсор находится на графическом элементе, то панель Форматирование будет содержать инструменты форматирования графических объектов; если же курсор будет находиться в тексте документа, то панель будет содержать инструменты форматирования текста.
Отображение или скрытие панели инструментов
Чтобы отобразить или скрыть панель инструментов, выберите меню Вид > Панели инструментов, затем щёлкните по названию панели в раскрывшемся списке. Активная панель инструментов имеет отметку возле своего названия. Отсоединённые панели инструментов не перечисляются в меню Вид.
Подменю и отсоединяемые панели инструментов
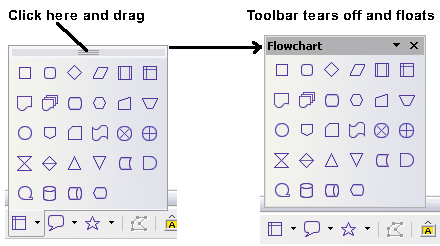
Если какой-либо значок на панели инструментов имеет справа изображение небольшого треугольника, то это значит, что щелчок по кнопке с таким значком откроет подменю, отсоединяемую панель инструментов или иной элемент интерфейса для выбора функций.
Отсоединяемая панель инструментов может быть превращена в плавающую или пристыкована либо к краю экрана, либо к другим панелям в окне документа. Чтобы переместить плавающую панель инструментов, перетащите её за строку заголовка. Подробности в разделе Перемещение панели инструментов.
Перемещение панели инструментов
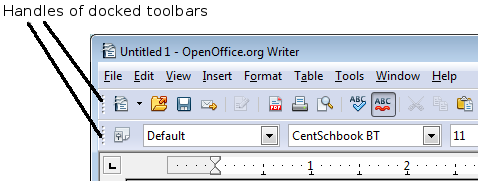
Чтобы переместить пристыкованную панель инструментов, поместите указатель мыши на метку-манипулятор панели, нажмите левую кнопку мыши, перетащите панель в новое место и потом отпустите кнопку мыши.
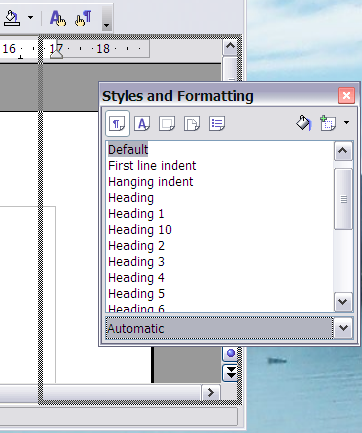
Чтобы переместить плавающую панель инструментов, нажмите на её строку заголовка и перетащите панель в новое место.
Floating toolbars
Writer includes several additional context-sensitive toolbars, whose defaults appear as floating toolbars in response to the cursor’s current position or selection. For example, when the cursor is in a table, a floating Table toolbar appears, and when the cursor is in a numbered or bullet list, the Bullets and Numbering toolbar appears. You can dock these toolbars to the top, bottom, or side of the window, if you wish (see Moving toolbars).
Docking/floating windows and toolbars
Toolbars and some windows, such as the Navigator and the Styles and Formatting window, are dockable. You can move, resize, or dock them to an edge.
To dock a window, do one of the following:
- Click on the title bar of the floating window and drag it to the side until you see the outline of a box appear in the main window and then release the window. This method depends on your system’s window manager settings, so it may not work for you.
- Hold down the Control key and double-click on a vacant part of the floating window to dock it in its last position. If that does not work, try double-clicking without using the Control key.
To undock a window, hold down the Control key and double-click on a vacant part of the docked window.
Customizing toolbars
You can customize toolbars in several ways, including choosing which icons are visible and locking the position of a docked toolbar. You can also add icons and create new toolbars, as described in Chapter 17.
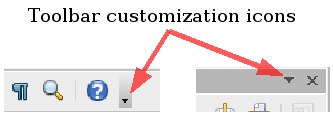
To access a toolbar’s customization options, use the down-arrow at the end of the toolbar or on its title bar.
To show or hide icons defined for the selected toolbar, choose Visible Buttons from the drop-down menu. Visible icons have a checkmark next to them. Click on icons to select or deselect them.
You can quickly access many menu functions by right-clicking on a paragraph, graphic, or other object. A context menu will pop up. Often the context menu is the fastest and easiest way to reach a function. If you’re not sure where in the menus or toolbars a function is located, you can often find it by right-clicking.
Rulers
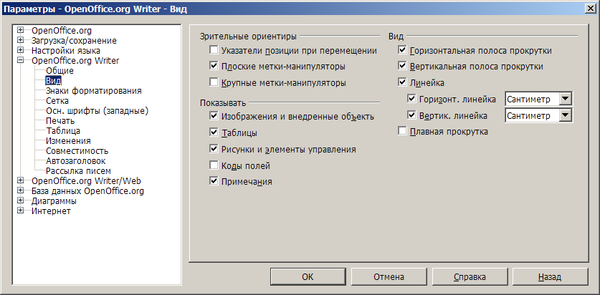
To show or hide rulers, choose View > Ruler. To enable the vertical ruler, choose Tools > Options > OpenOffice.org Writer > View and select Vertical ruler.
Status bar
The Writer status bar provides information about the document and convenient ways to quickly change some document features. From left to right, the fields are as follows.
Page number
Shows the current page number, the sequence number of the current page (if different), and the total number of pages in the document. For example, if you restarted page numbering at 1 on the third page, its page number is 1 and its sequence number is 3.
If any bookmarks have been defined in the document, a right-click on this field pops up a list of bookmarks; click on the required one.
To jump to a specific page in the document, double-click in this field. The Navigator opens (see page 13). Click in the Page Number field and type the required page number.
Page style
Shows the style of the current page. To change the page style, right-click on this field. A list of page styles pops up; choose a different style by clicking on it.
To edit the page style, double-click on this field. The Page Style dialog box opens.
Language
Shows the language for the selected text.
Click to open a menu where you can choose another language for the selected text or for the paragraph where the cursor is located. You can also choose None to exclude the text from spellchecking or choose More... to open the Character dialog box.
Insert mode
Click to toggle between Insert and Overwrite modes when typing.
Selection mode
Click to toggle between STD (Standard), EXT (Extend), ADD (Add) and BLK (Block) selection. EXT is an alternative to Shift+click when selecting text. See Chapter 3 (Working with Text) for more information about ADD and BLK.
Digital signature
If the document has been digitally signed, an icon ![]() shows in this part of the Status bar. You can double-click the icon to view the certificate.
shows in this part of the Status bar. You can double-click the icon to view the certificate.
Section or object information
When the cursor is on a section or object (such as a picture), information about that item appears in this field. Double-clicking in this area opens a relevant dialog box.
| Object | Information shown | Dialog box opened |
| Picture | Size and position | Format Picture |
| List item | Level and list style | Bullets and Numbering (Note 1) |
| Heading | Outline numbering level | Bullets and Numbering (Note 1) |
| Table | Name or number and cell reference of cursor | Table Format |
| Section | Name of section | Edit Sections |
| Other | (Blank) | Fields (Cross References page) |
Note 1: If a list style was used with a list item or heading, no dialog box appears.
View layout
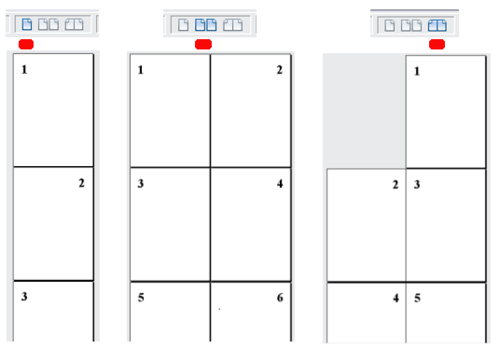
Click the appropriate icon to change between single page, side-by-side, and book layout views. You can edit the document in any view.
Zoom
To change the view magnification, drag the Zoom slider or click on the + and – signs. You can also right-click on the zoom level percentage to select a magnification value. Zoom interacts with the selected view layout to determine how many pages are visible in the document window.
Changing document views
Writer has several ways to view a document: Print Layout, Web Layout, and Full Screen. To access these and other choices, go to the View menu and click on the required view. (When in Full Screen view, press the Esc key to return to either Print or Web Layout view.)
When in Web Layout, you can use the Zoom slider on the Status bar, as described above. In Print Layout, you can use both the Zoom slider and the View Layout icons on the Status bar.
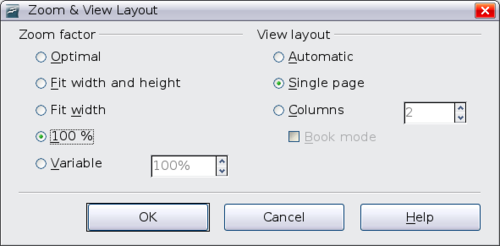
You can also choose View > Zoom from the menu bar to display the Zoom & View Layout dialog box, where you can set the same options as on the Status bar. In Web Layout view, most of the choices are not available.
Footnotes
Template:RU/documentation/signtransyear
| Content on this page is licensed under the Creative Common Attribution 3.0 license (CC-BY). |
