Difference between revisions of "QA/test automation guide"
(→Run Testing in Terminal) |
m |
||
| (59 intermediate revisions by 4 users not shown) | |||
| Line 1: | Line 1: | ||
| − | + | {{DISPLAYTITLE: Getting Started with Test Automation}} | |
| + | [[Category: Quality Assurance]] | ||
| + | [[Category: TestAutomation]] | ||
| − | |||
| − | |||
| − | + | == Introduction == | |
| − | + | Two kind of approaches is supported by Apache OpenOffice. | |
| − | + | *GUI Testing: Simulating a common user to perform testing. It depends on a Java library named VCLAuto, which does testing like the old [[VCLTesttool]]. It can easily integrates with JUnit. VCLAuto provides APIs to generate user interface events such as keystrokes and mouse clicks, do GUI actions and get information from the GUI to validate functions. | |
| − | + | *UNO API Testing: Use UNO API to verify functions. | |
| − | + | == Notice == | |
| + | There are some reasons for test failures, so please [[QA/test_env|prepare your testing machine]] before running test. | ||
| − | + | == Getting the source code == | |
| − | + | Anyone can checkout source code from our Subversion repository. Run the following command. | |
| − | + | <source lang="bash"> | |
| − | + | svn co https://svn.apache.org/repos/asf/openoffice/trunk/test/ test | |
| − | + | </source> | |
| − | + | If you are not familiar with Subversion, see our [https://openoffice.apache.org/svn-basics.html Subversion Basics] for more information. | |
| − | + | ||
| − | + | ||
| − | + | ||
| − | + | ||
| − | + | ||
| + | == Getting started with Eclipse == | ||
=== Prerequisites === | === Prerequisites === | ||
| − | Eclipse Java IDE: [ | + | *Eclipse Java IDE: [https://www.eclipse.org/downloads/packages/ Eclipse Juno(4.2) IDE for Java Developers] or above.<br /> |
| + | *Apache OpenOffice | ||
| − | === Setup | + | === Setup project === |
| + | '''Step 1.''' Open Eclipse, click menu "File->Import…", and then select "General->Existing Projects into Workspace".<br /> | ||
| + | [[File:test_automation_guide_1.png]]<br /> | ||
| + | '''Step 2.''' Click next, set "Select root directory" to the source code directory, and then check the following projects.<br /> | ||
| + | '''testcommon''': The project includes the common test utilities and low-level implementation to do GUI testing | ||
| + | '''testgui''': The project includes the GUI testing scripts. | ||
| + | '''testuno''': The project includes the UNO API testing scripts. | ||
| + | [[File:test_automation_guide_2.png]]<br /> | ||
| + | '''Step 3.''' Click "Finish" to import the projects. | ||
| − | + | '''Step 4.''' Click menu "Window->Preferences" ("Eclipse->Preferences" on Mac) and then select "Java->Build Path->Classpath Variables" page.<br /> | |
| − | + | [[File:test_automation_guide_10.png]]<br /> | |
| − | + | Click "New" to create one new variable "'''openoffice.home'''", and set its value to Apache OpenOffice installation directory.<br /> | |
| − | + | [[File:test_automation_guide_11.png]]<br /> | |
| − | '' | + | {{Note| '''The default installation directory of Apache OpenOffice'''<br /> |
| − | + | Mac OS X: "''/Applications/OpenOffice.app/Contents"''<br /> | |
| − | + | Linux: "''/opt/openoffice3''"<br /> | |
| + | Windows: "''C:/Program Files/OpenOffice 3''"<br /> | ||
| + | Windows 64b: "''C:/Program Files (x86)/OpenOffice 3''" | ||
| + | }} | ||
| + | Click "OK" to close "New Variable Entry"dialog. Then click "OK" button of preferences dialog. A message box pops up. Click "Yes".<br /> | ||
| + | [[File:test_automation_guide_12.png]]<br /> | ||
| − | == Run | + | === Run testing === |
| + | '''Step 1.''' Select one test class. e.g. testcase.gui.AOOTest, and then click "Run" on the toolbar to start testing. <br /> | ||
| + | [[File:test_automation_guide_13.png]]<br /> | ||
| + | When testing is finished, JUnit view will show the result.<br /> | ||
| + | [[File:test_automation_guide_14.png]]<br /> | ||
| + | You also can select one package, click "Run", and then choose "JUnit test" to run all test classes under it. | ||
| − | === | + | == Getting started with command line == |
| − | + | ||
| − | + | ||
| − | + | ||
| − | === | + | === Prerequisites === |
| − | + | *JDK: [http://java.sun.com/j2se/1.5/ JDK 1.5], [http://java.sun.com/javase/6/ JDK 1.6] or above.<br /> | |
| − | JDK: [http://java.sun.com/j2se/1.5/ JDK 1.5], [http://java.sun.com/javase/6/ JDK 1.6] or above.<br /> | + | *Ant: [http://ant.apache.org/bindownload.cgi Apache Ant 1.8.2] or above. |
| − | Ant: [http://ant.apache.org/bindownload.cgi Apache Ant 1.8.2] or above. | + | *JUnit: [https://github.com/KentBeck/junit/downloads JUnit 4.10] or above. For lazy people, if internet is available, it can be automatically installed during testing. |
| − | ''' | + | === Run testing === |
| + | '''As a developer, how to run testing against an OpenOffice built by me?''' <br /> | ||
| + | It's easy for developers to run testing after building OpenOffice. One thing you need to do is to make sure you run the commands in the build environment. The script will automatically install your build and then start testing. e.g. | ||
<source lang="bash"> | <source lang="bash"> | ||
| − | cd | + | cd main |
| − | + | source MacOSXX86Env.Set.sh | |
| + | cd ../test && ant | ||
</source> | </source> | ||
| − | ''' | + | '''As a normal user, how to run testing against an installed OpenOffice?'''<br /> |
| − | + | Firstly compile the project with the command under test module. | |
<source lang="bash"> | <source lang="bash"> | ||
| − | + | ant -Dopenoffice.home="OpenOffice installation directory" compile | |
| − | + | ||
</source> | </source> | ||
| − | + | Then start testing with the command "run". | |
| − | + | e.g. Run all test classes under package bvt ("Build Verification Testing") | |
| − | + | <source lang="bash"> | |
| − | + | run -Dopenoffice.home="/Applications/OpenOffice.app/Contents" -tp bvt | |
| − | + | ||
| − | + | ||
| − | + | ||
| − | + | ||
| − | + | ||
| − | + | ||
| − | + | ||
| − | + | ||
| − | + | ||
| − | + | ||
| − | + | ||
| − | + | ||
| − | + | ||
| − | <source lang=" | + | |
| − | + | ||
| − | + | ||
| − | + | ||
| − | + | ||
| − | + | ||
| − | + | ||
| − | + | ||
| − | + | ||
| − | + | ||
| − | + | ||
| − | + | ||
| − | + | ||
| − | + | ||
| − | + | ||
| − | + | ||
| − | + | ||
| − | + | ||
| − | + | ||
| − | + | ||
| − | + | ||
| − | + | ||
| − | + | ||
| − | + | ||
| − | + | ||
| − | + | ||
| − | + | ||
| − | + | ||
| − | + | ||
| − | + | ||
| − | + | ||
| − | + | ||
| − | + | ||
| − | + | ||
| − | + | ||
| − | + | ||
| − | + | ||
| − | + | ||
| − | + | ||
| − | + | ||
| − | + | ||
| − | + | ||
| − | + | ||
| − | + | ||
| − | + | ||
| − | + | ||
| − | + | ||
| − | + | ||
| − | + | ||
| − | + | ||
| − | + | ||
| − | + | ||
| − | + | ||
| − | + | ||
</source> | </source> | ||
| − | + | e.g. Run the given test classes | |
| − | + | <source lang="bash"> | |
| − | <source lang=" | + | run -Dopenoffice.home="/Applications/OpenOffice.app/Contents" -tc bvt.gui.BasicFunctionTest |
| − | + | ||
| − | // | + | |
| − | + | ||
| − | + | ||
| − | + | ||
</source> | </source> | ||
| + | On Linux use e.g. -Dopenoffice.home="/opt/openoffice4/program" instead. | ||
| − | |||
| − | |||
| − | |||
| − | |||
| − | |||
| − | |||
| − | |||
| − | |||
| − | |||
| − | |||
| − | |||
| − | |||
| − | + | ''' Where to get the testing result? ''' | |
| − | ''' | + | |
| − | + | By default, the testing output is stored in "test/testspace/output***". Open "test/testspace/output/result.html" in your browser to see the testing report.<br /> | |
| − | + | [[File:test_automation_report.png]]<br /> | |
| − | + | ||
| − | + | ||
| − | Open " | + | |
| − | + | ||
| − | + | ||
| − | + | ||
| − | [[File: | + | |
| − | + | ||
| − | + | ||
| − | + | ||
| − | + | ||
| − | + | Special stuff in the output directory. | |
| − | + | result.xml: Test result in HTML. | |
| + | result.html: Test result in XML. | ||
| + | screenshot/: Screenshot pictures when test assert is failed. | ||
| − | == | + | == Next == |
| − | + | Now, all things have been ready for developing new test code. If you are interested, please read [[QA/dev_gui_testing|GUI Testing Development]] and [[QA/dev_api_testing|UNO API Testing Development]] to get more information. | |
| − | + | ||
| − | + | ||
| − | + | ||
| − | + | ||
| − | + | ||
| − | + | ||
| − | + | ||
| − | + | ||
| − | + | ||
| − | + | ||
| − | + | ||
Latest revision as of 15:56, 14 September 2021
Contents
Introduction
Two kind of approaches is supported by Apache OpenOffice.
- GUI Testing: Simulating a common user to perform testing. It depends on a Java library named VCLAuto, which does testing like the old VCLTesttool. It can easily integrates with JUnit. VCLAuto provides APIs to generate user interface events such as keystrokes and mouse clicks, do GUI actions and get information from the GUI to validate functions.
- UNO API Testing: Use UNO API to verify functions.
Notice
There are some reasons for test failures, so please prepare your testing machine before running test.
Getting the source code
Anyone can checkout source code from our Subversion repository. Run the following command.
svn co https://svn.apache.org/repos/asf/openoffice/trunk/test/ test
If you are not familiar with Subversion, see our Subversion Basics for more information.
Getting started with Eclipse
Prerequisites
- Eclipse Java IDE: Eclipse Juno(4.2) IDE for Java Developers or above.
- Apache OpenOffice
Setup project
Step 1. Open Eclipse, click menu "File->Import…", and then select "General->Existing Projects into Workspace".
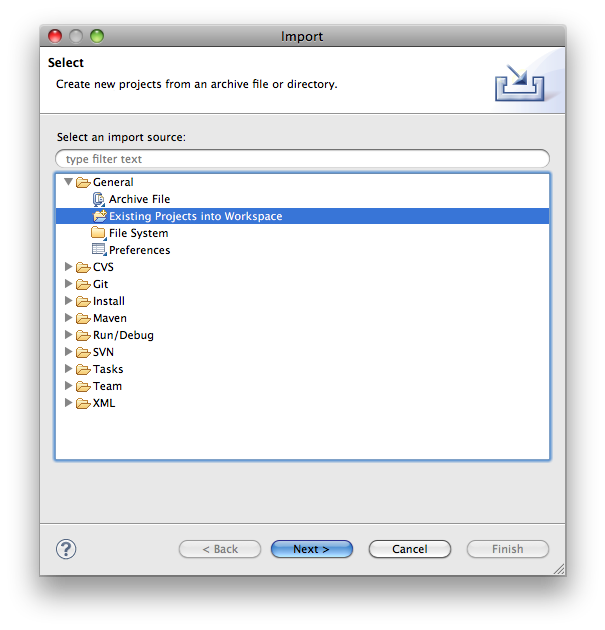
Step 2. Click next, set "Select root directory" to the source code directory, and then check the following projects.
testcommon: The project includes the common test utilities and low-level implementation to do GUI testing
testgui:  The project includes the GUI testing scripts.
testuno:  The project includes the UNO API testing scripts.
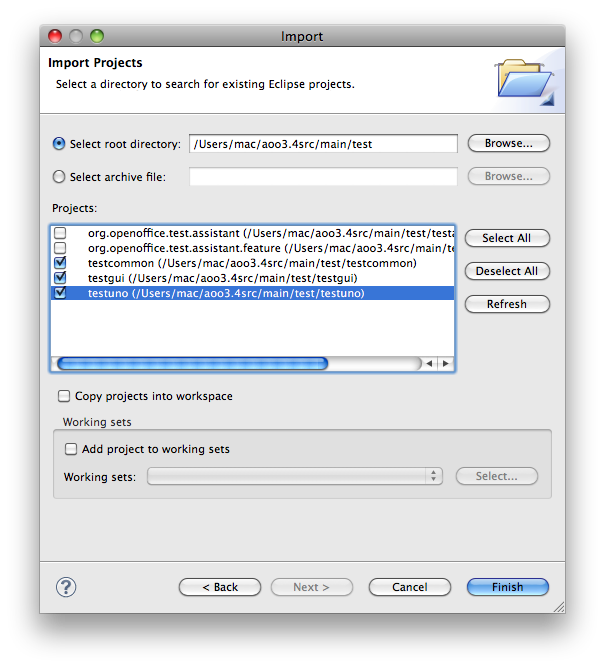
Step 3. Click "Finish" to import the projects.
Step 4. Click menu "Window->Preferences" ("Eclipse->Preferences" on Mac) and then select "Java->Build Path->Classpath Variables" page.
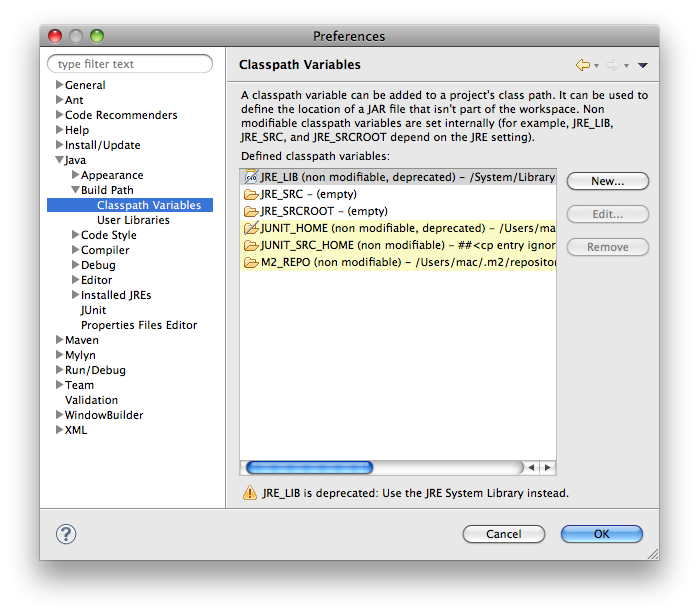
Click "New" to create one new variable "openoffice.home", and set its value to Apache OpenOffice installation directory.
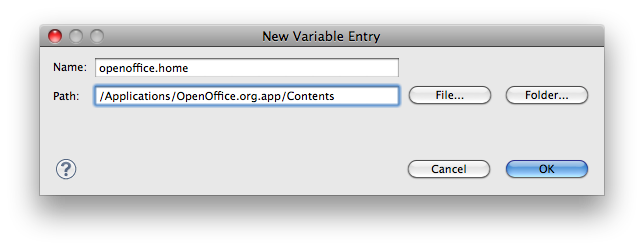
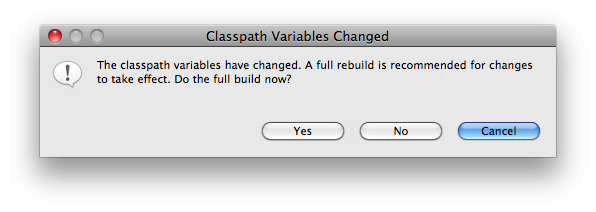
Click "OK" to close "New Variable Entry"dialog. Then click "OK" button of preferences dialog. A message box pops up. Click "Yes".
Run testing
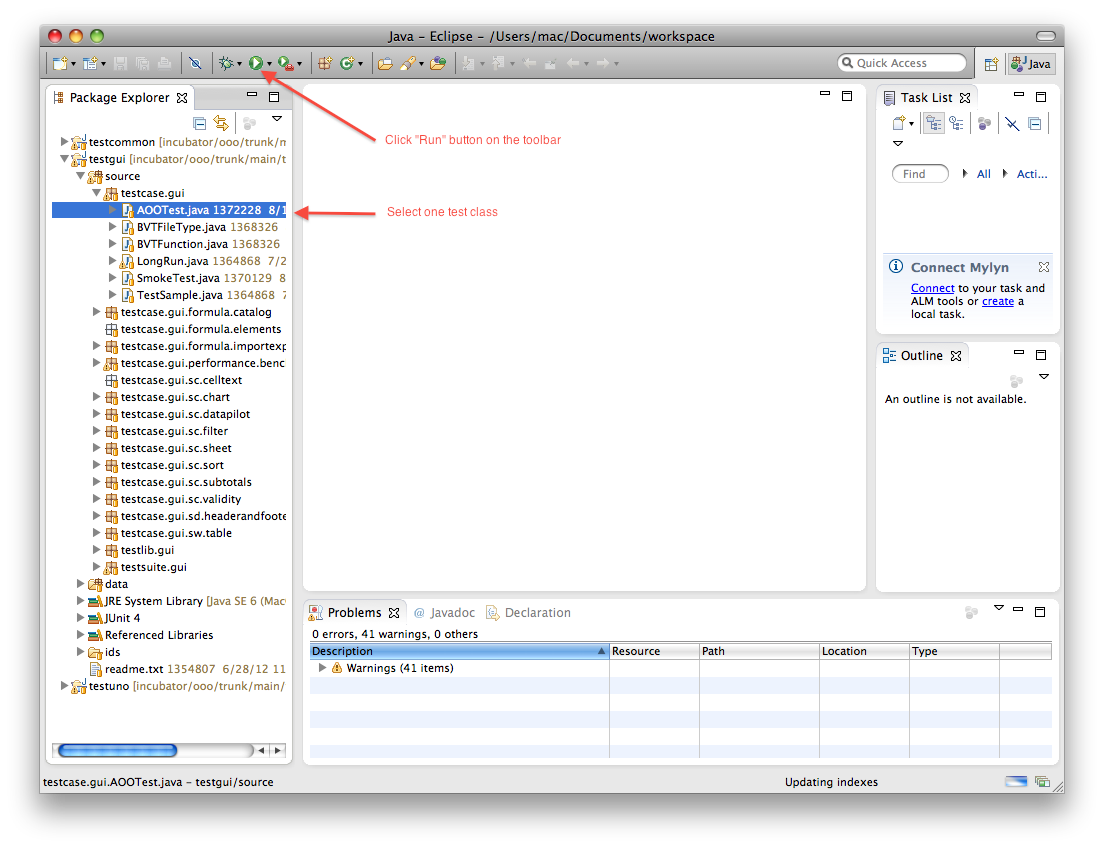
Step 1. Select one test class. e.g. testcase.gui.AOOTest, and then click "Run" on the toolbar to start testing.
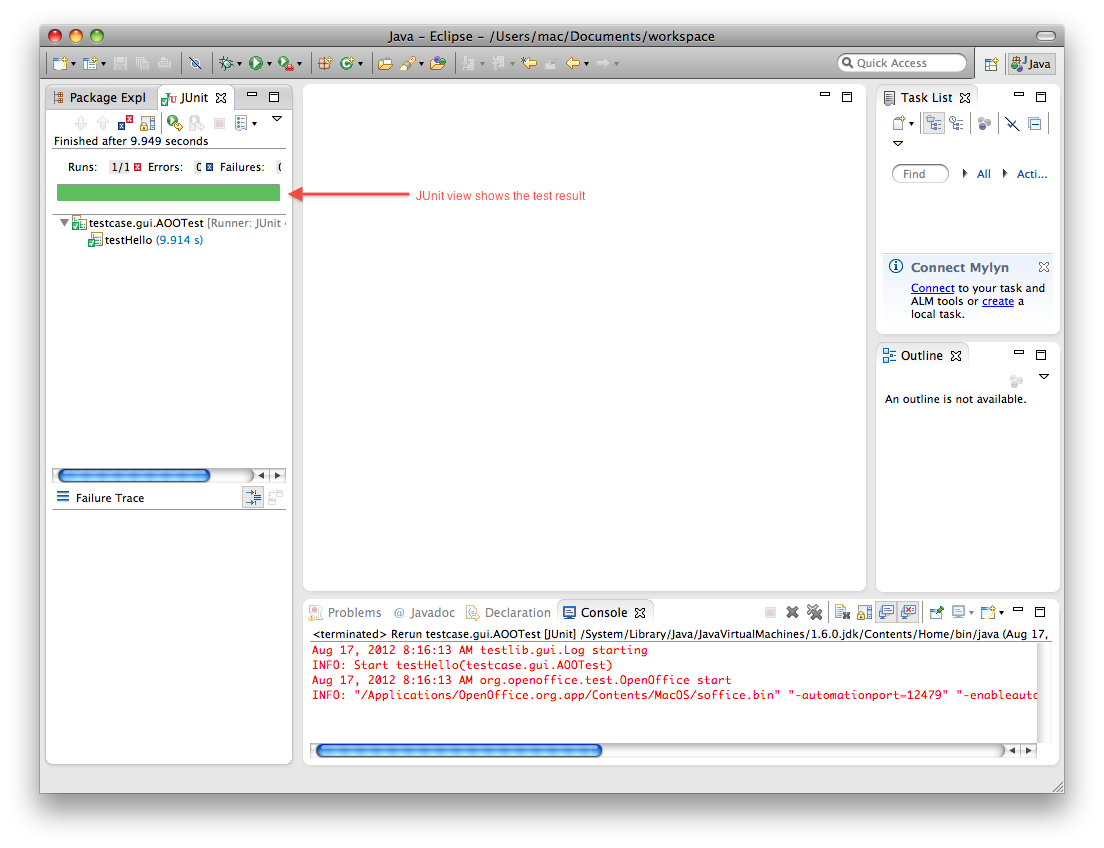
When testing is finished, JUnit view will show the result.
You also can select one package, click "Run", and then choose "JUnit test" to run all test classes under it.
Getting started with command line
Prerequisites
- JDK: JDK 1.5, JDK 1.6 or above.
- Ant: Apache Ant 1.8.2 or above.
- JUnit: JUnit 4.10 or above. For lazy people, if internet is available, it can be automatically installed during testing.
Run testing
As a developer, how to run testing against an OpenOffice built by me?
It's easy for developers to run testing after building OpenOffice. One thing you need to do is to make sure you run the commands in the build environment. The script will automatically install your build and then start testing. e.g.
cd main
source MacOSXX86Env.Set.sh
cd ../test && ant
As a normal user, how to run testing against an installed OpenOffice?
Firstly compile the project with the command under test module.
ant -Dopenoffice.home="OpenOffice installation directory" compileThen start testing with the command "run". e.g. Run all test classes under package bvt ("Build Verification Testing")
run -Dopenoffice.home="/Applications/OpenOffice.app/Contents" -tp bvt
e.g. Run the given test classes
run -Dopenoffice.home="/Applications/OpenOffice.app/Contents" -tc bvt.gui.BasicFunctionTest
On Linux use e.g. -Dopenoffice.home="/opt/openoffice4/program" instead.
Where to get the testing result?
By default, the testing output is stored in "test/testspace/output***". Open "test/testspace/output/result.html" in your browser to see the testing report.
File:Test automation report.png
Special stuff in the output directory.
result.xml: Test result in HTML.
result.html: Test result in XML.
screenshot/: Screenshot pictures when test assert is failed.
Next
Now, all things have been ready for developing new test code. If you are interested, please read GUI Testing Development and UNO API Testing Development to get more information.