A interface do Writer
A principal área de trabalho do Writer está mostrada abaixo:

Menus
A Barra de Menu está localizada sobre toda extensão do topo da janela do Writer, exatamente abaixo da Barra de Título. Quando você escolhe um dos menus, um submenu descerá para mostrar os comandos.
- Arquivo contém comandos que aplicam-se ao documento inteiro como Abrir, Salvar e Exportar como PDF...
- Editar contém comandos para editar o documento tais como Desfazer: xxx (onde xxx é o comando a ser desfeito) e Localizar e Substituir.... Contém também comandos para cortar, copiar e colar partes selecionadas de um documento.
- Exibir contém comandos para controlar a exibição de um documento tais como Zoom... e Layout da Web
- Inserir contém comandos para inserção de elementos dentro de seu documento como cabeçalhos, rodapés e figuras.
- Formatar contém comandos para formatação do Layout de seu documento, tais como Estilos e Formatação, Parágrafo, e Marcadores e Numeração....
- Tabela mostra todos os comandos para inserção e edição de uma tabela em um documento de texto.
- Ferramentas contém funções como Ortografia e Gramática, Personalizar e Opções.
- Janela contém comandos referente à visualização da Janela.
- Ajuda contém links para o arquivo de ajuda do OpenOffice.org, O que é isto?, e informação sobre o programa. Veja Getting help
Barra de Ferramentas
Writer tem vários tipos de barra de ferramentas: Ancoradas, flutuantes, e menus deslizantes. Barra de ferramentas ancoradas podem ser movidas para diferentes posições ou deixadas flutuantes e barras de ferramentas flutuantes podem ser ancoradas.
A barra de ferramentas mais acima (na disposição original) é chamada de Barra de ferramentas Padrão. Esta é igual nas Aplicações do OpenOffice.org (Writer, Calc, Draw, Impress, Base)
A segunda Barra de Ferramentas na parte de cima do aplicativo (posição original) é a barra de ferramenta de Formatação. Ela é sensível ao contexto é mostra as ferramentas relevantes em resposta a posição atual do cursor ou ao que está selecionado. Por exemplo, quando o cursor está sobre um gráfico, a barra de Ferramentas Formatação provê ferramentas para formatação de gráficos; quando o cursor está sob texto, as ferramentas disponíveis são para formatação de textos.
Mostrando ou ocultando barra de ferramentas
Para mostrar ou ocultar barras de ferramentas, escolha Exibir > Barra de ferramentas, então clique no nome da barra de ferramentas na lista. Uma barra de ferramentas ativa mostra um marcador de checagem ao lado do seu nome. Barra de ferramentas deslizantes não são mostrados no menu Exibir.
Os ícones da barra de ferramentas com um pequeno triângulo do lado direito mostrará submenus deslizantes, e outros modos de selecionar objetos, dependendo do ícone. A imagem abaixo mostra um menu deslizante derivado da barra de desenho.

Os menus deslizantes podem estar flutuando or ancorados lado da tela ou em em uma barra de ferramentas já existente. Para mover um menu deslizante que estaja flutuando, arraste-o pela barra de títulos. Veja Moving toolbars
Movendo barra de ferramentas
Para mover uma barra de ferramentas ancorada, coloque o ponteiro do mouse sobre sua alça (handle of toolbar), pressione o botão esquerdo do mouse, arraste o barra de ferramentas para a nova localização e então libere o botão do mouse que estava pressionado.

Para mover um menu flutuante, clique sobre sua barra de títulos e arraste-o para a nova localização.

Floating toolbars
Writer includes several additional context-sensitive toolbars, whose defaults appear as floating toolbars in response to the cursor’s current position or selection. For example, when the cursor is in a table, a floating Table toolbar appears, and when the cursor is in a numbered or bullet list, the Bullets and Numbering toolbar appears. You can dock these toolbars to the top, bottom, or side of the window, if you wish (see Moving toolbars).
Docking/floating windows and toolbars
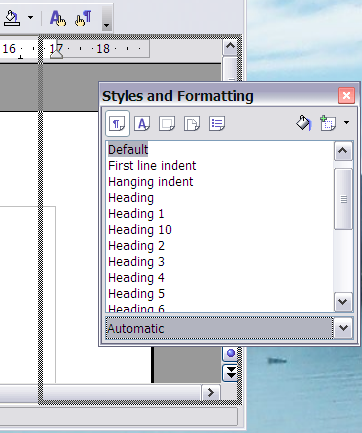
Toolbars and some windows, such as the Navigator and the Styles and Formatting window, are dockable. You can move, resize, or dock them to an edge.
To dock a window, do one of the following:
- Click on the title bar of the floating window and drag it to the side until you see the outline of a box appear in the main window and then release the window. This method depends on your system’s window manager settings, so it may not work for you.
- Hold down the Control key and double-click on a vacant part of the floating window to dock it in its last position. If that does not work, try double-clicking without using the Control key.
-
 Docking a window

To undock a window, hold down the Control key and double-click on a vacant part of the docked window.
| The Styles and Formatting window can also be docked or undocked by using Control+double-click on the gray area next to the icons at the top of the window. |
Customizing toolbars
You can customize toolbars in several ways, including choosing which icons are visible and locking the position of a docked toolbar. You can also add icons and create new toolbars, as described in Chapter 17.
To access a toolbar’s customization options, use the down-arrow at the end of the toolbar or on its title bar.

To show or hide icons defined for the selected toolbar, choose Visible Buttons from the drop-down menu. Visible icons have a checkmark next to them. Click on icons to select or deselect them.
You can quickly access many menu functions by right-clicking on a paragraph, graphic, or other object. A context menu will pop up. Often the context menu is the fastest and easiest way to reach a function. If you’re not sure where in the menus or toolbars a function is located, you can often find it by right-clicking.
Rulers
To show or hide rulers, choose View > Ruler. To enable the vertical ruler, choose Tools > Options > OpenOffice.org Writer > View and select Vertical ruler.

Status bar
The Writer status bar provides information about the document and convenient ways to quickly change some document features. From left to right, the fields are as follows.


Page number
Shows the current page number, the sequence number of the current page (if different), and the total number of pages in the document. For example, if you restarted page numbering at 1 on the third page, its page number is 1 and its sequence number is 3.
If any bookmarks have been defined in the document, a right-click on this field pops up a list of bookmarks; click on the required one.
To jump to a specific page in the document, double-click in this field. The Navigator opens. Click in the Page Number field and type the required page number.
Page style
Shows the style of the current page. To change the page style, right-click on this field. A list of page styles pops up; choose a different style by clicking on it.
To edit the page style, double-click on this field. The Page Style dialog box opens.
Language
Shows the language for the selected text.
Click to open a menu where you can choose another language for the selected text or for the paragraph where the cursor is located. You can also choose None to exclude the text from spellchecking or choose More... to open the Character dialog box.
Insert mode
Click to toggle between Insert and Overwrite modes when typing.
Selection mode
Click to toggle between STD (Standard), EXT (Extend), ADD (Add) and BLK (Block) selection. EXT is an alternative to Shift+click when selecting text. See Chapter 3 (Working with Text) for more information about ADD and BLK.
Unsaved changes
An asterisk (*) appears here if changes to the document have not been saved.
Digital signature
If the document has been digitally signed, an icon ![]() shows in this part of the Status bar. You can double-click the icon to view the certificate.
shows in this part of the Status bar. You can double-click the icon to view the certificate.
Section or object information
When the cursor is on a section or object (such as a picture), information about that item appears in this field. Double-clicking in this area opens a relevant dialog box.
| Object | Information shown | Dialog box opened |
| Picture | Size and position | Format Picture |
| List item | Level and list style | Bullets and Numbering (Note 1) |
| Heading | Outline numbering level | Bullets and Numbering (Note 1) |
| Table | Name or number and cell reference of cursor | Table Format |
| Section | Name of section | Edit Sections |
| Other | (Blank) | Fields (Cross References page) |
Note 1: If a list style was used with a list item or heading, no dialog box appears.
View layout
Click an icon to change between single page, side-by-side, and book layout views. You can edit the document in any view.

Zoom
To change the view magnification, drag the Zoom slider, or click on the + and – signs, or right-click on the zoom level percent to pop up a list of magnification values from which to choose. Zoom interacts with the selected view layout to determine how many pages are visible in the document window.
![]()
Changing document views
Writer has several ways to view a document: Print Layout, Web Layout, and Full Screen. To access these and other choices, go to the View menu and click on the required view. (When in Full Screen view, press the Esc key to return to either Print or Web Layout view.)
When in Print Layout, you can use both the Zoom slider and the View Layout icons on the Status bar. In Web Layout, you can use the Zoom slider.
You can also choose View > Zoom from the menu bar to display the Zoom & View Layout dialog box, where you can set the same options as on the Status bar. In Web Layout view, most of the choices are not available.

| Content on this page is licensed under the Creative Common Attribution 3.0 license (CC-BY). |