Eenvoudig presentaties maken in OpenOffice.org
Deze instructies zullen u een overzicht geven over de mogelijkheden van "Impress“, uitgelegd met een klein en eenvoudig voorbeeld. Er wordt vanuit gegaan dat u enige ervaring hebt met de bediening van uw computer en uw besturingssysteem (bijvoorbeeld Windows®, Linux met de grafische omgeving (X11)). Het is niet mogelijk om alle menu's tot in detail te bespreken. Indien u hulp nodig hebt bij de installatie van OpenOffice.org, kijk dan eens in de "Getting Started-Guides“ of "First Steps in OpenOffice.org Writer“.
Indien u het gegeven voorbeeld wilt namaken, duurt dit ongeveer één uur. Na deze training zult u in staat zijn om een nieuwe presentatie te maken met OpenOffice.org Impress.
Het is niet mogelijk om richtlijnen te geven over hoe een "goede“ presentatie eruit moet zien. Dat zou teveel zijn voor dit document.
Contents
- 1 Beginnen met uw eerste presentatie
- 2 Introductie van het hoofdvenster van Impress
- 3 Uw eerste presentatie opmaken
- 4 Effects
- 5 Background and Background Color
- 6 Saving
- 7 Notes
- 8 Handouts
- 9 Printing
- 10 Presenting Your Slide Show
- 11 Exporting Your File as HTML-File
- 12 Exporting Your Presentation as a PDF-File
- 13 Feedback
- 14 Acknowledgments
- 15 Modifications and Updates
Beginnen met uw eerste presentatie
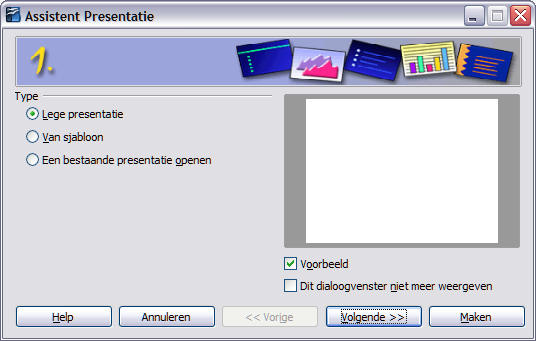
Start het programma door in het menu Start Presentatie te selecteren in de groep OpenOffice.org (of OpenOffice.org Impress onder Linux/KDE). De assistent van OpenOffice.org Impress verschijnt om u te helpen met de basis van uw presentatie in slechts een paar muisklikken.
Omdat u nog geen presentatie hebt gemaakt kiest u "Lege presentatie“. Later kunt u uw eigen presentaties en patronen selecteren.
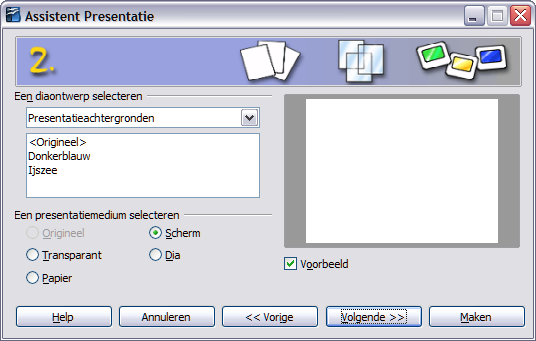
Klik op "Volgende Het volgende dialoogvenster verschijnt:
Hier bepaalt u voor welk medium u uw presentatie wilt maken (papier, scherm...).
Kies, om te beginnen, "Scherm“ en accepteer de vooraf ingestelde instellingen met "Volgende“.
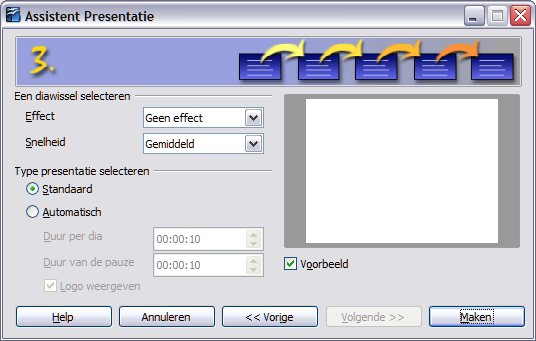
Gedurende de derde stap kunt u de vorm kiezen waarin u van de ene naar de andere dia wijzigt.
U kunt, bijvoorbeeld, bepalen of de inhoud van uw dia gewijzigd wordt door een overlapping vanaf de linkerkant... Bekijk de opties.
In het tweede openklapmenu kunt u kiezen hoe sel de wijziging moet gebeuren.
In de laatste selectie kunt u uw presentatie automatiseren (wijziging van het geportretteerde of de dia's na een bepaald tijdverloop).
U zou, om te beginnen, de standaard presentatie moeten gebruiken. Klik daarom op – zonder enige wijziging – "Maken“.
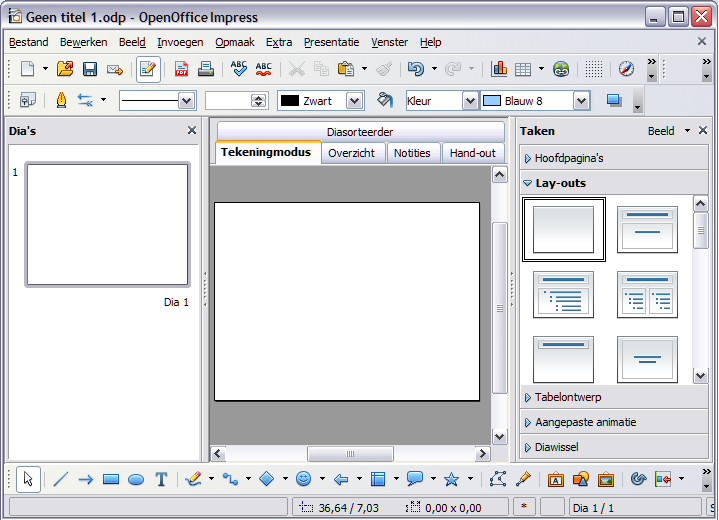
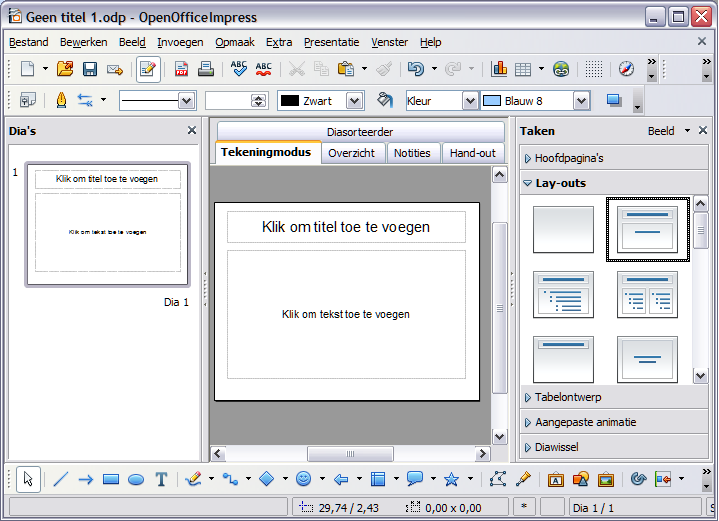
Nadat u op "Maken" hebt geklikt, zult u het hoofdvenster van OpenOffice.org Impress zien, met zijn drie delen. In het midden van het venster is de werkruimte, het belangrijkste ontwerpgebied van de toepassing.
Aan de linkerkant van het venster vindt u het venster Dia's. In dit venster ziet u verkleinde weergaven van alle dia's in uw presentatie. Ze staan in de volgorde die u hebt gekozen. Als u de volgorde wilt wijzigen kunt u dat hier doen. Klik op een dia en sleep, met de linker muisknop ingedrukt, hem naar de nieuwe plaats en laat daar de muisknop los.
Rechts ziet u het zwevende venster Stijlen en opmaak. Druk op <F11> of kies Opmaak > Stijlen en opmaak om het venster te openen/sluiten.
Rechts van de werkruimte vindt u het venster Taken. Afbeelding 4 geeft het geopende gedeelte "Lay-outs" weer. Hier kunt u verschillende sjablonen selecteren met de volgende velden in verschillende combinaties:
- titel,
- tekst,
- animaties
- tabel,
- diagram
- object.
Als u kijkt naar alle lay-out varianten, zult u zien dat alle veel voorkomende combinaties daarbij zijn. Een kleine helptip wordt weergegeven als u de muisaanwijzer over de verschillende lay-outs beweegt.
Begin voor uw eerste presentatie met de Titeldia die velden voor titel en tekst bevat. Klik op het overeenkomende symbool van de lay-out. Uw lege dia zal wijzigen naar de nieuwe lay-out.
Voordat u begint met werken aan uw eerste presentatie, zou u zichzelf bekend moeten laten worden met de belangrijkste elementen in het venster.
Als u deze informatie niet nodig hebt, verlaat dan dit hoofdstuk en ga door metUw eerste presentatie opmaken.
Introductie van het hoofdvenster van Impress
Onder de Titelbalk (die de naam weergeeft van uw document en de module die gebruikt wordt) vindt u de Menubalk.
Onder de Menubalk vindt u drie werkbalken:
- de werkbalk Standaard,
- de werkbalk Presentatie en
- de werkbalk Lijn en opvulstijl.
De Menubalk bevat de belangrijkste opdrachten voor de presentatie.
- In het menu Bestand vindt u de opdrachten om bestanden te openen, te maken (nieuw), op te slaan, te exporteren en af te drukken en OpenOffice.org te sluiten.
- Het menu Bewerken bevat opdrachten om met uw bestand te werken, zoals ongedaan maken, knippen, kopiëren, alles selecteren, zoeken en vervangen, het aanroepen van de Navigator en dupliceren.
- Met de opdrachten onder het menu Beeld kunt u de zoomfactor van uw diapresentatie wijzigen. U kunt de verschillende werkbalken openen, de liniaal en de Statusbalk, en u kunt de weergave veranderen.
- Met het menu Invoegen kunt u nieuwe dia's invoegen, tabellen, velden, afbeeldingen enzovoort.
- Het menu Opmaak stelt u in staat om de verschillende objecten in uw presentatie te bewerken. U kunt het opmaakprofiel wijzigen van de gebruikte lijnen (doorlopend, onderbroken), de richting van uw tekst (diagonaal, verticaal), de positie (spaties) en de grootte van de tekens. Aansluitend kunt u de opmaak voor de dia en het venster Stijlen en opmaak openen.
- In het menu Extra kunt u de spellingscontrole en woordafbreking activeren. Aanvullend zult u daar de Galerij vinden, met de beschikbare afbeeldingen. En onder Macro's zult u de verschillende items vinden voor het opnemen, beheren en uitvoeren van de macro's. Verder zult u hier het item voor de nieuwe Media Player vinden. De Media Player stelt u in staat geluids- of video-objecten in uw presentatie af te spelen. Voor de Media Player moet het JMF (Java Media Framework) zijn geïnstalleerd. In het menu Extra is ook een item voor het aanpassen van uw venster voor Impress (snelkoppelingen, menu's, werkbalken) en een ander item met opties voor de standaard instellingen (standaard lettertypen of gebruikersgegevens).
- In het menu Presentatie kunt u de diavoorstelling starten (met of zonder stoppen van de tijd). En met Instellingen presentatie kunt u selecteren hoe de presentatie zal worden uitgevoerd (startpagina, opmaakprofiel voor de muisaanwijzer). Aanvullend kunt u animaties maken en u kunt kiezen hoe Impress zal reageren na een muisklik.
- In het menu Venster kunt u navigeren tussen uw geopende documenten of een nieuw venster openen, of een ander venster sluiten.
- Het menu Help geeft toegang tot de verschillende functies van Help.
Open de menu's en probeer alle opdrachten uit. U kunt al uw wijzigingen regelmatig terugdraaien via het menu Bewerken met de opdracht Ongedaan maken.
De werkbalk Standaard geeft u toegang tot alle functies zoals Bestand bewerken, Nieuwe presentatie, bestand Openen, document Opslaan, Exporteren als PDF (sinds versie 1.1), Afdrukken, Knippen, Kopiëren en Plakken. Aanvullend vindt u hier de pijlen voor Ongedaan maken en Opnieuw. Standaard kunt u 100 stappen terug doen. U kunt dit aantal vergroten of verkleinen in beide richtingen.
Op de werkbalk Standaard vindt u de Navigator.
U vindt de werkbalk Presentatie aan de rechterkant onder de werkbalk Standaard. Doe werkbalk bevat knoppen voor het starten van de presentatie, toegang tot het sjabloon, en voor het invoegen van een nieuwe dia. Net als andere werkbalken kunt u deze werkbalk als een zwevend venster verplaatsen naar elke plek die u wilt. Klik eenvoudigweg op de linker rand en sleep het naar waar u wilt (de muisaanwijzer wijzigt nar een kruis met 4 pijlen).
De werkbalk Lijn en opvulstijl geeft u enkele gereedschappen vanuit dit gedeelte. U vindt er de knop voor het venster Stijlen en opmaak.
Indien nodig worden context-gevoelige werkbalken weergegeven als zwevende vensters. U kunt alle werkbalken bekijken door ze te kiezen in het menu Beeld > Werkbalken. Bekijk ze eens en test de verschillende functies. (Als u een vinkje ziet voor de naam van de werkbalk is die werkbalk geselecteerd, anders is hij niet geselecteerd.)
Onder in uw venster vindt u de werkbalk Tekening.
De werkbalk Tekening bevat handige bronnen voor het snel invoegen van verschillende arrangementen in uw presentatie. U vindt er bijvoorbeeld een knop voor het invoegen van een tekstveld. Selecteer het pictogram en kies een plaats voor het veld, sleep het en u kunt het invoegen in uw tekst.
U vindt er twee knoppen voor grafische elementen plus enkele openklap-menu's met de meest belangrijke standaardvormen, standaard symbolen, pijlen... Klik op een element om meer te leren over deze elementen. Een submenu zal worden geopend met meer variaties van de verschillende elementen. Als u de muisaanwijzer langer boven een knop houdt, zal een korte uitleg (Help tip) verschijnen.
Neem de tijd voor het testen van de functies van de werkbalken met het volgende voorbeeld. U kunt alle opdrachten terugdraaien met de pijl Ongedaan maken, indien een opdracht niet het effect heeft dat u verwachtte.
| Klein voorbeeld voor het testen van werkbalken en de pijlen "Ongedaan maken"/"Opnieuw": |
| Klik in het onderste tekstveld van uw presentatie. Kies de rechthoek op de werkbalk Tekening. Plaats de rechthoek met de muis in het tekstveld en wijzig de grootte, zodat de rechthoek een kwart van uw tekstveld is. Kies een ellips vanaf de werkbalk Tekening en plaats die rechts van uw tekstveld, wijzig de grootte. Selecteer, op de werkbalk Lijn en opvulstijl, een andere kleur voor het gebied van de ellips (misschien rood).
Klik op de knop Lijn met pijluiteinde op de werkbalk Tekening. Klik dan in het midden van de rechterzijde van uw rechthoek, sleep uw muis naar de linkerzijde van de ellips en laat dan de muisknop los. U kunt nu, op de werkbalk Lijn en opvulstijl, een kleur kiezen en een grotere dikte kiezen voor de pijl. Merk op dat het attribuut in de werkbalk Lijn en opvulstijl alleen geldig is voor het geselecteerde object. U kunt een object selecteren door er op te klikken met de linker muisknop. De selectie wordt gesymboliseerd door de gekleurde vierkantjes rondom het object. Door te klikken op een reeds geselecteerd object, kunt u het object naar een andere plek verplaatsen. Door te klikken en te trekken aan de gekleurde vierkantjes, met ingedrukte muisknop, kunt u de grootte van het object wijzigen. Na het klikken met rechts op een object zal het contextmenu verschijnen, waar u toegang krijgt tot verschillende karakteristieken van het object. Kies de rechthoek en voeg de tekst "Dit eerst" in. Selecteer de tekst en kies er een kleur voor op de werkbalk Lijn en opvulstijl. Klik op de ellips en voeg de tekst "en dan dit" in. Selecteer de tekst en kies een andere kleur voor de lettertypen. Nu kunt u enkele experimenten uitvoeren met de pijlen Ongedaan maken/Opnieuw en verschillende stappen terugdraaien of ze opnieuw maken. Verwijder, aan het eind, alle invoegingen uit dit voorbeeld als een demonstratie voor de functie van de symbolen Ongedaan maken/Opnieuw. |
Aan de bovenrand van de werkruimte vindt u de tabs voor de verschillende weergaven. U kunt een weergave van de werkruimte activeren door op een tab te klikken. OpenOffice.org Impress biedt de volgende weergaven (van links naar rechts):
- Normale weergave (om te tekenen),
- weergave Overzicht
- weergave Notities
- weergave Hand-out
- weergave Diasorteerder
Selecteer elk van deze weergaven.
Uw eerste presentatie opmaken
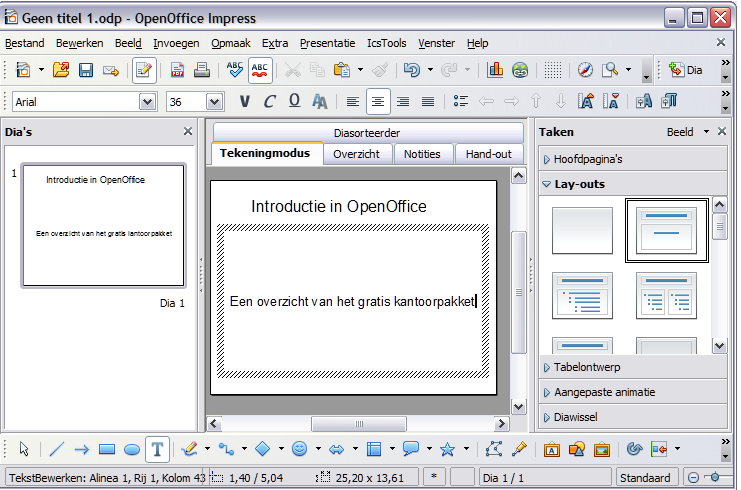
Na deze korte uitleg van het hoofdvenster van Impress gaat u door met uw presentatie. Wijzig de weergave naar "Normaal". Voer in het eerste gedeelte van de titelpagina een titel in voor de presentatie. Klik hiervoor in het bovenste tekstveld "Klik om titel toe te voegen" en voer de tekst "Introductie in OpenOffice.org" in. Schrijf in het onderste tekstveld, na daarin te hebben geklikt, "Een kort overzicht van het gratis kantoorpakket".
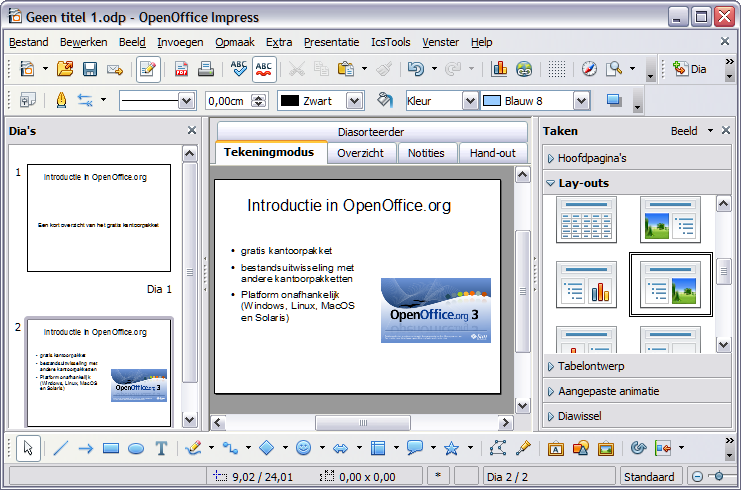
Voeg een nieuwe pagina toe aan uw presentatie. Kies daarvoor Invoegen > Dia. Een nieuwe, lege pagina zal worden toegevoegd. Selecteer, uit het venster Lay-outs, een lay-out met titel, afbeelding en tekst met opsommingstekens (de snelle tip geeft "titel, tekst, clipart" weer). Deze selectie zal onmiddellijk worden gebruikt voor uw nieuwe pagina. Voeg de tekst van de eerste pagina in.
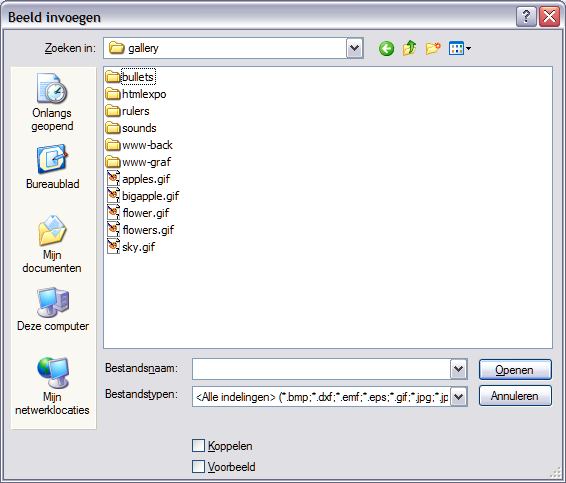
In het onderste gedeelte voegt u een afbeelding in. Dubbel-klik in dat gedeelte. Kies, in het volgende dialoogvenster, de afbeelding die u wilt invoegen en klik op 'Openen. (Het dialoogvenster kan er anders uitzien, afhankelijk van het gebruikte besturingssysteem.)
Gebruik de onderste linker helft voor een lijst met opsommingstekens:
- gratis kantoorpakket
- bestandsuitwisseling met andere kantoorpakketten
- platform onafhankelijk (Windows, Linux, MacOS en Solaris)
Selecteer de ingevoegde tekst in uw lijst en wijzig de grootte van het lettertype met de werkbalk Lijn en opvulstijl naar 28. Klik daarna met rechts op de geselecteerde tekst om het context-menu op te roepen om verder te bewerken.
Selecteer "Tekst". Op deze tab kunt u de tekst aan de linkerzijde bewerken.
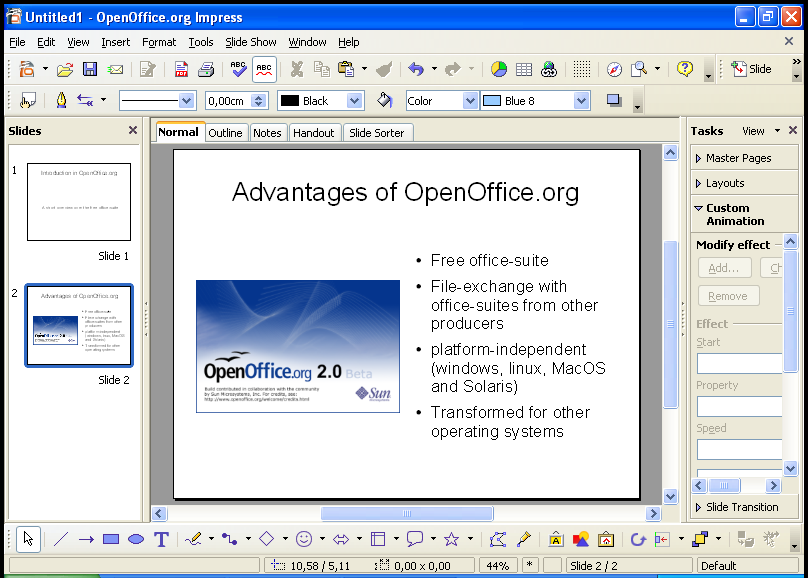
Het resultaat zou als volgt moeten zijn:
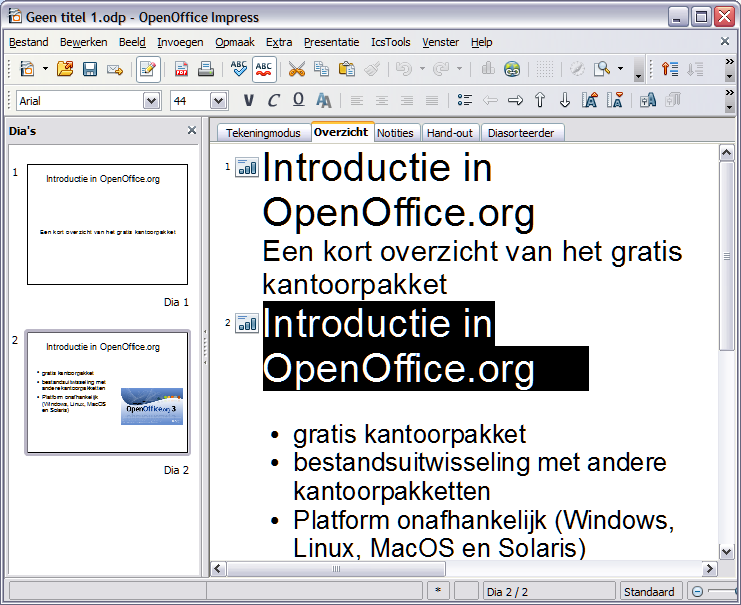
Tot nu heeft u gewerkt in de Normale weergave van OpenOffice.org Impress. Eerder hebt u de andere tabs, voor andere weergaven, leren kennen. Kies nu de tweede tab vanaf de linkerkant ("Overzicht"). U kunt nu alle dia's zien met de teksten:
In this view you can check the contents of your slides. You can insert new outline levels and distribute contents on the different slides.
The Outline view is very helpful for the planning and the arrangement of the content in your presentation.
You can see the result of your changes with a short delay in the Slides pane on the left.
Select the first row of the second slide and replace the text with "Advantages of OpenOffice.org". Go to the end of the last row, press Return and insert "Transformed for other operating systems". On your second slide a new point appears.
Place your mouse pointer behind the title of your second slide and press the Return key. A new slide (number 3) appears. The bullet points will be moved to slide 3. With the Backspace key you can take back the changes. The bullet points are on slide 2 again.
Repeat the creation of a new slide. But now, press the Tab key instead of the Return key. The new slide disappears. On the second slide there is only one bullet point at the beginning. This point can be deleted with the Backspace key.
As you see, changes can be done easily in the Outline view.
Effects
Change back to the Normal view.
In the Slides pane on the left side choose slide 1 of your presentation.
Select the (lower) text field.
In the Task pane on the right side open "Custom Animation". When you press the "Add" button a dialog appears, where you can choose different effects for the slides. In the "Entrance" tab you will find elements for the appearance of the text fields on the slide. In the "Exit" tab you will find effects for the disappearance of the text fields. You can choose the different effects from a list. The effects are sorted in categories by the reaction of the audience. In another tab you will find paths of animations, which means that different effects are combined. In the lower part of the dialog you can adjust the speed of the animations. When you have checked "Automatic preview" you can see how your presentation is working.
When you press the OK button, you will see a list with the selected animations in the Task pane. From this list you can choose an entry as animation for your objects. The name of this animation is written in bold above the part with the adjustments for this entry. Changes can be made for the kind of starting the effect (with mouse click), for the direction (from outside to inside) or the speed.
With the arrow keys below the list field you can change the order of the effects. If you want to delete an effect from this list, you can do this with the context-menu (right-click with the mouse) or by pressing the Delete key, when the entry is selected.
You can add sounds for the change from one slide to the next. You find them – like the optical animations – in the part "Slide Transition" in the Task pane. You can select the optical and acoustical animation styles from a list.
Similar to the optical user defined effects you can choose the speed for the effect, the action, which starts the effect. When you choose a sound, you can determine that the sound should be repeated.
Furthermore, you can choose, if the selected animation is valid only for this slide or for all slides.
If you have chosen a sound for the slide transition, you can reach the dialog through the list entry "Other sound...". A new dialog for the selection of the sound file will appear.
Background and Background Color
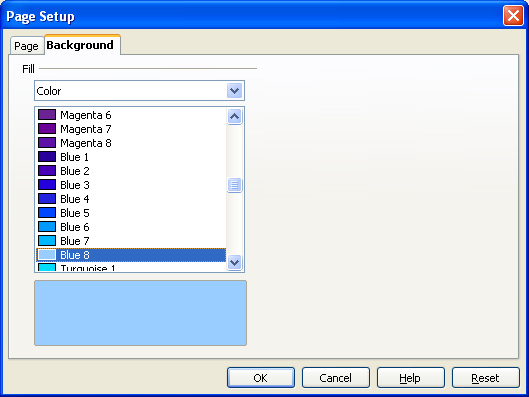
As a next step, you can add a background color. Place your mouse pointer on your slide and call the menu Format > Page.
In the opening window you can select the background color for your slide in the "Background" tab.
You can choose between plain color, color gradient, hatching or bitmap. Look at all possibilities and test them with your presentation.
You have been asked about the selection of the background, if the background settings are valid for all slides. You can change (fast and simple) the settings for all slides of your presentation (master function).
If you want to create a special background (for example using a graphic or a logo) choose View > Master > Slide Master to open the master view of the slides. Now choose Insert > Picture > From File to select the image you want to insert. Confirm your selection with the "Open" button. Select the image and call for the context-menu (click with the right mouse-button). Choose Position and Size. In the following dialog you can change the size and the alignment of your graphic.
Eventually, you will have to go to the context-menu arrangement and put your graphic in the right level (maybe in the level behind the text boxes).
In the slide master view you can change the text styles of the outline texts and the colors. Leave the slide master view by clicking on the button "Close master view" in the Master View bar.
Saving
You can save your presentation with File > Save or by clicking on the "Save" button (disk symbol). You can also use the menu File > Save as... and define a path.
You can save your presentation as a template for using it as a base for your next presentation.
When you know the path, choose File > Save as, select the correct directory, give it an easy-to-know name without file extension and in the "File type" list select "OpenDocument Presentation Template" (or the format of the older version: OpenOffice.org 1.0 Presentation Template).
When you start OpenOffice.org for the next time, choose File > Templates > Organize. In the left window, after a double-click on "My Templates", you can see your saved template. After closing this dialog, you can use the wizard for creating a new presentation. Now you will find your own template under step 1 if you select "My Templates".
Notes
You can make some notes for your presentation quite easy. Choose the Notes tab in the work space. You will see an added notes area in your slide, where you can write down some headwords or your lecture text.
When you print your presentation, you can choose, if this part will be printed too or not.
Handouts
In the Handout view you can check, how the documents for the listeners look like. If you prefer another sharing out of the slides, you can change the Layout in the Task pane on the right side. This selection is used after a mouse click for all pages of the handout.
Printing
If you want to print your presentation directly, you can click the Printer button (printer symbol) in the Standard bar. Special adjustments can be done in the menu File > Print.
Here you can define if all pages should be printed, or only individual pages.
When you click the Options button a dialog box will appear, where you can define, that notes or handouts should be printed too.
Presenting Your Slide Show
Open your presentation with File > Open. Start the slide show with the menu Slide show > Slide show or with the button in the Presentation bar. Alternatively, you can start the slide show with the function key F5.
Template:Documentation/Windows
After a short moment, the first slide of your presentation will appear. If you did not choose an automatic change to the next slide, you can reach the next slide by clicking with the left mouse button or by pressing the space-bar.
If you want to go back to the previous slide, press the right mouse button. You can also use the arrow keys for browsing fast back or forward.
If you want to browse to a slide, which is near the end (while you are just starting), you can use the Navigator. For calling the Navigator, press <shift> + <F5> (until version 1.1 only the function key F5). In the Standard bar click the button with the compass. The Navigator appears on your actual slide.
In the Navigator window you can click the slide you want to go to, or you can browse with the arrow keys on the upper border of the window. If you double-click a slide, this slide will be shown immediately in the work space.
With the ESC key you can cancel your presentation at any time.
Exporting Your File as HTML-File
You want to show your presentation with internet techniques. This may be necessary, when the computer, which you are using for the presentation, has no OpenOffice.org installed.
For this, choose File > Export. A dialog will be opened, where you can insert the file name and the directory for saving the file. As file extension "HTML-document (OpenOffice.org Impress)" is preselected. The extension HTML will be added automatically (if you have not deselected the automatic file extension). When you click on "Export", the next dialog will appear.
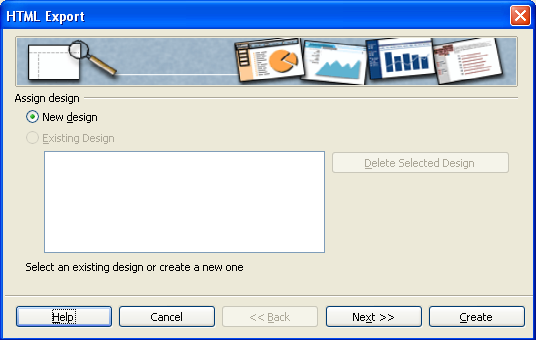
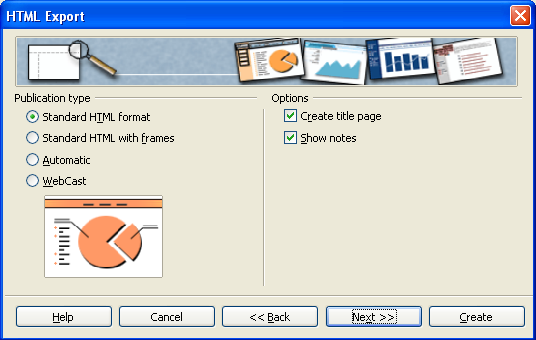
When you open this dialog for the first time, there is no "Existing design", so you have to add a "New design", which you can use for other presentations as well. Leave the preinstalled settings as they are and click "Next". The following dialog will appear:
On the left hand side you can choose how your HTML code should look like. Leave the preinstalled settings as they are.
On the right side you should ask OpenOffice.org to create a title page (index file). Deselect "Show notes". If you do not deselect them, then on each page a note area will be added. But this is not needed for your presentation. Click "Next" and a new dialog will appear.
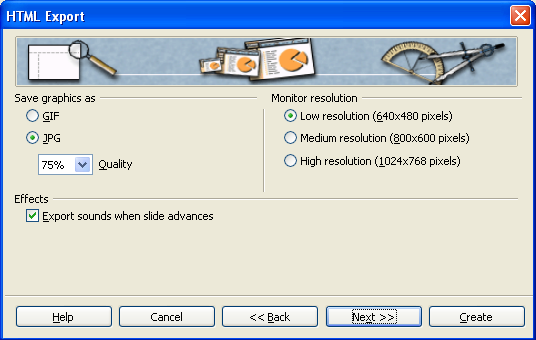
Here you can choose, in which format (gif or jpg) your graphics will be saved and how strong they will be compressed (only possible, if you choose jpg). On the right side you can enter the screen resolution for your presentation. Choose "Medium resolution". In the lower part of the window, you can select or deselect, if sounds should be used when the slides are changing. Press the "Next" button and the next dialog box will appear:
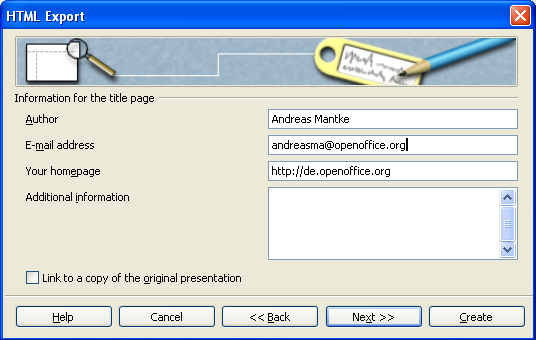
Here you can enter your personal data and additionally other data for the newly created title page. By clicking the "Next" button you reach the following dialog.
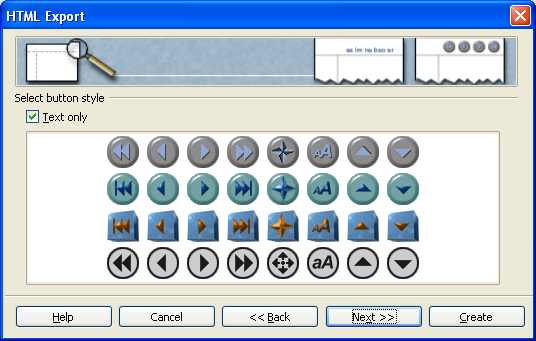
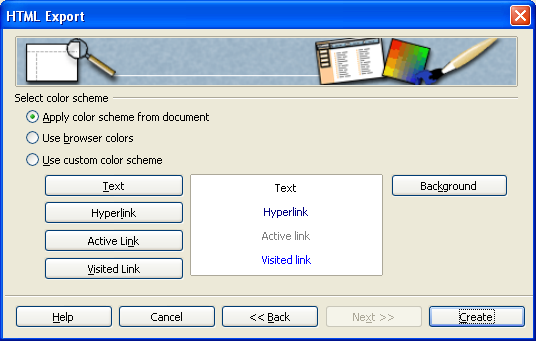
Here you can choose a button set for your presentation. Deselect "Text only" and apply your choice by clicking the "Next" button. Now you can choose the color scheme for your document.
Leave the preinstalled settings as they are and use the color scheme of your document. Alternatively, you can use the settings of your browser or other - quite different settings - as you like. If you want to choose your own settings, you can do this with the buttons "Text", "Hyperlink" and so on by entering different colors. When you have entered everything, then click on the "Create" button. The export of your presentation is finished and you can look at it with a browser.
Exporting Your Presentation as a PDF-File
Since version 1.1 of OpenOffice.org, it has been possible to save (export) a file directly as a PDF file. You need no other program for creating these files. You only have to click the button ![]() in the menu bar. Alternatively, you can choose File > Export as PDF.
in the menu bar. Alternatively, you can choose File > Export as PDF.
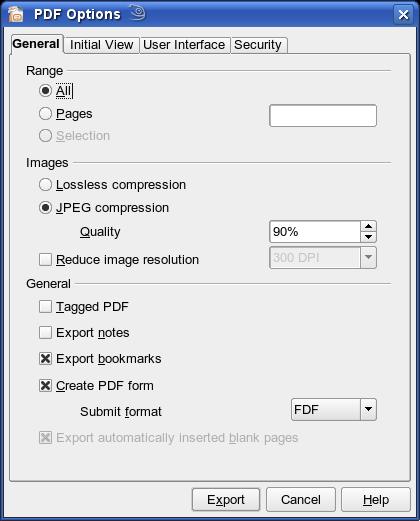
The following dialog appears:
In the first tab you can choose, which slides should be exported (all, special pages...), and you can select the quality level of your graphics. In the lower part of the window, you can determine, if the notes should be added too, and if a "tagged" PDF file will be created. A tagged PDF file has some advantages: If you use this file on the Internet, the beginning will be shown, while the rest of the file will be downloaded. Additionally, hyperlinks have the same function in the PDF file as in the original document. In the tab „User Interface“ you get settings for animations, to transfer the transitions of the slides to the PDF file.
If you have made your selections, click on "Export" and a new dialog appears. In this dialog you have to enter a name for the file and the directory, where it should be saved. Apply your entries by clicking the "Export" button and OpenOffice.org creates the PDF file.
Feedback
Please direct any comments or suggestions about this document to:andreasma[at]openoffice.org
Acknowledgments
Initial author: Andreas Mantke
Corrections (of the German version): Klaus Endelmann, Helga Fischer, Michael Kirchner, Michael Scheurer, Thomas Hackert
Version: third (for the German version), first (for the English version)
Last changes::
First translation into English: Sigrid Kronenberger
Modifications and Updates
| |
|
Description of Change |
|---|---|---|
| 0.1 | 042103 | Original-Dokument (german language) by Andreas Mantke (andreasma[at]openoffice.org) |
| 0.2 | 090203 | Update for OpenOffice.org 1.1 (german language) by Andreas Mantke (andreasma[at]openoffice.org) |
| 0.3 | 050805 | Update for OpenOffice.org 2.0 (german language) by Andreas Mantke (andreasma[at]openoffice.org) |
| 0.4 | 061405 | Translation into English by Sigrid Kronenberger (eskroni[at]openoffice.org) |
| 0.5 | 102305 | English screen shots by Andreas Mantke (andreasma[at]openoffice.org) |
| 0.6 | 113005 | Update to Oasis-format by Andreas Mantke (andreasma[at]openoffice.org) |
| 0.7 | 101307 | Move to Wiki and update section export to pdf by Andreas Mantke (andreasma[at]openoffice.org) |
For further modifications and updates see Wiki history.
