Difference between revisions of "IT/Documentation/OOo3 User Guides/Getting Started/Printing from Writer"
(Stampa con Writer) |
|||
| Line 1: | Line 1: | ||
| − | + | {{DISPLAYTITLE:Stampa con Writer}} | |
| + | {{Documentation/GS3WriterITTOC | ||
| + | |ShowPrevNext=block | ||
| + | |PrevPage=IT/Documentation/OOo3_User_Guides/Getting Started/Creating a toc | ||
| + | |NextPage=IT/Documentation/OOo3_User_Guides/Getting Started/Sending a fax | ||
| + | }} | ||
| + | |||
| + | |||
| + | |||
| + | |||
| + | |||
| + | |||
| + | |||
| + | Pagina in traduzione | ||
| + | |||
| + | |||
| + | |||
| + | |||
| + | |||
| + | |||
| + | |||
Writer mette a disposizione diverse opzioni per la stampa. | Writer mette a disposizione diverse opzioni per la stampa. | ||
| Line 154: | Line 174: | ||
<center>[[Image:|thumb|''Figura 38: Finestra di dialogo Etichette, scheda Extra'']]</center> | <center>[[Image:|thumb|''Figura 38: Finestra di dialogo Etichette, scheda Extra'']]</center> | ||
| + | |||
| + | |||
| + | |||
| + | |||
| + | |||
| + | |||
| + | |||
| + | |||
| + | Writer provides a range of choices when printing. | ||
| + | |||
| + | == Quick printing == | ||
| + | Click the '''Print File Directly''' icon [[Image:PrintFileDir.png]] to send the entire document to the default printer defined for your computer. | ||
| + | |||
| + | {{Documentation/Note| You can change the action of the '''Print File Directly''' icon to send the document to the printer defined for the document instead of the default printer for the computer. Go to '''Tools > Options > Load/Save > General''' and select the '''Load printer settings with the document''' option.}} | ||
| + | |||
| + | == Controlling printing == | ||
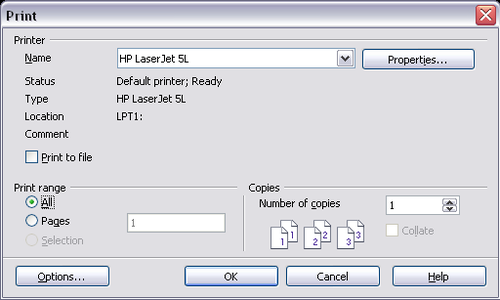
| + | For more control over printing, use '''File > Print''' to display the Print dialog. | ||
| + | |||
| + | [[Image:PrintDialog.png|thumb|none|500px|''The Print dialog.'']] | ||
| + | |||
| + | On the Print dialog, you can choose: | ||
| + | |||
| + | * Which printer to use (if more than one are installed on your system) and the properties of the printer—for example, orientation (portrait or landscape), which paper tray to use, and what paper size to print on. The properties available depend on the selected printer; consult the printer’s documentation for details. | ||
| + | * What pages to print, how many copies to print, and in what order to print them. Use dashes to specify page ranges and commas or semicolons to separate ranges; for example: 1, 5, 11–14, 34–40. ''Selection'' is the highlighted part of a page or pages. | ||
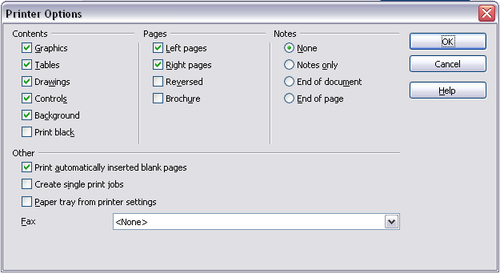
| + | * What items to print. Click the '''Options''' button to display the Printer Options dialog. | ||
| + | |||
| + | [[Image:PrinterOptions.png|thumb|none|500px|''Printer Options dialog.'']] | ||
| + | |||
| + | == Selecting print options for a document == | ||
| + | Selections on the Printer Options dialog apply to this printing of this document only. | ||
| + | |||
| + | To specify default printing options, you need to use two pages in '''Tools > Options''': '''OpenOffice.org – Print''' (see [[../Setting Up {{OOo}}|Chapter 2]]) and '''OpenOffice.org Writer – Print''' (which looks very similar to the Printer Options dialog). | ||
| + | |||
| + | Some items of interest on the Printer Options dialog include: | ||
| + | |||
| + | * In the ''Contents'' section, you might choose not to print graphics or page background in drafts, for example (to save toner or ink). | ||
| + | * In the ''Pages'' section, you can choose: | ||
| + | ** Print only left (even-numbered) pages or only right (odd-numbered) pages. These settings are useful when you want to print on both sides of the page, but do not have a printer that handles this automatically. | ||
| + | ** Print in reversed page order. | ||
| + | ** ''Brochure''—the results of this selection are discussed in [[#Printing a brochure|Printing a brochure]]. | ||
| + | * In the ''Notes'' section, you can choose whether to print any notes that have been added to your document (using '''Insert > Note'''), and where to print the notes. | ||
| + | |||
| + | == Printing in black and white on a color printer == | ||
| + | You may wish to print documents in black and white on a color printer, to save expensive color ink or toner. Common uses are for drafts or documents to be photocopied in black and white. Several choices are available. | ||
| + | |||
| + | To print the current document in black and white or grayscale: | ||
| + | |||
| + | # Click '''File > Print''' to open the Print dialog. | ||
| + | # Click '''Properties''' to open the properties dialog for the printer. The available choices vary from one printer to another, but you should find an option for Color. See your printer’s help or user manual for more information. | ||
| + | # The choices for color may include ''black and white'' or ''grayscale''. Choose one of these. Grayscale is best if you have any graphics in the document. Click '''OK''' to confirm your choice and return to the Print dialog, then click '''OK''' again to print the document. | ||
| + | |||
| + | To set up OOo to print all color text and graphics as grayscale: | ||
| + | |||
| + | # Click '''Tools > Options > OpenOffice.org > Print'''. | ||
| + | # Select the '''Convert colors to grayscale''' option. Click '''OK''' to save the change. | ||
| + | |||
| + | To set up OOo Writer to print all color text as black, and all graphics as grayscale: | ||
| + | |||
| + | # Click '''Tools > Options > OpenOffice.org Writer > Print'''. | ||
| + | # Under ''Contents'', select the '''Print black''' option. Click '''OK''' to save the change. | ||
| + | |||
| + | == Previewing pages before printing == | ||
| + | The normal page view in Writer shows you what each page will look like when printed, but it shows only one page at a time. If you are designing a document to be printed double-sided, you may want to see what facing pages look like. OOo provides two ways to do this: | ||
| + | |||
| + | * View Layout (editable view) —see [[../Writer interface#Status bar|View layout]]. | ||
| + | * Page Preview (read-only view) —from which you can print multiple pages onto one sheet of paper. | ||
| + | |||
| + | To use Page Preview: | ||
| + | |||
| + | <ol> | ||
| + | <li>Click '''File > Page Preview''', or click the '''Page Preview''' button [[Image:PagePrevIcon.png]]. The Writer window changes to display the current page and the following page, and shows the '''Page Preview''' toolbar in place of the Formatting toolbar.</li> | ||
| + | |||
| + | [[Image:PagePrevToolbar.png|thumb|none|500px|''Page Preview toolbar.'']] | ||
| + | |||
| + | <li>Click the '''Book Preview''' icon [[Image:BookPrevIcon.png]] to display left and right pages in their correct orientation.</li> | ||
| + | <li>To print the document from this page view, click the '''Print page view''' icon [[Image:PrintPgViewIcon.png]] to open the Print dialog. Choose your options and click '''OK''' to print as usual.</li> | ||
| + | <li>To choose margins and other options for the printout, click the '''Print options page view''' icon [[Image:PrOptPgViewIcon.png]] to display the Print Options dialog).</li> | ||
| + | |||
| + | [[Image:PrOpt.png|thumb|none|500px|''Print Options dialog.'']] | ||
| + | </ol> | ||
| + | |||
| + | == Printing a brochure == | ||
| + | You can print a document with two pages on each side of a sheet of paper, arranged so that when the printed pages are folded in half, the pages are in the correct order to form a booklet or brochure. | ||
| + | |||
| + | To print a brochure on a single-sided printer: | ||
| + | |||
| + | # Plan your document so it will look good when printed half size (choose appropriate margins, font sizes, and so on). Click '''File > Print'''. In the Print dialog, click '''Properties''' and be sure the printer is set to the same orientation (portrait or landscape) as specified in the page setup for your document. (Usually the orientation does not matter, but it does for brochures.) | ||
| + | # Click '''Options'''. In the Pages section of the Printer Options dialog, choose '''Brochure''' and '''Right pages'''. Click '''OK''' twice to print the first side of each page. | ||
| + | # Flip the pages and put them back into the printer, in the correct orientation to print on the blank side. You may need to experiment a bit to find out what the correct arrangement is for your printer. | ||
| + | # Click '''File > Print''' and check '''Properties''' to make sure the printer setup is still correct. | ||
| + | # Click '''Options''' again. In the Pages section of the Printer Options dialog, choose '''Brochure''' and '''Left page'''. Click '''OK''' twice to print the second sides. | ||
| + | # If your printer can do double-sided, then click on the options for '''Left pages''', '''Right pages''', and '''Brochure''', and it should not only do those but collate too. | ||
| + | |||
| + | == Printing envelopes == | ||
| + | Printing envelopes involves two steps: setup and printing. | ||
| + | |||
| + | To set up an envelope to be printed by itself or with your document: | ||
| + | |||
| + | <ol> | ||
| + | <li>Click '''Insert > Envelope''' from the menu bar.</li> | ||
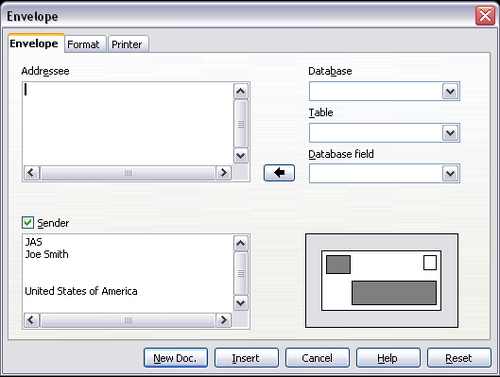
| + | <li>In the Envelope dialog, start with the ''Envelope'' tab. Verify, add, or edit the information in the Addressee and Sender boxes (the “from” on the envelope). You can type information directly into the Addressee and Sender boxes, or use the right-hand drop-down lists to select the database or table from which you can draw the envelope information, if desired. See [[../../Writer Guide/Using Mail Merge|Chapter 11 (Using Mail Merge)]] in the ''Writer Guide'' for details on how to print envelopes from a database.</li> | ||
| + | |||
| + | [[Image:Envelope.png|thumb|none|500px|''Choosing addressee and sender information for an envelope.'']] | ||
| + | |||
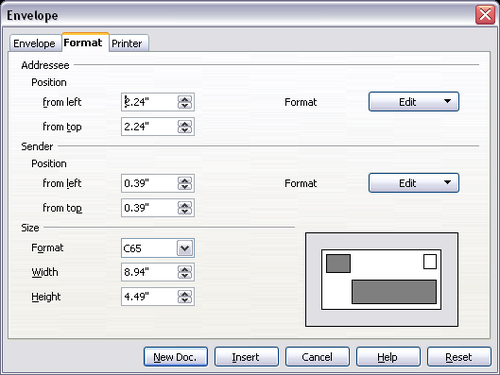
| + | <li>On the ''Format'' page, verify or edit the positioning of the addressee and the sender information. The preview area on the lower right shows the effect of your positioning choices.</li> | ||
| + | |||
| + | [[Image:EnvelopeFormat.png|thumb|none|500px|''Choosing positioning and size of elements for an envelope.'']] | ||
| + | |||
| + | <li>To format the text of these blocks, click the '''Edit''' buttons to the right. In the drop-down list you have two choices: Character and Paragraph.</li> | ||
| + | |||
| + | * In Character, you can choose Fonts (Sizes...), Fonts Effects (Underlining, Color...), Position (Rotating/scaling...), Hyperlink, Background and more. | ||
| + | * In Paragraph, you can choose Indents & Spacing, Alignment, Text Flow, Tabs, Drop Caps, Borders and Backgrounds. | ||
| + | |||
| + | <li>In the lower left of this page, choose the envelope format from the drop-down list. The width and height of the selected envelope then show in the boxes below the selected format. If you chose a pre-existing format, just verify these sizes. If you chose ''User defined'' in the Format list, then you can edit the sizes.</li> | ||
| + | |||
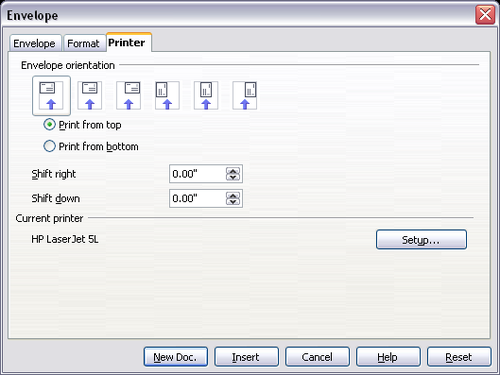
| + | <li>After formatting, go to the ''Printer'' page to choose printer options such as envelope orientation and shifting. You may need to experiment a bit to see what works best for your printer. You can also choose a different printer or alter printer setup (for example, specify the tray that holds envelopes) for this print job.</li> | ||
| + | |||
| + | [[Image:EnvelopePrinter.png|thumb|none|500px|''Choosing printer options for an envelope.'']] | ||
| + | |||
| + | <li>When you have finished formatting and are ready to print, click either the '''New Doc''' or '''Insert''' button to finish.</li> | ||
| + | |||
| + | * '''New Doc''' makes only an envelope or starts a new document with the envelope. '''Insert''' inserts the envelope into your existing document as page 1. | ||
| + | * To not proceed with this envelope, click '''Cancel''' or press the ''Esc'' key. You can also click '''Reset''' to remove your changes and return to the original settings when the dialog opened. | ||
| + | |||
| + | <li>When the Envelope dialog closes, you are returned to your document, which now has the envelope in the same file as the document. Save this file before you do anything else.</li> | ||
| + | </ol> | ||
| + | |||
| + | To print the envelope: | ||
| + | |||
| + | # Choose '''File > Print''' from the menu bar. | ||
| + | # On the Print dialog, under ''Print range'', choose '''Pages''' and type 1 in the box. Click '''OK''' to print. | ||
| + | |||
| + | == Printing labels == | ||
| + | Labels are commonly used for printing address lists (where each label shows a different address), but they can also be used for making multiple copies of one label only, for example return-address stickers. | ||
| + | |||
| + | To print labels: | ||
| + | |||
| + | <ol> | ||
| + | <li>Choose '''File > New > Labels''' on the menu bar. The Labels dialog opens.</li> | ||
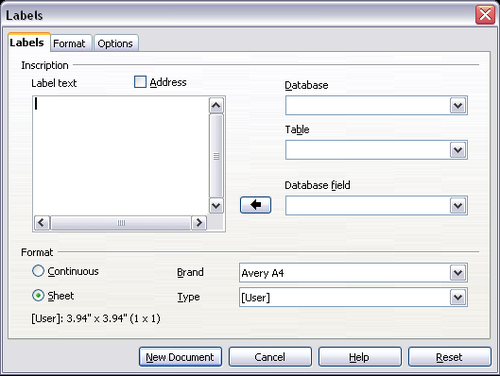
| + | <li>On the ''Labels'' page, fill in your own label text in the '''Inscription''' box, or use the '''Database''' and '''Table''' drop-down lists to choose the required information, as described in | ||
| + | [[../../Writer Guide/Using Mail Merge|Chapter 11 (Using Mail Merge)]] in the ''Writer Guide''.</li> | ||
| + | |||
| + | [[Image:Labels.png|thumb|none|500px|''Labels dialog, Labels page.'']] | ||
| + | |||
| + | <li>Select the label stock in the '''Brand''' drop-down list. The types for that brand then appear in the '''Type''' drop-down list. Select the size and type of labels required. You can also select User in the '''Type''' drop-down list and then make specific selections on the ''Format'' page.</li> | ||
| + | |||
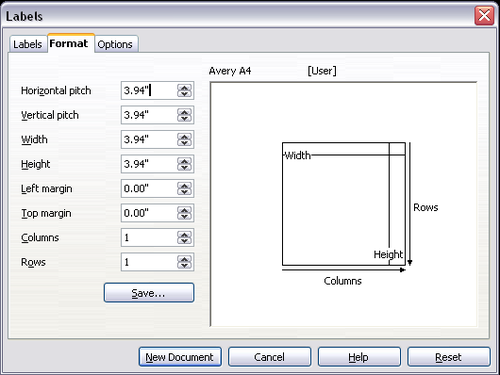
| + | [[Image:LabelsFormat.png|thumb|none|500px|''Labels dialog, Format page.'']] | ||
| + | |||
| + | <li>On the ''Format'' page, choose the pitch, sizes, margins, columns and rows for user-defined labels, or just verify with a brand of label stock you have loaded into the printer.</li> | ||
| + | |||
| + | <li>Click '''Save''' to save your new format.</li> | ||
| + | |||
| + | <li>When you have finished formatting, click '''New Document''' to make your sheet of labels or click '''Cancel''' (or press the ''Esc'' key). You can also click '''Reset''' to remove your changes and return to the original settings when the dialog opened.</li> | ||
| + | |||
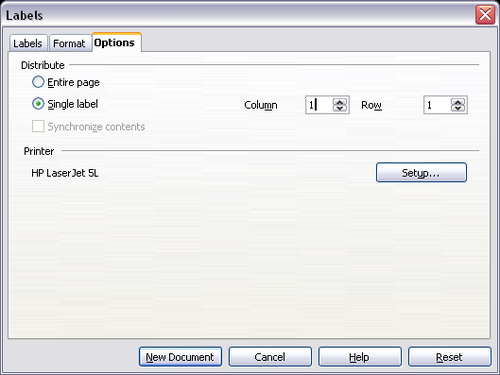
| + | <li>On the ''Options'' page, choose to print the entire page of labels or one single label, then select which one by the column and row. You can also change printer setup.</li> | ||
| + | |||
| + | [[Image:LabelsOpt.png|thumb|none|500px|''Labels dialog, Options page.'']] | ||
| + | |||
| + | <li>You can print right away using the '''Print File Directly''' icon on the toolbar or by choosing '''File > Print''' from the menu bar, or you can save the file to print later.</li> | ||
| + | </ol> | ||
| + | |||
| + | {{CCBY}} | ||
| + | [[Category:Getting Started (Documentation)]] | ||
Revision as of 15:16, 16 April 2010
- L'interfaccia di Writer
- Lavorare con i documenti
- Lavorare con il testo
- Formattazione del testo
- Formattare le pagine
- Aggiunta di note e immagini a un documento
- Creazione di un indice generale, indice analitico o bibliografia
- Stampa con Writer
- Spedire un fax
- Memorizzare le modifiche in un documento
- Uso della stampa in serie, documenti master, formulari, e campi
- Uso dei riferimenti incrociati e dei segnalibri
Pagina in traduzione
Writer mette a disposizione diverse opzioni per la stampa.
Contents
- 1 Stampa rapida
- 2 Controllo della stampa
- 3 Selezione delle opzioni di stampa per un documento
- 4 Stampa in bianco e nero con una stampante a colori
- 5 Visualizzare le pagine prima della stampa
- 6 Stampa di un dépliant
- 7 Stampa di buste
- 8 Stampa di etichette
- 9 Quick printing
- 10 Controlling printing
- 11 Selecting print options for a document
- 12 Printing in black and white on a color printer
- 13 Previewing pages before printing
- 14 Printing a brochure
- 15 Printing envelopes
- 16 Printing labels
Stampa rapida
Fate clic sull'icona Stampa file direttamente[[Image:]] per stampare l'intero documento sulla stampante predefinita del computer.
| |
E' possibile modificare l'azione associata all'icona Stampa file direttamente per stampare sulla stampante predefinita del documento invece che sulla stampante predefinita del computer. Andate in Strumenti > Opzioni > Carica/Salva > Generale e selezionate l'opzione Carica le impostazioni della stampante assieme al documento. |
Controllo della stampa
Utilizzate File > Stampa per aprire la finestra di dialogo Stampa (Figura 29) che consente maggiori controlli sulla funzionalità di stampa.
Nella finestra di dialogo è possibile selezionare:
- Quale stampante usare (se sul sistema ne sono installate più d'una) e le relative proprietà—ad esempio, orientamento (orizzontale o verticale), quale cassetto di alimentazione usare e la dimensione dei fogli. Le proprietà disponibili dipendono dal tipo di stampante selezionata; per maggiori dettagli consultare il manuale della stampante.
- Quali pagine stampare, quante copie farne e in quale ordine stamparle. Utilizzare trattini per specificare intervalli di pagine, e virgole o punti e virgola per separare intervalli diversi; ad esempio: 1, 5, 11–14, 34–40. Selezione rappresenta la parte evidenziata di una pagina o di più pagine.
- Scelta degli oggetti da stampare. Fare clic sul pulsante Extra per aprire la finestra di dialogo Opzioni stampante (Figura 30).
Selezione delle opzioni di stampa per un documento
Le selezioni effettuate dalla finestra di dialogo Opzioni stampante si applicano solo alla sessione di stampa corrente.
Per preimpostare le opzioni di stampa, utilizzare le due pagine disponibili in Strumenti > Opzioni: OpenOffice.org – Stampa (vedi Capitolo 2) e OpenOffice.org Writer – Stampa (che è molto simile alla finestra di dialogo Opzioni stampante).
Di seguito sono illustrati alcuni elementi di particolare interesse della finestra di dialogo Opzioni stampante.
- Nella sezione Contenuto, è possibile scegliere di non stampare oggetti grafici o lo sfondo (utile nella stampa di bozze per risparmiare inchiostro o toner).
- Nella sezione Pagine è possibile scegliere:
-
- La stampa delle sole pagine sinistre (numeri pari) o destre (numeri dispari). Queste impostazioni sono utili quando si vuole effettuare una stampa fronte-retro con una stampante che non ha questa funzionalità.
- La stampa delle pagine in ordine invertito.
- La stampa in modalità Depliant—questa opzione è trattata nel paragrafo “Stampa di un depliant” a pagina 43.
- Nella sezione Note e possibile scegliere se stampare le note inserite nel documento (con il comando Inserisci > Nota), e in quale posizione stamparle.
Stampa in bianco e nero con una stampante a colori
La stampa in bianco e nero con una stampante a colori consente di risparmiare inchiostro colorato o toner quando si stampano bozze o documenti che devono essere fotocopiati in bianco e nero. Sono disponibili diverse opzioni.
Per stampare in bianco e nero o in sfumature di grigio il documento corrente:
- Fare clic su File > Stampa per aprire la finestra di dialogo Stampa.
- Fare clic su Proprietà per aprire la finestra di dialogo delle proprietà della stampante. Le scelte disponibili dipendono dal modello di stampante, ma dovrebbe essere disponibile un'opzione per il colore. Consultare il manuale della stampante per ulteriori informazioni.
- Le scelte per il colore potrebbero includere bianco e nero o scala di grigio: scegliete una di queste. Se ci sono oggetti grafici nel documento è preferibile la sfumatura di grigio. Fate clic su OK per confermare la scelta e tornare alla finestra di dialogo Stampa, quindi fate di nuovo clic su OK per stampare il documento.
Per impostare OOo affinché stampi in sfumature di grigio tutto il testo a colori e gli oggetti grafici, procedere come segue.
- Fare clic su Strumenti > Opzioni > OpenOffice.org > Stampa.
- Selezionate l'opzione Converti i colori in sfumature di grigio. Fate clic su OK per salvare le modifiche.
Per impostare OOo Writer affinché stampi in nero il testo colorato e in sfumature di grigio gli oggetti grafici:
- Fare clic su Strumenti > Opzioni > OpenOffice.org Writer> Stampa.
- Sotto Contenuto, selezionare l'opzione Stampa in nero. Fate clic su OK per salvare le modifiche.
Visualizzare le pagine prima della stampa
La visualizzazione di pagina normale in Writer mostra come risulterà la pagina una volta stampata, visualizzando solo una pagina alla volta. Può essere utile vedere come risulteranno le pagine affiancate, soprattutto se si sta producendo un documento per la stampa fronte-retro. Ci sono due modalità per fare questo in OOo:
- Visualizza Layout di stampa (vista modificabile) —vedi “Modalità di visualizzazione dei documenti” a pagina 8.
- Anteprima di stampa (vista non modificabile) —da cui è possibile stampare pagine multiple su un unico foglio.
Per utilizzare Anteprima di stampa:
- Fare clic su File > Anteprima di stampa, o sul pulsante Anteprima di stampa [[Image:]].
La finestra di Writer cambia e mostra ora la pagina corrente e le pagine seguenti, oltre alla barra degli strumenti Anteprima di stampa al posto della barra di Formattazione.
- Fare clic sull'icona Anteprima del libro [[Image:]] per mostrare le pagine sinistre e destre nella loro disposizione corretta.
- Per stampare il documento da questa vista, fare clic sull'icona Stampa anteprima pagina [[Image:]]: si aprirà la finestra di dialogo di Stampa. Scegliere le opzioni e fare clic su OK per stampare.
- Per impostare i margini e altre opzioni per la stampa, fare clic sull'icona Opzioni di stampa [[Image:]]: si aprirà la finestra di dialogo Opzioni di stampa.
Stampa di un dépliant
E' possibile stampare un documento che abbia due pagine su ogni lato del foglio, in modo che quando le pagine vengono piegate si trovano nell'ordine corretto per formare un dépliant o una brochure.
Per stampare un dépliant su una stampante priva della funzione fronte-retro:
- Organizzare il documento in modo che risulti adeguato ad una stampa a dimensione dimezzata (scegliere opportunamente i margini, la dimensione dei caratteri, etc.). Fare clic su File > Stampa. Nella finestra di dialogo Stampa, fare clic su Proprietà e assicurarsi che la stampante abbia la stessa impostazione di orientamento (verticale od orizzontale) di quella specificata nell'impostazione di pagina del documento. (In generale l'orientamento non è rilevante, ma lo è per i dépliant.)
- Fare clic su Extra. Nella sezione Pagine della finestra di dialogo Opzioni stampante, scegliere Dépliant e Pagine destre. Fare clic su OK due volte per stampare la prima facciata di ogni pagina.
- Capovolgere le pagine e reintrodurle nella stampante, con l'orientamento appropriato per stampare la facciata ancora vuota. Potrebbe essere necessario fare qualche prova per trovare la procedura corretta per la vostra stampante.
- Fare clic su File > Stampa e verificare Proprietà per assicurarsi che la stampante sia ancora impostata correttamente.
- Fare clic nuovamente su Extra. Nella sezione Pagine della finestra di dialogo Opzioni stampante, scegliere Dépliant e Pagine sinistre. Fare clic su OK due volte per stampare le seconde facciate.
- Se la vostra stampante consente la stampa fronte-retro, fate click su Pagine sinistre, Pagine destre e Dépliant: oltre alla stampa delle pagine in un unico passaggio, queste dovrebbero anche risultare nell'ordine corretto per la rilegatura.
Stampa di buste
La stampa delle buste richiede due passaggi: l'impostazione e la stampa.
Per impostare la stampa di una busta insieme al documento:
- Fare clic su Inserisci > Busta dalla barra dei menu.
- Nella finestra di dialogo Busta, iniziare dalla scheda Busta (Figura 33). Controllare, aggiungere o modificare le informazioni nelle aree Mittente e Destinatario.
E' possibile inserire le informazioni direttamente nelle aree Mittente e Destinatario, o utilizzare il menu a discesa sulla destra per selezionare la base dati o la tabella da cui recuperare tali informazioni. Vedere il Capitolo 11 (Uso della Stampa in serie) nella Guida a Writer per maggiori dettagli su come stampare buste da una base dati.
- Nella scheda Formato (Figura 34), verificare o modificare il posizionamento delle informazioni su mittente e destinatario. Lo spazio di anteprima in basso a destra mostra il risultato delle impostazioni di posizionamento.
Per formattare il testo in queste aree, fare clic sui pulsanti Modifica posti sulla destra. L'elenco a cascata consente due impostazioni: Carattere e Paragrafo.
-
- In Carattere, è possibile impostare il tipo di carattere (Dimensioni...), gli effetti (Sottolineato, Colore...), la posizione (Rotazione/scala...), il collegamento, lo sfondo, etc.
- In paragrafo, è possibile impostare rientri e distanze, allineamento, flusso di testo, tabulazioni, capo lettera, bordi e sfondo.
- Nell'area in basso a sinistra di questa scheda, scegliere il formato della busta dall'elenco a discesa. Nelle due aree sotto il formato sono mostrate larghezza e altezza della busta selezionata. Verificate queste dimensioni se utilizzate un formato preesistente. Scegliendo Personalizzata dall'elenco dei formati, è possibile modificare direttamente le dimensioni.
- Eseguita la formattazione, passare alla scheda Stampante (Figura 35) per selezionare le opzioni di orientamento e posizionamento della busta nella stampante. Potrebbe essere necessario effettuare alcune prove per individuare le impostazioni più adatte alla stampante in uso.
E' inoltre possibile scegliere una diversa stampante o modificarne le impostazioni (ad esempio, per specificare quale cassetto conterrà le buste).
- Effettuate le impostazioni, fare clic su Nuovo doc. o su Inserisci per terminare. Nuovo doc. crea solamente una busta, o un nuovo documento contenente la busta. Inserisci inserisce la busta come prima pagina in un documento esistente.
Per annullare la creazione della busta, fare clic su Annulla o premere il tasto Esc. Facendo clic su Ripristina è inoltre possibile annullare le modifiche effettuate e ritornare alle impostazioni presenti all'apertura della finestra di dialogo.
- Alla chiusura della finestra di dialogo Busta viene riproposto il documento, che ora contiene anche la busta. E' consigliabile innanzitutto salvare questo file.
Per stampare la busta:
- Selezionate dalla barra dei menu File > Stampa.
- Nella finestra di dialogo Stampa, sotto Area di stampa, selezionare Pagine e inserire 1 nella casella corrispondente. Fare clic su OK per stampare.
Stampa di etichette
Le etichette sono utilizzate tipicamente per stampare indirizzi multipli (un indirizzo per etichetta), ma possono essere utili anche per realizzare più copie dello stesso indirizzo, ad esempio realizzare etichette adesive con l'indirizzo del mittente.
Per stampare etichette:
- Scegliere File > Nuovo > Etichette dalla barra dei menu. Verrà mostrata la finestra di dialogo Etichette.
- Nella scheda Etichette, inserire il testo dell'etichetta nell'area Testo etichetta, o utilizzare gli elenchi a discesa Database e Tabella per scegliere le informazioni da inserire in etichetta, come descritto nel Capitolo 11 (Uso della stampa in serie) della Guida a Writer.
- Selezionare il tipo di etichette dall'elenco a discesa Marca. I modelli di etichetta compariranno nell'elenco a discesa Tipo. Selezionare la dimensione e la tipologia di etichette. Nell'elenco a discesa Tipo è anche possibile selezionare Utente, per impostare manualmente le caratteristiche nella scheda Formato.
- Nella scheda Formato (Figura 37), selezionare distanze, dimensioni, margini, colonne e righe per personalizzare le etichette, o per verificare le impostazioni della tipologia di etichette scelta nella scheda precedente.
- Fare clic su Salva per salvare il nuovo formato di etichette.
- Terminata la formattazione, per creare il foglio di etichette fare clic su Nuovo documento, oppure fare clic su Cancel per annullare (o premere il tasto Esc). E' anche possibile fare clic su Ripristina per reimpostare i parametri predefiniti. Nella scheda Extra, è possibile selezionare se stampare l'intera pagina di etichette oppure una sola etichetta, identificata indicando la riga e la colonna corrispondenti. E' inoltre possibile modificare le impostazioni della stampante.
- E' possibile stampare direttamente utilizzando l'icona Stampa file direttamente sulla barra degli strumenti, oppure selezionare File > Stampa dalla barra dei menu, o infine salvare il file ottenuto per stampare in un momento successivo.
Writer provides a range of choices when printing.
Quick printing
Click the Print File Directly icon ![]() to send the entire document to the default printer defined for your computer.
to send the entire document to the default printer defined for your computer.
Controlling printing
For more control over printing, use File > Print to display the Print dialog.
On the Print dialog, you can choose:
- Which printer to use (if more than one are installed on your system) and the properties of the printer—for example, orientation (portrait or landscape), which paper tray to use, and what paper size to print on. The properties available depend on the selected printer; consult the printer’s documentation for details.
- What pages to print, how many copies to print, and in what order to print them. Use dashes to specify page ranges and commas or semicolons to separate ranges; for example: 1, 5, 11–14, 34–40. Selection is the highlighted part of a page or pages.
- What items to print. Click the Options button to display the Printer Options dialog.
Selecting print options for a document
Selections on the Printer Options dialog apply to this printing of this document only.
To specify default printing options, you need to use two pages in Tools > Options: OpenOffice.org – Print (see Chapter 2) and OpenOffice.org Writer – Print (which looks very similar to the Printer Options dialog).
Some items of interest on the Printer Options dialog include:
- In the Contents section, you might choose not to print graphics or page background in drafts, for example (to save toner or ink).
- In the Pages section, you can choose:
- Print only left (even-numbered) pages or only right (odd-numbered) pages. These settings are useful when you want to print on both sides of the page, but do not have a printer that handles this automatically.
- Print in reversed page order.
- Brochure—the results of this selection are discussed in Printing a brochure.
- In the Notes section, you can choose whether to print any notes that have been added to your document (using Insert > Note), and where to print the notes.
Printing in black and white on a color printer
You may wish to print documents in black and white on a color printer, to save expensive color ink or toner. Common uses are for drafts or documents to be photocopied in black and white. Several choices are available.
To print the current document in black and white or grayscale:
- Click File > Print to open the Print dialog.
- Click Properties to open the properties dialog for the printer. The available choices vary from one printer to another, but you should find an option for Color. See your printer’s help or user manual for more information.
- The choices for color may include black and white or grayscale. Choose one of these. Grayscale is best if you have any graphics in the document. Click OK to confirm your choice and return to the Print dialog, then click OK again to print the document.
To set up OOo to print all color text and graphics as grayscale:
- Click Tools > Options > OpenOffice.org > Print.
- Select the Convert colors to grayscale option. Click OK to save the change.
To set up OOo Writer to print all color text as black, and all graphics as grayscale:
- Click Tools > Options > OpenOffice.org Writer > Print.
- Under Contents, select the Print black option. Click OK to save the change.
Previewing pages before printing
The normal page view in Writer shows you what each page will look like when printed, but it shows only one page at a time. If you are designing a document to be printed double-sided, you may want to see what facing pages look like. OOo provides two ways to do this:
- View Layout (editable view) —see View layout.
- Page Preview (read-only view) —from which you can print multiple pages onto one sheet of paper.
To use Page Preview:
- Click File > Page Preview, or click the Page Preview button
 . The Writer window changes to display the current page and the following page, and shows the Page Preview toolbar in place of the Formatting toolbar.
 - Click the Book Preview icon
 to display left and right pages in their correct orientation.
 - To print the document from this page view, click the Print page view icon
 to open the Print dialog. Choose your options and click OK to print as usual.
 - To choose margins and other options for the printout, click the Print options page view icon
 to display the Print Options dialog).
Printing a brochure
You can print a document with two pages on each side of a sheet of paper, arranged so that when the printed pages are folded in half, the pages are in the correct order to form a booklet or brochure.
To print a brochure on a single-sided printer:
- Plan your document so it will look good when printed half size (choose appropriate margins, font sizes, and so on). Click File > Print. In the Print dialog, click Properties and be sure the printer is set to the same orientation (portrait or landscape) as specified in the page setup for your document. (Usually the orientation does not matter, but it does for brochures.)
- Click Options. In the Pages section of the Printer Options dialog, choose Brochure and Right pages. Click OK twice to print the first side of each page.
- Flip the pages and put them back into the printer, in the correct orientation to print on the blank side. You may need to experiment a bit to find out what the correct arrangement is for your printer.
- Click File > Print and check Properties to make sure the printer setup is still correct.
- Click Options again. In the Pages section of the Printer Options dialog, choose Brochure and Left page. Click OK twice to print the second sides.
- If your printer can do double-sided, then click on the options for Left pages, Right pages, and Brochure, and it should not only do those but collate too.
Printing envelopes
Printing envelopes involves two steps: setup and printing.
To set up an envelope to be printed by itself or with your document:
- Click Insert > Envelope from the menu bar.
- In the Envelope dialog, start with the Envelope tab. Verify, add, or edit the information in the Addressee and Sender boxes (the “from” on the envelope). You can type information directly into the Addressee and Sender boxes, or use the right-hand drop-down lists to select the database or table from which you can draw the envelope information, if desired. See Chapter 11 (Using Mail Merge) in the Writer Guide for details on how to print envelopes from a database.
- On the Format page, verify or edit the positioning of the addressee and the sender information. The preview area on the lower right shows the effect of your positioning choices.
- To format the text of these blocks, click the Edit buttons to the right. In the drop-down list you have two choices: Character and Paragraph.
- In Character, you can choose Fonts (Sizes...), Fonts Effects (Underlining, Color...), Position (Rotating/scaling...), Hyperlink, Background and more.
- In Paragraph, you can choose Indents & Spacing, Alignment, Text Flow, Tabs, Drop Caps, Borders and Backgrounds.
- In the lower left of this page, choose the envelope format from the drop-down list. The width and height of the selected envelope then show in the boxes below the selected format. If you chose a pre-existing format, just verify these sizes. If you chose User defined in the Format list, then you can edit the sizes.
- After formatting, go to the Printer page to choose printer options such as envelope orientation and shifting. You may need to experiment a bit to see what works best for your printer. You can also choose a different printer or alter printer setup (for example, specify the tray that holds envelopes) for this print job.
- When you have finished formatting and are ready to print, click either the New Doc or Insert button to finish.
- New Doc makes only an envelope or starts a new document with the envelope. Insert inserts the envelope into your existing document as page 1.
- To not proceed with this envelope, click Cancel or press the Esc key. You can also click Reset to remove your changes and return to the original settings when the dialog opened.
- When the Envelope dialog closes, you are returned to your document, which now has the envelope in the same file as the document. Save this file before you do anything else.
To print the envelope:
- Choose File > Print from the menu bar.
- On the Print dialog, under Print range, choose Pages and type 1 in the box. Click OK to print.
Printing labels
Labels are commonly used for printing address lists (where each label shows a different address), but they can also be used for making multiple copies of one label only, for example return-address stickers.
To print labels:
- Choose File > New > Labels on the menu bar. The Labels dialog opens.
- On the Labels page, fill in your own label text in the Inscription box, or use the Database and Table drop-down lists to choose the required information, as described in Chapter 11 (Using Mail Merge) in the Writer Guide.
- Select the label stock in the Brand drop-down list. The types for that brand then appear in the Type drop-down list. Select the size and type of labels required. You can also select User in the Type drop-down list and then make specific selections on the Format page.
- On the Format page, choose the pitch, sizes, margins, columns and rows for user-defined labels, or just verify with a brand of label stock you have loaded into the printer.
- Click Save to save your new format.
- When you have finished formatting, click New Document to make your sheet of labels or click Cancel (or press the Esc key). You can also click Reset to remove your changes and return to the original settings when the dialog opened.
- On the Options page, choose to print the entire page of labels or one single label, then select which one by the column and row. You can also change printer setup.
- You can print right away using the Print File Directly icon on the toolbar or by choosing File > Print from the menu bar, or you can save the file to print later.
| Content on this page is licensed under the Creative Common Attribution 3.0 license (CC-BY). |
