Difference between revisions of "IT/Documentation/OOo3 User Guides/Getting Started/Entering data in a form"
(Inserimento dei dati tramite un formulario) |
|||
| Line 1: | Line 1: | ||
| − | Inserimento dei dati tramite un formulario | + | {{DISPLAYTITLE:Inserimento dei dati tramite un formulario}} |
| + | {{Documentation/GS3BaseITTOC | ||
| + | |ShowPrevNext=block | ||
| + | |PrevPage=IT/Documentation/OOo3_User_Guides/Getting Started/Using data sources | ||
| + | |NextPage=IT/Documentation/OOo3_User_Guides/Getting Started/Creating queries and reports | ||
| + | }}__NOTOC__ | ||
| + | |||
| + | |||
| + | |||
| + | |||
| + | |||
| + | |||
| + | |||
| + | |||
| + | Pagina in traduzione - Translation in progress | ||
| + | |||
| + | |||
| + | |||
| + | |||
| + | |||
| + | |||
| + | |||
| + | |||
I ''record'' servono ad organizzare i dati che vengono inseriti in un formulario. Essi organizzano anche i dati inseriti nei formulari secondari (Figura 1). | I ''record'' servono ad organizzare i dati che vengono inseriti in un formulario. Essi organizzano anche i dati inseriti nei formulari secondari (Figura 1). | ||
| Line 81: | Line 103: | ||
|} | |} | ||
<center>[[Image:|thumb|''Figura 3: Esempio di record del formulario principale e secondario Vacanze'']]</center> | <center>[[Image:|thumb|''Figura 3: Esempio di record del formulario principale e secondario Vacanze'']]</center> | ||
| + | |||
| + | |||
| + | |||
| + | |||
| + | |||
| + | |||
| + | |||
| + | |||
| + | |||
| + | |||
| + | |||
| + | |||
| + | |||
| + | |||
| + | |||
| + | |||
| + | |||
| + | |||
| + | |||
| + | |||
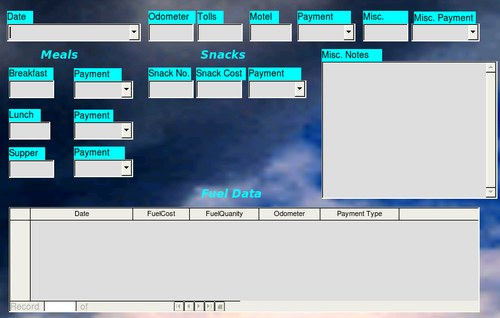
| + | ''Records'' are used to organize the data we enter into a form. They also organize the data we enter into a subform. | ||
| + | |||
| + | : [[Image:SingleRecord.png|thumb|none|500px|''Single Record.'']] | ||
| + | |||
| + | Each type of field allows a different method to enter the data. In most if not all cases, more than one method can be used. | ||
| + | |||
| + | The first step to entering data in a form is to open it from the main database window. | ||
| + | |||
| + | # Click the Forms icon in the ''Database'' list. | ||
| + | # Find the form's name in the ''Forms'' list (Vacations). | ||
| + | # Double-click the form's name. | ||
| + | |||
| + | The quickest way to enter a date in the Date field is to click the arrow that opens the dropdown calendar. Then click the date you want. Use the ''Tab'' key to go to the Odometer field. | ||
| + | * Click the left arrow before September to go back one month (August 2008). | ||
| + | * Click the right arrow after 2008 to go forward one month (October 2008). | ||
| + | * Multiple clicks in either direction will change the month and year the same number of times as the number of clicks. (The year also changes as you move from January back to December or December forward to January each time.) | ||
| + | :: [[Image:BaseCalendar08.png|thumb|none|500px|''Calendar dropdown.'']] | ||
| + | |||
| + | The Odometer, Tolls, and Motel fields are numerical fields. Enter values directly into them, or use the ''up'' and ''down arrows''. When the value is entered, use the ''Tab'' key to go to the next field. | ||
| + | |||
| + | * Clicking the ''up arrow'' increases the value, and the ''down arrow'' decreases the value. | ||
| + | * These two arrows only change the numerals to the left of the decimal place. | ||
| + | * Numerals to the right of the decimal place must be changed by deleting them and typing the desired ones. | ||
| + | |||
| + | The Motel's Payment field is a dropdown list. If as in my case, all of the elements of the list start with different letters, typing the first letter will select the desired letter. | ||
| + | |||
| + | * If two or more elements of the list have the same first letter, repeated typing of the first letter will cycle through the elements with this same first letter. So, if you accidentally go past the the element you wanted, you can keep typing the first letter until it reappears again. | ||
| + | * When the selection is correct, use the ''Tab'' key to go to the Misc. field. | ||
| + | |||
| + | The rest of the fields of the main form are either numerical fields or dropdown lists until we reach the Misc. Notes field. It is a text field. Type anything you desire in this field just as you would any simple text editor. | ||
| + | |||
| + | {{Documentation/Caution|Since the ''Tab'' key is used to move between fields, it can not be used in a text field. All spacing must be done by the ''spacebar''. Finally, the'' Enter'' key only acts as a line break to move the cursor to the next line. While the Enter key will move from non-text fields to non-text fields, it will not do so from a text field. Use the Tab instead.}} | ||
| + | |||
| + | {{Documentation/Note|If we did not have a subform for fuel data, using the ''Tab'' key would save all of the fields, clear them, and make the form ready to accept data on the second record.}} | ||
| + | |||
| + | Since we have a subform form, using the ''Tab'' key places the cursor in the first Date field of the subform with the date automatically entered to match the Date field of the main form. | ||
| + | |||
| + | The FuelCost, FuelQuantity, and Odometer fields are numerical fields. The Payment field is a dropdown list. Enter the data just as you did in the main form, and use the ''Tab'' key to go to the next field. | ||
| + | |||
| + | When you use the ''Tab'' key to leave the Payment field, it goes to the Date field of the next line and automatically enters the date. Now you can enter your second set of fuel data for this day. | ||
| + | |||
| + | To move to another record when the form has a subform, click any of the fields of the main form. In this case, click the Date field of the main form. Then use the directional arrows at the bottom. There are four of them from left to right: ''First Record, Previous Record, Next Record'', and ''Last Record''. To the right of these arrows in the ''New Record'' icon. | ||
| + | |||
| + | To create a new record while in another record in the main form, use one of these choices: | ||
| + | |||
| + | * Click the ''Next Record'' icon. | ||
| + | * Or, click the ''New Record'' icon. | ||
| + | |||
| + | [[Image:NavArrows.png|thumb|none|500px|Navigation arrows of a form.]] | ||
| + | |||
| + | {{Documentation/Tip|The number in the Record box is the number of the record whose data is shown in the form. (The data from the second record of the Vacations form was displayed when I took the screenshot above.) | ||
| + | |||
| + | If you know the number of the record you want, you can enter it into the record box and then use the ''Enter'' key to take you to that record.}} | ||
| + | |||
| + | Below is a record with data inserted in its fields. Note that not all fields have data in them. It is only necessary to have data in every field if you determine ahead of time to require all fields contain data. | ||
| + | |||
| + | [[Image:BaseSubformSample.png|thumb|none|500px|''Sample record of the Vacation form and subform.'']] | ||
| + | |||
| + | {{Documentation/Caution|If you required data be entered for a particular field and you do not have data for that field, you can no longer create a new record. You have to edit the table containing that field and change the ''Entry Required''. Save the table '''and''' the database. This could also cause you to lose data in the particular field.}} | ||
| + | |||
| + | |||
| + | {{CCBY}} | ||
| + | [[Category:Getting Started (Documentation)]] | ||
Revision as of 10:23, 10 September 2010
Pagina in traduzione - Translation in progress
I record servono ad organizzare i dati che vengono inseriti in un formulario. Essi organizzano anche i dati inseriti nei formulari secondari (Figura 1).
Ogni tipo di campo consente un diverso metodo di inserimento dati; nella maggior parte se non in tutti i casi è possibile usare più di un metodo.
Il primo passo per inserire dati in un formulario consiste nell'aprire il formulario dalla finestra principale del database.
- Fate clic sull'icona Formulari nell'elenco Database.
- Trovate nell'elenco Formulari quello con il nome Vacanze.
- Fate doppio clic sul nome del formulario.
Il modo più veloce per inserire la data nel campo Data è di fare clic sulla freccia a destra del campo che apre il calendario a scomparsa, quindi cliccare sul giorno desiderato (Figura 2). Per cambiare il mese seguite i seguenti passaggi; dopodiché, usate il tasto TAB per spostarvi nel campo Chilometraggio.
- Fate clic sulla freccia a sinistra del nome del mese per tornare indietro di un mese.
- Fate clic sulla freccia a destra per andare avanti di un mese.
- Ogni clic in ciascuna direzione sposterà il calendario un mese avanti o indietro (anche l'anno cambierà ogni volta che vi muoverete da Gennaio a Dicembre o da Dicembre a Gennaio).
I campi Chilometraggio, Pedaggi e Hotel sono campi numerici. Inserite i valori direttamente al loro interno, oppure utilizzate le frecce su e giù. Dopo avere inserito il valore, usate il tasto TAB per spostarvi nel prossimo campo.
- Facendo clic sulla Freccia Su si incrementa il valore, con la Freccia Giù si diminuisce il valore di una unità.
- Queste due frecce modificano solo i numeri a sinistra della virgola; i numeri alla sua destra devono essere modificati cancellandoli e reinserendoli.
Il campo PagamentoHotel è un elenco a tendina. Se come nel nostro caso tutti gli elementi dell'elenco iniziano con lettere differenti, è sufficiente digitare la lettera iniziale per selezionare la voce desiderata.
- Se due o più elementi dell'elenco hanno la stessa lettera iniziale, ripetendo la digitazione di tale lettera vedrete comparire ciclicamente questi elementi. Così, se accidentalmente superate l'elemento che desiderate, continuando a digitare la prima lettera questo comparirà di nuovo.
- Quando la selezione è corretta, mediante il tasto TAB spostatevi nel campo Varie.
Il resto dei campi del formulario principale sono campi numerici e/o elenchi apribili fino ad arrivare al campo Note; esso è un campo testo. Digitate in esso quello che volete come se fosse un semplice editor di testo.
| |
Dato che il tasto TAB viene usato per spostarsi tra i campi, esso non può essere usato all'interno di un campo di testo. Tutti gli spazi devono essere inseriti mediante la barra spaziatrice. Inoltre, il tasto INVIO agisce come un'interruzione di riga, spostando il cursore nella riga successiva. Esso consente di spostarsi da un campo non testuale ad un altro campo non testuale, ma non si comporta allo stesso modo in un campo di testo. Per uscire da un campo di testo, dovete utilizzare il tasto TAB. |
| |
Se non avessimo un formulario secondario per i dati relativi al carburante il tasto TAB, usato nell'ultimo campo, salverebbe il contenuto di tutti i campi e li pulirebbe preparando il formulario per l'inserimento dei dati relativi al secondo record. |
Dato che abbiamo un formulario secondario, usando il tasto TAB si posiziona il cursore nel primo campo Data del formulario secondario, con la data inserita automaticamente e uguale a quella del campo Data del formulario principale.
I campi CostoCarburante, QuantitàCarburante e Chilometraggio sono campi numerici. Il campo Pagamento è un elenco a tendina. Inserite i dati come già avete fatto nel formulario principale, ed usate il tasto TAB per spostarvi al campo successivo.
Usando il tasto TAB per lasciare il campo Pagamento vi sposterete nel campo Data della successiva riga con la data inserita automaticamente. Ora potrete inserire un secondo record di dati carburante per il medesimo giorno.
Per muovervi su un altro record, quando il formulario ha anche un formulario secondario, dovete fare clic su uno qualsiasi dei campi del formulario principale. Nel nostro caso, fate clic sul campo Data del formulario principale, quindi utilizzate le frecce direzionali in basso. Ce ne sono quattro, da sinistra a destra: Primo record di dati, Record di dati precedente, Record dati successivo e Ultimo record (Errore: sorgente del riferimento non trovata). A destra di queste frecce c'è l'icona Nuovo record di dati.
Per creare un nuovo record mentre vi trovate in un record sul formulario principale, utilizzate una di queste opzioni:
- Fate clic sull'icona Record dati successivo,
- oppure fate clic sull'icona Nuovo record.
| |
Il numero che compare nella casella Numero record dati corrisponde al record i cui dati sono visualizzati nel formulario (nella schermata di Figura 3 sono visualizzati i dati del secondo record del formulario vacanze).
Se conoscete il numero del record che desiderate, potete inserirlo nel riquadro Record di dati e quindi usare il tasto INVIO per visualizzare il contenuto di tale record. |
La Figura 3 mostra un record con i dati inseriti nei rispettivi campi; notate che non tutti i campi contengono dei dati. È necessario avere dei dati in ogni campo solo se ciò viene determinato prima, impostando ogni campo perché richieda dei dati.
| |
Se per un particolare campo avete richiesto l'inserimento del dato ma non avete dati da inserirvi, non potrete procedere nella creazione di un nuovo record. Dovete modificare le proprietà della tabella che contiene il campo e cambiare l'impostazione Digitazione necessaria, poi salvate la tabella e il database. Questo potrebbe anche causare la perdita dei dati del campo in questione. |
Records are used to organize the data we enter into a form. They also organize the data we enter into a subform.
-
 Single Record.

Each type of field allows a different method to enter the data. In most if not all cases, more than one method can be used.
The first step to entering data in a form is to open it from the main database window.
- Click the Forms icon in the Database list.
- Find the form's name in the Forms list (Vacations).
- Double-click the form's name.
The quickest way to enter a date in the Date field is to click the arrow that opens the dropdown calendar. Then click the date you want. Use the Tab key to go to the Odometer field.
- Click the left arrow before September to go back one month (August 2008).
- Click the right arrow after 2008 to go forward one month (October 2008).
- Multiple clicks in either direction will change the month and year the same number of times as the number of clicks. (The year also changes as you move from January back to December or December forward to January each time.)
-
 Calendar dropdown.
-

The Odometer, Tolls, and Motel fields are numerical fields. Enter values directly into them, or use the up and down arrows. When the value is entered, use the Tab key to go to the next field.
- Clicking the up arrow increases the value, and the down arrow decreases the value.
- These two arrows only change the numerals to the left of the decimal place.
- Numerals to the right of the decimal place must be changed by deleting them and typing the desired ones.
The Motel's Payment field is a dropdown list. If as in my case, all of the elements of the list start with different letters, typing the first letter will select the desired letter.
- If two or more elements of the list have the same first letter, repeated typing of the first letter will cycle through the elements with this same first letter. So, if you accidentally go past the the element you wanted, you can keep typing the first letter until it reappears again.
- When the selection is correct, use the Tab key to go to the Misc. field.
The rest of the fields of the main form are either numerical fields or dropdown lists until we reach the Misc. Notes field. It is a text field. Type anything you desire in this field just as you would any simple text editor.
| Since the Tab key is used to move between fields, it can not be used in a text field. All spacing must be done by the spacebar. Finally, the Enter key only acts as a line break to move the cursor to the next line. While the Enter key will move from non-text fields to non-text fields, it will not do so from a text field. Use the Tab instead. |
Since we have a subform form, using the Tab key places the cursor in the first Date field of the subform with the date automatically entered to match the Date field of the main form.
The FuelCost, FuelQuantity, and Odometer fields are numerical fields. The Payment field is a dropdown list. Enter the data just as you did in the main form, and use the Tab key to go to the next field.
When you use the Tab key to leave the Payment field, it goes to the Date field of the next line and automatically enters the date. Now you can enter your second set of fuel data for this day.
To move to another record when the form has a subform, click any of the fields of the main form. In this case, click the Date field of the main form. Then use the directional arrows at the bottom. There are four of them from left to right: First Record, Previous Record, Next Record, and Last Record. To the right of these arrows in the New Record icon.
To create a new record while in another record in the main form, use one of these choices:
- Click the Next Record icon.
- Or, click the New Record icon.
Below is a record with data inserted in its fields. Note that not all fields have data in them. It is only necessary to have data in every field if you determine ahead of time to require all fields contain data.

| If you required data be entered for a particular field and you do not have data for that field, you can no longer create a new record. You have to edit the table containing that field and change the Entry Required. Save the table and the database. This could also cause you to lose data in the particular field. |
| Content on this page is licensed under the Creative Common Attribution 3.0 license (CC-BY). |