Difference between revisions of "IT/Documentation/OOo3 User Guides/Getting Started/Editing a Fontwork object"
(Modifica di un oggetto Fontwork) |
|||
| Line 1: | Line 1: | ||
| − | Modifica di un oggetto Fontwork | + | {{DISPLAYTITLE:Modifica di un oggetto Fontwork}} |
| + | {{Documentation/GS3GgraphicsITTOC | ||
| + | |ShowPrevNext=block | ||
| + | |PrevPage=IT/Documentation/OOo3_User_Guides/Getting Started/What is Fontwork? | ||
| + | |NextPage=IT/Documentation/OOo3_User_Guides/Getting Started/Creating Web Pages | ||
| + | }}__notoc__ | ||
| + | |||
| + | |||
| + | |||
| + | |||
| + | |||
| + | |||
| + | |||
| + | |||
| + | Pagina in traduzione - translation in progress | ||
| + | |||
| + | |||
| + | |||
| + | |||
| + | |||
| + | |||
| + | |||
| + | |||
Una volta creato l'oggetto Fontwork, potete modificare alcuni dei suoi attributi. Per farlo, potete usare la barra degli strumenti di Fontwork, la barra di formattazione o le opzioni di menu descritte in questa sezione. | Una volta creato l'oggetto Fontwork, potete modificare alcuni dei suoi attributi. Per farlo, potete usare la barra degli strumenti di Fontwork, la barra di formattazione o le opzioni di menu descritte in questa sezione. | ||
| Line 126: | Line 148: | ||
Usate la finestra di dialogo Posizione e dimensione per definire correttamente la posizione e le dimensioni dell'oggetto (Figura 6). | Usate la finestra di dialogo Posizione e dimensione per definire correttamente la posizione e le dimensioni dell'oggetto (Figura 6). | ||
| + | |||
| + | |||
| + | |||
| + | |||
| + | |||
| + | |||
| + | |||
| + | |||
| + | |||
| + | |||
| + | |||
| + | |||
| + | |||
| + | |||
| + | |||
| + | |||
| + | |||
| + | |||
| + | |||
| + | |||
| + | |||
| + | |||
| + | Now that the Fontwork object is created, you can edit some of its attributes. To do this, you can use the Fontwork toolbar, the Formatting toolbar, or menu options as described in this section. If the selected Fontwork object is a 3D object, you can also use the 3D-Settings toolbar. | ||
| + | |||
| + | == Using the Fontwork toolbar == | ||
| + | Make sure that the Fontwork toolbar is visible. If you do not see it, go to '''View > Toolbars > Fontwork'''. | ||
| + | |||
| + | Click on the different icons to edit Fontwork objects. | ||
| + | |||
| + | [[Image:FontworkShapesIcon.png]] '''Fontwork Shape''': Edits the shape of the selected object. You can choose from a palette of shapes, as shown below. | ||
| + | |||
| + | : [[Image:FontworkShapes.png|thumb|none|500px|Fontwork toolbar showing palette of shapes.]] | ||
| + | |||
| + | [[Image:FWSameLtrHIcon.png]] '''Fontwork Same Letter Heights''': Changes the height of characters in the object. Toggles between normal height (some characters taller than others, for example capital letters, d, h, l and others) and all letters the same height. | ||
| + | |||
| + | : [[Image:FWSameLtrHt.png|thumb|none|500px|Left: normal letters; right: same letter heights.]] | ||
| + | |||
| + | [[Image:FWAlignIcon.png]] '''Fontwork Alignment''': Changes the alignment of characters. Choices are left align, center, right align, word justify, and stretch justify. The effects of the text alignment can only be seen if the text spans over two or more lines. In the stretch justify mode, all the lines are filled completely. | ||
| + | |||
| + | : [[Image:FWAlignMenu.png]] | ||
| + | |||
| + | [[Image:FWCharSpaceIcon.png]] '''Fontwork Character Spacing''': Changes the character spacing and kerning in the object. For custom spacing, input a percentage value: 100% is normal spacing; less than 100% is tight spacing; more than 100% is expanded spacing. | ||
| + | |||
| + | : [[Image:FWCharSpace.png]] | ||
| + | |||
| + | == Using the Formatting toolbar == | ||
| + | Now let us go further and customize the Fontwork object with several more attributes. | ||
| + | |||
| + | Click on the Fontwork object. The Formatting toolbar changes to show all the options for editing the object. (The toolbar shown below appears when you use Fontwork in Writer.) | ||
| + | |||
| + | [[Image:FontworkFormatBar.png|thumb|none|600px|''Formatting toolbar with a Fontwork object selected in Writer'']] | ||
| + | |||
| + | This figure shows the toolbar floating. In its default, docked position it is one of the toolbars located below the menu bar. The example toolbar has also been customized to show all of the available options; by default only a subset of these options is shown. | ||
| + | |||
| + | On the Formatting toolbar you have a large choice of options for customizing your object. These choices are the same as the ones for other drawing objects. For more information, see the ''Draw Guide''. | ||
| + | |||
| + | === Line options === | ||
| + | '''Line''' icon: Opens a dialog with three tabs: '''Line''', '''Line Styles''', '''Arrow Styles'''. | ||
| + | |||
| + | * Use the '''Line''' tab to edit the most common properties of the line around the selected Fontwork object, by choosing from previously-defined attributes including line style, line color, and arrow styles. | ||
| + | * Use the '''Lines Styles''' and '''Arrow Styles''' tabs to edit the properties of line and arrow styles, and define new styles. | ||
| + | |||
| + | '''Arrow Style''' icon: Choose from the different arrow styles. | ||
| + | |||
| + | '''Line Style''' box: Choose from the available line styles. | ||
| + | |||
| + | '''Line Width''' box: Set the width of the line. | ||
| + | |||
| + | '''Line Color''' box: Select the color of the line. | ||
| + | |||
| + | === Area options === | ||
| + | '''Area''' icon: Opens a dialog (Figure 11) with seven tabs: '''Area''', '''Shadow''', '''Transparency''', '''Colors''', '''Gradients''', '''Hatching''', '''Bitmaps'''. | ||
| + | |||
| + | * '''Area''' tab: Choose from the predefined list a color, bitmap, gradient or hatching pattern to fill the selected object. | ||
| + | * '''Shadow''' tab: Set the shadow properties of the selected object. | ||
| + | * '''Transparency''' tab: Set the transparency properties of the selected object. | ||
| + | * '''Colors''' tab: Modify the available colors or add new ones to appear on the Area tab. | ||
| + | * '''Gradients''' tab: Modify the available gradients or add new ones to appear on the Area tab. | ||
| + | * '''Hatching''' tab: Modify the available hatching patterns or add new ones to appear on the Area tab. | ||
| + | * '''Bitmaps''' tab: Create simple bitmap patterns and import bitmaps, to make them available on the Area tab. | ||
| + | |||
| + | '''Area Style / Filling''' boxes: Select the type of the fill of the selected object. For more detailed settings, use the Area icon. | ||
| + | |||
| + | === Positioning options === | ||
| + | '''Rotate''' icon: Rotate the selected object manually using the mouse to drag the object. | ||
| + | |||
| + | '''To Foreground''' icon: Moves the selected object in front of the text. | ||
| + | |||
| + | '''To Background''' icon: Moves the selected object behind the text. | ||
| + | |||
| + | '''Alignment''' icon: Modifies the alignment of the selected objects. | ||
| + | |||
| + | '''Bring to front''' icon: Moves the selected object in front of the others. | ||
| + | |||
| + | '''Send to back''' icon: Moves the selected object behind the others. | ||
| + | |||
| + | '''Change '''A'''nchor''' icon: Switch between anchoring options: | ||
| + | |||
| + | * To Page - The object keeps the same position in relation to the page margins. It does not move as you add or delete text. | ||
| + | * To Paragraph - The object is associated with a paragraph and moves with the paragraph. It may be placed in the margin or another location. | ||
| + | * To Character - The object is associated with a character but is not in the text sequence. It moves with the paragraph but may be placed in the margin or another location. This method is similar to anchoring to a paragraph. | ||
| + | * As Character - The object is placed in the document like any character and moves with the paragraph as you add or delete text before the object. | ||
| + | |||
| + | '''Ungroup''' icon: Ungroups the selected objects, so you can manage them individually. | ||
| + | |||
| + | '''Group''' icon: Groups the selected objects, so you can manage them as a single object. | ||
| + | |||
| + | == Using menu options == | ||
| + | You can use some the choices on the '''Format''' menu to anchor, align, arrange and group selected Fontwork objects, wrap text around them, and flip them horizontally and vertically. | ||
| + | |||
| + | You can also right-click on a Fontwork object and choose many of the same options from the pop-up menu. In addition, the pop-up menu provides quick access to the Line, Area, Text, and Position and Size dialogs. The Text dialog offers only a few options for Fontwork objects and is not discussed here. On the Position and Size dialog, you can enter precise values concerning size and position. For more information on all of these menu options, see the ''Draw Guide''. | ||
| + | |||
| + | ==Using the 3D-Settings toolbar== | ||
| + | If the selected Fontwork object is a 3D object, you can also use the options on the 3D-Settings toolbar. You can also change a 2D Fontwork object into a 3D object (or change a 3D object into a 2D object) by clicking the Extrusion On/Off icon on the 3D-Settings toolbar. For more information, see the ''Draw Guide''. | ||
| + | |||
| + | [[Image:3Dsettingstoolbar.png|thumb|none|500px|3D-Settings toolbar.]] | ||
| + | |||
| + | = Moving and resizing Fontwork objects = | ||
| + | When you select a Fontwork object, eight blue squares (known as ''handles'') appear around the edge of the object. You can drag these handles to resize the object. | ||
| + | |||
| + | A yellow dot also appears on the object. This dot may be along an edge of the object, or it may be somewhere else; see below for an example. If you hover the pointer over this yellow dot, the pointer turns into a hand symbol. You can drag the dot in different directions to distort the object. | ||
| + | |||
| + | [[Image:FWYellowDot.png|thumb|none|500px|''Yellow dot'']] | ||
| + | |||
| + | Hovering the pointer over other parts of the object turns the pointer into the usual symbol for dragging the object to another part of the page. | ||
| + | |||
| + | For precise control of the location and size of the object, use the Position and Size dialog. | ||
| + | |||
| + | |||
| + | {{CCBY}} | ||
| + | [[Category:Getting Started (Documentation)]] | ||
Revision as of 16:30, 10 September 2010
Pagina in traduzione - translation in progress
Una volta creato l'oggetto Fontwork, potete modificare alcuni dei suoi attributi. Per farlo, potete usare la barra degli strumenti di Fontwork, la barra di formattazione o le opzioni di menu descritte in questa sezione.
Uso della barra degli strumenti di Fontwork
Assicuratevi che la barra degli strumenti di Fontwork (mostrata nella Errore: sorgente del riferimento non trovata) sia visibile. Se non riuscite a visualizzare la barra, selezionatela da Visualizza > Barre degli strumenti > Fontwork.
Fate clic sulle diverse icone per modificare gli oggetti Fontwork.
| [[Image:]] | Forma Fontwork: consente di modificare la forma dell'oggetto selezionato. Potete sceglierla tramite una tavolozza delle forme. |
| [[Image:]] | Lettere di uguale altezza fontwork : consente di modificare l'altezza dei caratteri nell'oggetto. Si passa dall'altezza normale (alcuni caratteri sono più alti degli altri, per esempio le lettere maiuscole d, h, l e altre) a lettere della stessa altezza. |
| [[Image:]] | Allineamento fontwork : permette di modificare l'allineamento dei caratteri. Potete scegliere fra: allinea a sinistra, al centro, a destra, giustifica parole e giustifica caratteri. L'effetto dell'allineamento del testo si può vedere solo se il testo si estende su due o più linee. Nel modo "giustifica caratteri" tutte le linee vengono occupate completamente. | [[Image:]]
|
| [[Image:]] | Spaziatura caratteri fontwork : consente di modificare la distanza e la crenatura fra i caratteri dell'oggetto. Per scegliere la spaziatura, inserite un valore percentuale: 100% è la spaziatura normale; meno di 100% è una spaziatura stretta; più di 100% è una spaziatura larga. | [[Image:]]
|
Uso della Barra di formattazione
A questo punto potete personalizzare l'oggetto Fontwork con numerose altre caratteristiche.
Fate clic sull'oggetto Fontwork. La Barra di formattazione cambia per mostrare tutte le opzioni disponibili per modificare l'oggetto. (Ad esempio, la barra degli strumenti mostrata nella Figura 3 apparirà quando utilizzate Fontwork in Writer.)
Notate che in questa figura la barra degli strumenti è stata sganciata per comodità di illustrazione: se non avete scelto di avere la barra degli strumenti mobile, essa apparirà come al solito, posizionata da qualche parte sotto la barra dei menu.
Sulla Barra di formattazione avete a disposizione numerose opzioni per personalizzare l'oggetto. Queste opzioni sono le stesse utilizzate per altri oggetti di disegno. Potete trovare maggiori informazioni a riguardo nella Guida a Draw .
Opzioni Linea
Icona Linea: apre una finestra di dialogo (Figura 4) con tre schede: Linea, Stili linea, Stili freccia.
Usate la scheda Linea per modificare le proprietà più comuni della linea intorno all'oggetto Fontwork selezionato, scegliendo fra gli attributi definiti precedentemente, compresi lo stile linea, il colore linea e gli stili freccia.
Usate le schede Stili linea e Stili freccia per modificare le proprietà della linea, gli stili delle frecce e definire nuovi stili.
Icona Stile freccia: consente di scegliere tra i diversi stili delle frecce.
Riquadro Stile linea: permette di scegliere fra i diversi stili di linea disponibili.
Riquadro Spessore linea: consente di impostare lo spessore della linea.
Riquadro Colore linea: permette di selezionare il colore della linea.
Opzioni Area
Icona Area: consente di aprire una finestra di dialogo (Figura 5) con sette schede: Area, Ombre, Trasparenza, Colori, Sfumature, Tratteggi, Bitmap.
- Scheda Area: consente di scegliere fra i parametri definiti un colore, tipo di bitmap, sfumatura o tratteggio per riempire l'oggetto selezionato.
- Scheda Ombra: consente di impostare le proprietà dell'ombreggiatura dell'oggetto selezionato.
- Scheda Trasparenza: consente di impostare le proprietà della trasparenza dell'oggetto selezionato.
- Scheda Colori: permette di modificare i colori disponibili o di aggiungerne di nuovi a quelli che appaiono nella scheda Area.
- Scheda Sfumature: consente di modificare le sfumature disponibili o di aggiungerne di nuove a quelle che appaiono nella scheda Area.
- Scheda Tratteggio: consente di modificare i modelli di tratteggio disponibili o di aggiungerne di nuovi a quelli che appaiono nella scheda Area.
- Scheda Bitmap: consente di creare dei semplici modelli bitmap e di importarne altri per renderli disponibili nella scheda Area.
Riquadri Stile area/Riempimento: consentono di scegliere il tipo di riempimento dell'oggetto selezionato. Usate l'icona Area per informazioni più dettagliate sulle impostazioni.
Opzioni Posizionamento
Icona Ruota: consente di ruotare manualmente l'oggetto selezionato utilizzando il mouse per trascinare l'oggetto.
Icona In primo piano: permette di spostare l'oggetto selezionato davanti al testo.
Icona Sullo sfondo: permette di spostare l'oggetto selezionato dietro al testo.
Icona Allineamento: consente di modificare l'allineamento degli oggetti selezionati.
Icona Porta in primo piano: consente di spostare l'oggetto davanti agli altri.
Icona Porta in fondo: consente di spostare l'oggetto selezionato dietro agli altri.
Icona Commuta l'ancoraggio: permette di utilizzare diverse opzioni di ancoraggio:
- Alla pagina - L'oggetto conserva la stessa posizione rispetto ai margini della pagina. L'oggetto non si sposterà se aggiungete o cancellate del testo.
- Al paragrafo - L'oggetto è associato al paragrafo e si sposta con esso. Può essere posizionato sul margine o altrove.
- Al carattere - L'oggetto è associato al carattere ma non si trova nella sequenza del testo. Si sposta insieme al paragrafo ma può essere posizionato sul margine o altrove. Questo metodo è simile all'ancoraggio al paragrafo.
- Come carattere - L'oggetto è posizionato nel documento come qualsiasi carattere e si sposta con il paragrafo ogni volta che viene aggiunto o cancellato del testo prima dell'oggetto.
Icona Rimuovi: consente di separare gli oggetti selezionati, così da poterli gestire singolarmente.
Icona Raggruppa: consente di raggruppare gli oggetti selezionati per poterli gestire come un oggetto singolo.
Potete utilizzare alcune opzioni del menu Formato per ancorare, allineare, organizzare e raggruppare gli oggetti Fontwork selezionati, disporre il testo intorno ad essi, ruotarli in orizzontale e in verticale.
Facendo clic con il tasto destro su un oggetto Fontwork potete scegliere molte delle stesse funzioni proposte dal menu a scomparsa. Inoltre, il menu a scomparsa offre un accesso rapido alle finestre di dialogo Linea, Area, Testo, Posizione e dimensione. Le finestre di dialogo Linea e Area sono descritte alle pagine 3 e 4. La finestra di dialogo Testo offre solo poche opzioni per gli oggetti Fontwork (in questa guida non viene descritta).
Nella finestra di dialogo Posizione e dimensione (Figura 6) potete inserire dei valori precisi relativi alle dimensioni e alla posizione. Per maggiori informazioni consultate la Guida a Draw.
Come spostare e ridimensionare gli oggetti Fontwork
Quando selezionate un oggetto Fontwork, otto quadratini blu (chiamati maniglie) appaiono intorno ai bordi dell'oggetto, come si nota sotto. Potete ridimensionare l'oggetto trascinando queste maniglie.
| Sull'oggetto appare anche un punto giallo. Questo punto può trovarsi sul bordo dell'oggetto o altrove; vedete la figura a destra per un esempio. Se portate il cursore del mouse sul punto giallo, esso si trasformerà in una mano. Potete trascinare il punto in diverse direzioni per modificare la forma dell'oggetto. | [[Image:]] |
Posizionando il cursore su altre parti dell'oggetto, esso riprende la forma abituale. In questo caso è possibile trascinare l'oggetto in un'altra posizione nella pagina.
Usate la finestra di dialogo Posizione e dimensione per definire correttamente la posizione e le dimensioni dell'oggetto (Figura 6).
Now that the Fontwork object is created, you can edit some of its attributes. To do this, you can use the Fontwork toolbar, the Formatting toolbar, or menu options as described in this section. If the selected Fontwork object is a 3D object, you can also use the 3D-Settings toolbar.
Using the Fontwork toolbar
Make sure that the Fontwork toolbar is visible. If you do not see it, go to View > Toolbars > Fontwork.
Click on the different icons to edit Fontwork objects.
![]() Fontwork Shape: Edits the shape of the selected object. You can choose from a palette of shapes, as shown below.
Fontwork Shape: Edits the shape of the selected object. You can choose from a palette of shapes, as shown below.
-
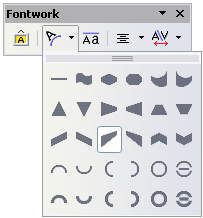 Fontwork toolbar showing palette of shapes.

![]() Fontwork Same Letter Heights: Changes the height of characters in the object. Toggles between normal height (some characters taller than others, for example capital letters, d, h, l and others) and all letters the same height.
Fontwork Same Letter Heights: Changes the height of characters in the object. Toggles between normal height (some characters taller than others, for example capital letters, d, h, l and others) and all letters the same height.
-
 Left: normal letters; right: same letter heights.

![]() Fontwork Alignment: Changes the alignment of characters. Choices are left align, center, right align, word justify, and stretch justify. The effects of the text alignment can only be seen if the text spans over two or more lines. In the stretch justify mode, all the lines are filled completely.
Fontwork Alignment: Changes the alignment of characters. Choices are left align, center, right align, word justify, and stretch justify. The effects of the text alignment can only be seen if the text spans over two or more lines. In the stretch justify mode, all the lines are filled completely.

![]() Fontwork Character Spacing: Changes the character spacing and kerning in the object. For custom spacing, input a percentage value: 100% is normal spacing; less than 100% is tight spacing; more than 100% is expanded spacing.
Fontwork Character Spacing: Changes the character spacing and kerning in the object. For custom spacing, input a percentage value: 100% is normal spacing; less than 100% is tight spacing; more than 100% is expanded spacing.

Using the Formatting toolbar
Now let us go further and customize the Fontwork object with several more attributes.
Click on the Fontwork object. The Formatting toolbar changes to show all the options for editing the object. (The toolbar shown below appears when you use Fontwork in Writer.)

This figure shows the toolbar floating. In its default, docked position it is one of the toolbars located below the menu bar. The example toolbar has also been customized to show all of the available options; by default only a subset of these options is shown.
On the Formatting toolbar you have a large choice of options for customizing your object. These choices are the same as the ones for other drawing objects. For more information, see the Draw Guide.
Line options
Line icon: Opens a dialog with three tabs: Line, Line Styles, Arrow Styles.
- Use the Line tab to edit the most common properties of the line around the selected Fontwork object, by choosing from previously-defined attributes including line style, line color, and arrow styles.
- Use the Lines Styles and Arrow Styles tabs to edit the properties of line and arrow styles, and define new styles.
Arrow Style icon: Choose from the different arrow styles.
Line Style box: Choose from the available line styles.
Line Width box: Set the width of the line.
Line Color box: Select the color of the line.
Area options
Area icon: Opens a dialog (Figure 11) with seven tabs: Area, Shadow, Transparency, Colors, Gradients, Hatching, Bitmaps.
- Area tab: Choose from the predefined list a color, bitmap, gradient or hatching pattern to fill the selected object.
- Shadow tab: Set the shadow properties of the selected object.
- Transparency tab: Set the transparency properties of the selected object.
- Colors tab: Modify the available colors or add new ones to appear on the Area tab.
- Gradients tab: Modify the available gradients or add new ones to appear on the Area tab.
- Hatching tab: Modify the available hatching patterns or add new ones to appear on the Area tab.
- Bitmaps tab: Create simple bitmap patterns and import bitmaps, to make them available on the Area tab.
Area Style / Filling boxes: Select the type of the fill of the selected object. For more detailed settings, use the Area icon.
Positioning options
Rotate icon: Rotate the selected object manually using the mouse to drag the object.
To Foreground icon: Moves the selected object in front of the text.
To Background icon: Moves the selected object behind the text.
Alignment icon: Modifies the alignment of the selected objects.
Bring to front icon: Moves the selected object in front of the others.
Send to back icon: Moves the selected object behind the others.
Change Anchor icon: Switch between anchoring options:
- To Page - The object keeps the same position in relation to the page margins. It does not move as you add or delete text.
- To Paragraph - The object is associated with a paragraph and moves with the paragraph. It may be placed in the margin or another location.
- To Character - The object is associated with a character but is not in the text sequence. It moves with the paragraph but may be placed in the margin or another location. This method is similar to anchoring to a paragraph.
- As Character - The object is placed in the document like any character and moves with the paragraph as you add or delete text before the object.
Ungroup icon: Ungroups the selected objects, so you can manage them individually.
Group icon: Groups the selected objects, so you can manage them as a single object.
You can use some the choices on the Format menu to anchor, align, arrange and group selected Fontwork objects, wrap text around them, and flip them horizontally and vertically.
You can also right-click on a Fontwork object and choose many of the same options from the pop-up menu. In addition, the pop-up menu provides quick access to the Line, Area, Text, and Position and Size dialogs. The Text dialog offers only a few options for Fontwork objects and is not discussed here. On the Position and Size dialog, you can enter precise values concerning size and position. For more information on all of these menu options, see the Draw Guide.
Using the 3D-Settings toolbar
If the selected Fontwork object is a 3D object, you can also use the options on the 3D-Settings toolbar. You can also change a 2D Fontwork object into a 3D object (or change a 3D object into a 2D object) by clicking the Extrusion On/Off icon on the 3D-Settings toolbar. For more information, see the Draw Guide.

Moving and resizing Fontwork objects
When you select a Fontwork object, eight blue squares (known as handles) appear around the edge of the object. You can drag these handles to resize the object.
A yellow dot also appears on the object. This dot may be along an edge of the object, or it may be somewhere else; see below for an example. If you hover the pointer over this yellow dot, the pointer turns into a hand symbol. You can drag the dot in different directions to distort the object.

Hovering the pointer over other parts of the object turns the pointer into the usual symbol for dragging the object to another part of the page.
For precise control of the location and size of the object, use the Position and Size dialog.
| Content on this page is licensed under the Creative Common Attribution 3.0 license (CC-BY). |