Creare un modello
- Applicare gli stili
- Modificare gli stili
- Creare stili personalizzati
- Copiare e spostare gli stili
- Eliminare gli stili
- Usare un modello per creare un documento
- Creare un modello
- Modificare un modello
- Aggiunta di modelli tramite la Gestione estensioni
- Definire un modello predefinito
- Associazione di un documento a un modello differente
- Gestire i modelli
- Esempi di utilizzo dello stile
Potete creare modelli personali in due modi: da un documento e utilizzando una procedura guidata.
Creare un modello da un documento
Per creare un modello da un documento:
- Aprite un documento, nuovo o già esistente, del tipo per cui volete creare un modello (testo, foglio elettronico, disegno, presentazione).
- Aggiungete il contenuto e gli stili che preferite.
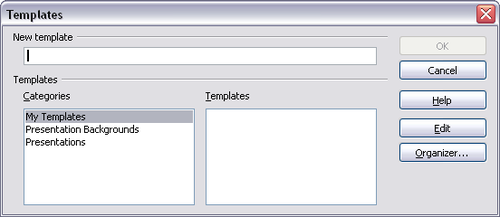
- Dal menu principale, scegliete File > Modelli > Salva. Si apre la finestra di dialogo Modelli (vedere Figura 9).
- Nel campo Nuovo modello, digitate un nome per il nuovo modello.
- Nell'elenco Categorie, fate clic sulla categoria alla quale volete assegnare il modello. La categoria scelta non ha effetto sul modello; è semplicemente la cartella in cui salvate il modello. Scegliendo una categoria appropriata, sarà più facile trovare il template quando vorrete utilizzarlo. Per esempio, potreste salvare modelli di Impress sotto la categoria Presentazioni.
Per ulteriori informazioni sulle cartelle di modelli vedere "Gestire i modelli" a pagina 25.
- Fate clic su OK per salvare il nuovo modello.
Ogni impostazione che può essere aggiunta o modificata in un documento può essere salvata in un modello. Per esempio, di seguito è riportato un elenco (non completo) delle impostazioni che possono essere incluse in documenti Writer e poi salvate come modello per un uso successivo:
- Impostazioni di stampa: scelta della stampante, pagina singola o fronte/retro, dimensione carta, e così via.
- Stili usati, ovvero gli stili carattere, pagina, cornice, numerazione e paragrafo.
- Formato e impostazioni relativi a indici, tabelle, bibliografie, tavole dei contenuti.
I modelli possono anche contenere testo predefinito, evitandovi di doverlo digitare ogni volta che create un nuovo documento. Per esempio, un modello di lettera potrebbe contenere il vostro nome, indirizzo e formula di saluto.
Nei modelli è anche possibile salvare le personalizzazioni del menu e della barra degli strumenti ; vedere il Capitolo 14 (Personalizzare OpenOffice.org) per ulteriori informazioni.
Creare un modello usando una procedura guidata
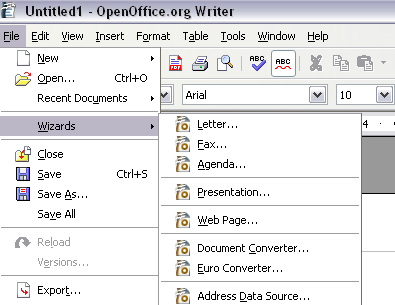
Potete usare delle procedure guidate per creare modelli di lettere, fax, agende, presentazioni, e pagine Web.
Ad esempio, la procedura guidata Fax vi guida attraverso le seguenti scelte:
- Tipo di fax (commerciale o personale).
- Elementi del documento come la data, l'oggetto (per i fax commerciali), formula di saluto e formula di chiusura.
- Opzioni per le informazioni sul mittente e sul destinatario (fax commerciali).
- Testo da includere nel piè di pagina (fax commerciali).
Per creare un modello usando una procedura guidata:
- Dal menu principale, scegliete File > Procedure guidate > [tipo di modello richiesto].
- Seguite le istruzioni sulle pagine della procedura guidata. Questa procedura è leggermente diversa per ciascun tipo di modello, ma il formato è molto simile.
- Nell'ultima sezione della procedura guidata, potete specificare il nome e la posizione di salvataggio del modello. La posizione predefinita è la cartella dei modelli personali, ma è possibile scegliere una posizione diversa.
- Infine, avete la possibilità di creare un nuovo documento immediatamente a partire dal modello, o di modificare manualmente il modello stesso. Per i futuri documenti, potete riutilizzare il modello creato con la procedura guidata, nello stesso modo con cui usate gli altri modelli.
You can create your own templates in two ways: from a document, and using a wizard.
Creating a template from a document
To create a template from a document:
- Open a new or existing document of the type you want to make into a template (text document, spreadsheet, drawing, presentation).
- Add the content and styles that you want.
- From the main menu, choose File > Templates > Save. The Templates dialog opens.
- In the New template field, type a name for the new template.
- In the Categories list, click the category to which you want to assign the template. The category you choose has no effect on the template itself; it is simply the folder in which you save the template. Choosing an appropriate category makes it easier to find the template when you want to use it. For example, you might save Impress templates under the Presentations category. To learn more about template folders, see Organizing templates.
- Click OK to save the new template.
Any settings that can be added to or modified in a document can be saved in a template. For example, below are some of the settings (although not a full list) that can be included in a Writer document and then saved as a template for later use:
- Printer settings: which printer, single sided / double sided, and paper size, and so on
- Styles to be used, including character, page, frame, numbering and paragraph styles
- Format and settings regarding indexes, tables, bibliographies, table of contents
Templates can also contain predefined text, saving you from having to type it every time you create a new document. For example, a letter template may contain your name, address and salutation.
You can also save menu and toolbar customizations in templates; see Chapter 14 (Customizing OpenOffice.org) for more information.
Creating a template using a wizard
You can use wizards to create templates for letters, faxes, agendas, presentations, and Web pages.
For example, the Fax Wizard steps you through the following choices:
- Type of fax (business or personal)
- Document elements like the date, subject line (business fax), salutation, and complementary close
- Options for sender and recipient information (business fax)
- Text to include in the footer (business fax)
To create a template using a wizard:
- From the main menu, choose File > Wizards > [type of template required].
- Follow the instructions on the pages of the wizard. This process is slightly different for each type of template, but the format is very similar.
- In the last section of the wizard, you can specify the name and location for saving the template. The default location is your user templates directory, but you can choose a different location if you prefer.
- Finally, you have the option of creating a new document from your template immediately, or manually changing the template. For future documents, you can re-use the template created by the wizard, just as you would use any other template.
| Content on this page is licensed under the Creative Common Attribution 3.0 license (CC-BY). |

