Difference between revisions of "IT/Documentation/OOo3 User Guides/Getting Started/Basic drawing shapes"
| Line 20: | Line 20: | ||
| − | Draw mette a disposizioni una larga scelta di forme, accessibili attraverso tavolozze posizionate sulla barra | + | Draw mette a disposizioni una larga scelta di forme, accessibili attraverso tavolozze posizionate sulla barra Disegno. In questo capitolo sono descritte solo alcune delle forme base, vedere la [[IT/Documentation/OOo3_User_Guides/Draw_Guide | Guida di Draw]] per una descrizione completa delle forme disponibili. Queste forme includono rettangoli e quadrati, cerchi, ellissi ed archi, linee e frecce, testo e connettori. |
Quando disegnate una forma base o ne selezionate una da modificare, il campo ''Info'' posto nella barra di stato cambia secondo l'azione intrapresa: ''Linea creata'', ''Corpo del testo xxyy selezionato'', e così via. | Quando disegnate una forma base o ne selezionate una da modificare, il campo ''Info'' posto nella barra di stato cambia secondo l'azione intrapresa: ''Linea creata'', ''Corpo del testo xxyy selezionato'', e così via. | ||
| − | + | La figura sotto mostra parte della barra del disegno con le relative icone. Anche l'icona ''Testo'' è inclusa tra queste. | |
| − | + | [[Image:DG2-2.png|thumb|none|500px|''Parte della barra Disegno'']] | |
| − | == | + | == Disegnare una linea retta == |
| − | Iniziamo con il disegnare la più semplice delle forme: una linea retta. Fate | + | Iniziamo con il disegnare la più semplice delle forme: una linea retta. Fate clic sull'icona '''Linea''' [[Image:DrawLineIcon.png]] sulla barra Disegno e posizionate il puntatore del mouse dove volete iniziare la linea. Trascinate il mouse mentre tenete premuto il pulsante. Poi rilasciate il pulsante del mouse quando volete terminare la linea. |
Una maniglia di selezione di colore blù o verde apparirà a ciascuna estremità della linea, ad indicare che questo è l'oggetto correntemente selezionato. Il colore dipende dal modo di selezione standard impostato (sarà verde per la selezione semplice mentre sarà blu per la modalità modifica). Potrete vedere tale effetto se nella sezione Opzioni della barra degli strumenti sono attive le voci '''Maniglie semplici''' e '''Maniglie grandi''' . | Una maniglia di selezione di colore blù o verde apparirà a ciascuna estremità della linea, ad indicare che questo è l'oggetto correntemente selezionato. Il colore dipende dal modo di selezione standard impostato (sarà verde per la selezione semplice mentre sarà blu per la modalità modifica). Potrete vedere tale effetto se nella sezione Opzioni della barra degli strumenti sono attive le voci '''Maniglie semplici''' e '''Maniglie grandi''' . | ||
| − | + | [[Image:Draw_lin_re_it.png|thumb|none|500px|''Disegnare una linea retta'']] | |
| − | Per disegnare una linea con un angolo multiplo di 45° rispetto all'asse orizzontale, tenete premuto il tasto ''(Maiusc)'' mentre | + | Per disegnare una linea con un angolo multiplo di 45° rispetto all'asse orizzontale, tenete premuto il tasto ''(Maiusc)'' mentre tracciate il segmento. |
Per agganciare la fine della linea al più vicino punto della griglia tenete premuto il tasto ''Control'' (''Ctrl'' nei PC) . | Per agganciare la fine della linea al più vicino punto della griglia tenete premuto il tasto ''Control'' (''Ctrl'' nei PC) . | ||
| + | |||
| + | {{Documentation/Note| L'effetto che otterrete premendo il tasto ''Ctrl'' dipende dall' impostazione dell'opzione '''Cattura alla griglia''' nel menù '''Visualizza > Griglia''':<br />'''Cattura alla Griglia attivato ''': ''Ctrl'' deseleziona l'opzione cattura per questa attività.<br />'''Cattura alla griglia disattivato''': ''Ctrl'' abilita l'opzione di cattura per questa attività.}} | ||
| + | |||
| + | |||
| + | |||
| + | |||
| + | |||
| + | |||
| − | |||
| − | |||
| − | |||
| − | |||
La spaziatura (risoluzione) dei punti della griglia può essere modificata nel menù '''Strumenti > Opzioni > OpenOffice.org Draw > Griglia'''. Vedere anche il Capitolo 8 (Trucchi e suggerimenti) nella ''Guida di Draw ''. | La spaziatura (risoluzione) dei punti della griglia può essere modificata nel menù '''Strumenti > Opzioni > OpenOffice.org Draw > Griglia'''. Vedere anche il Capitolo 8 (Trucchi e suggerimenti) nella ''Guida di Draw ''. | ||
| Line 156: | Line 160: | ||
| − | |||
| − | |||
| − | |||
| − | |||
| − | |||
| − | |||
| − | |||
| − | |||
| − | |||
| − | |||
| − | |||
The spacing (resolution) of the grid points can be adjusted under '''Tools > Options > OpenOffice.org-Draw > Grid'''. See also Chapter 8 (Tips and Tricks) in the ''Draw Guide''. | The spacing (resolution) of the grid points can be adjusted under '''Tools > Options > OpenOffice.org-Draw > Grid'''. See also Chapter 8 (Tips and Tricks) in the ''Draw Guide''. | ||
Revision as of 08:47, 12 June 2010
Pagina in traduzione
Draw mette a disposizioni una larga scelta di forme, accessibili attraverso tavolozze posizionate sulla barra Disegno. In questo capitolo sono descritte solo alcune delle forme base, vedere la Guida di Draw per una descrizione completa delle forme disponibili. Queste forme includono rettangoli e quadrati, cerchi, ellissi ed archi, linee e frecce, testo e connettori.
Quando disegnate una forma base o ne selezionate una da modificare, il campo Info posto nella barra di stato cambia secondo l'azione intrapresa: Linea creata, Corpo del testo xxyy selezionato, e così via.
La figura sotto mostra parte della barra del disegno con le relative icone. Anche l'icona Testo è inclusa tra queste.
Disegnare una linea retta
Iniziamo con il disegnare la più semplice delle forme: una linea retta. Fate clic sull'icona Linea ![]() sulla barra Disegno e posizionate il puntatore del mouse dove volete iniziare la linea. Trascinate il mouse mentre tenete premuto il pulsante. Poi rilasciate il pulsante del mouse quando volete terminare la linea.
sulla barra Disegno e posizionate il puntatore del mouse dove volete iniziare la linea. Trascinate il mouse mentre tenete premuto il pulsante. Poi rilasciate il pulsante del mouse quando volete terminare la linea.
Una maniglia di selezione di colore blù o verde apparirà a ciascuna estremità della linea, ad indicare che questo è l'oggetto correntemente selezionato. Il colore dipende dal modo di selezione standard impostato (sarà verde per la selezione semplice mentre sarà blu per la modalità modifica). Potrete vedere tale effetto se nella sezione Opzioni della barra degli strumenti sono attive le voci Maniglie semplici e Maniglie grandi .
Per disegnare una linea con un angolo multiplo di 45° rispetto all'asse orizzontale, tenete premuto il tasto (Maiusc) mentre tracciate il segmento.
Per agganciare la fine della linea al più vicino punto della griglia tenete premuto il tasto Control (Ctrl nei PC) .
La spaziatura (risoluzione) dei punti della griglia può essere modificata nel menù Strumenti > Opzioni > OpenOffice.org Draw > Griglia. Vedere anche il Capitolo 8 (Trucchi e suggerimenti) nella Guida di Draw .
Tenete premuto il tasto (Alt) per tracciare la linea simmetrica dal punto di partenza (la linea si estende da entrambe le parti del punto di partenza in maniera uguale). In questo modo è possibile tracciare delle linee rette partendo dal punto di mezzo della linea.
La linea che tracciate avrà gli attributi predefiniti (come il colore e il tipo di linea). Per modificare gli attributi della linea, fate clic sulla linea per selezionarla quindi usate gli strumenti presenti nella Barra linea e riempimento. In alternativa fate clic con il pulsante destro sulla linea e scegliete Linea per aprire la finestra di dialogo Linea.
Disegnare una freccia
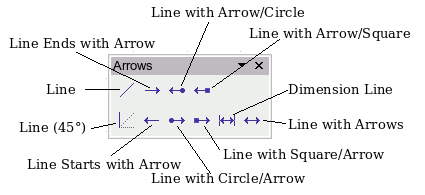
Le frecce sono disegnate come linee. In Draw le frecce sono classificate come sottogruppi di linee: Linee con punte a freccia. Esse sono visualizzate solo come linee nel campo informazioni della barra di stato. Fate clic sull'icona Linea con freccia terminale [[Image:]] per disegnare una freccia.
Disegnare linee e frecce
Fate clic sul piccolo triangolo nero posto sull'icona Linee e frecce [[Image:]] per aprire la barra degli strumenti mobile sulla quale si trovano dieci strumenti per disegnare linee e frecce (Figura 15). In alternativa potete fare clic direttamente sul simbolo per ripetere l'ultimo comando usato preso da questa barra degli strumenti. In entrambi i casi, l'ultimo comando usato viene immagazzinato sulla barra degli strumenti per richiamarlo più velocemente.
Disegnare un rettangolo o un quadrato
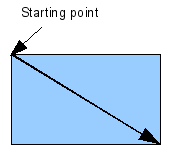
Disegnare rettangoli è simile a disegnare linee rette, con l'eccezione che che userete l'icona Rettangolo [[Image:]] posta sulla barra del disegno. La linea (immaginaria) tracciata con il mouse corrisponde alla diagonale del rettangolo. In aggiunta, il profilo del futuro rettangolo cambia forma mentre spostate il mouse. Il profilo è rappresentato come una linea tratteggiata sino a che non rilascerete il pulsante del mouse una volta che il rettangolo è disegnato.
Figura 16: Disegnare un rettangolo</center>
Per disegnare un quadrato tenete premuto il tasto Maiusc. Per disegnare un rettangolo tenete premuto il tasto Alt il rettangolo sarà disegnato a partire dal centro. Per combinare gli effetti tenete premuti simultaneamente entrambi i tastiMaiusc e Alt .
Disegnare un cerchio o un ellisse
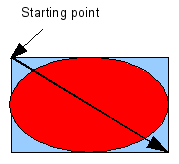
Per disegnare un ellisse (anche chiamata ovale) o un cerchio, potete utilizzare l'icona Ellisse [[Image:]] posta sulla barra del disegno. (Un cerchio è un ellisse nella quale i due assi hanno la stesa lunghezza.) L'ellisse disegnata sarà la più grande ellisse che si potrà inserire all'interno del rettangolo (immaginario) disegnato con il mouse.
Figura 17: Disegnare un ellisse</center>
Ci sono altri tre modi per disegnare un ellisse o un cerchio:
- Tenete premuto il tasto (Maiusc) per forzare il disegno di un cerchio.
- Tenete premuto il tasto (Alt) per disegnare un'ellisse simmetrica o un cerchio partendo dal centro invece che da uno degli angoli.
- Tenete premuto il tasto (Ctrl) mentre si disegna per agganciare l'ellisse o la circonferenza alle linee della griglia.
| |
Tenendo premuto il tasto (Ctrl) mentre fate clic su uno di questi pulsanti (Linea, Rettangolo, Ellisse e Testo), l'oggetto scelto apparirà direttamente nello spazio di lavoro con dimensioni, forma e colore predefiniti. Questi attributi nel caso si renda necessario possono essere cambiati in un secondo tempo. |
Disegnare linee curve
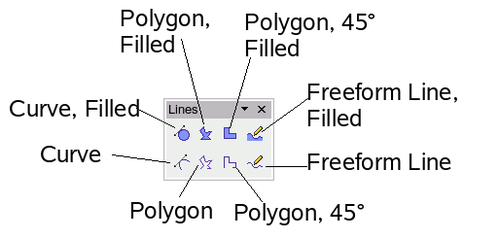
Gli strumenti per disegnare curve o poligoni sono sulla barra degli strumenti che appare facendo clic sull'icona Curve [[Image:]] della barra del disegno. Questa barra degli strumenti contiene otto strumenti per il disegno (Figura 18
| |
Passando il mouse sopra questa icona compare l'indicazione Curve. Se convertite l'icona in una barra mobile l'indicazione saràRighe, come mostrato in Figura 18. |
Se muovete il cursore sopra una delle icone, comparirà un suggerimento ad indicare la funzione ad essa associata. Per una descrizione più dettagliata di come utilizzate le curve di Bézier (curva e curva piena), vedere il Capitolo 10 ( Draw tecniche avanzate ) nella Guida di Draw.
Poligoni
Iniziate a disegnare la prima linea dal punto di partenza tenendo premuto il tasto sinistro del mouse. Come rilascerete il tasto del mouse, vedrete comparire il primo angolo, e muovendo il mouse vedrete come apparirà il secondo. Ad ogni successivo clic del mouse apparirà un altro angolo. Facendo doppio clic si terminerà il disegno. L'ultimo ed il primo punto del poligono saranno uniti automaticamente a formare la figura, che avrà il colore standard di riempimento. Un poligono senza riempimento non sarà automaticamente chiuso a tracciamento ultimato.
Poligono a 45°
A differenza dei poligoni normali, questi saranno formati da linee che hanno angoli di 45 o 90 gradi tra di loro.
Linea a mano libera
Con questo strumento potrete tracciare linee come con una matita. Per tracciare la linea tenete premuto il tato sinistro del mouse mentre lo spostate. Per terminare di tracciare la linea non è necessario fare doppio clic. Basta rilasciare il tasto del mouse per terminare il disegno. Se avete selezionato Linea a mano libera, piena, il primo e l'ultimo punto saranno uniti automaticamente e l'oggetto risulterà riempito con il colore selezionato.
Scrivere testo
Utilizzate lo strumento Testo [[Image:]] per scrivere del testo e sceglieteil carattere, il colore, la dimensione, e gli altri attributi. Fate clic in un punto vuoto dello spazio di lavoro per inserire il testo in quel punto, fate clic con il mouse e trascinatelo tenendo il tasto premuto, per delimitare un area all'interno nella quale inserire il testo. Tenete premuto Invio per andare a capo e creare una nuova riga.
Una volta che avrete terminato di inserire il testo fate clic all'esterno dell'area delimitata. Fate doppio clic su un punto del testo per modificarlo.
Quanto inserite del testo, la barra degli strumenti superiore mostra gli attributi del paragrafo: rientri, posizione della prima linea, e punti di tabulazione.
Potete modificare lo stile di parte o di tutto il testo. La finestra degli stili e della formattazione può essere aperta così (selezionate Formato > Stili e formattazione oppure premete F11 per lanciarla), in questo modo potrete creare stili grafici da riutilizzare in altre strutture di testo. Gli stili grafici creati si applicheranno a tutto il testo all'interno della stessa struttura. Per modificare lo stile di parte del testo all'interno della stessa struttura, potete utilizzare la formattazione diretta tramite la barra degli strumenti.
Le cornici di testo possono anche avere colori di riempimento, ombre e altri attributi, proprio come ogni altro oggetto di Draw. Potete ruotare il riquadro e scrivere il testo con qualsiasi angolazione. Queste opzioni sono disponibili facendo clic con il tasto destro del mouse sull'oggetto.
Usate lo strumento Legende, nella barra Disegno, per creare didascalie (denominate anche etichette).
Se fate doppio clic su di un oggetto o premete F2 (o l' icona Testo sulla barra del disegno) dopo avere selezionato l'oggetto, il testo sarà scritto nel centro dell'oggetto e rimarrà al suo interno.. E' possibile aggiungere testo in quasi tutti gli oggetti. Il testo così inserito ha leggere differenze rispetto a quello inserito nelle cornici di testo, differenze riguardanti posizione e sillabazione.
Per maggiori informazioni riguardo l'inserimento di testo, vedere il Capitolo 2 (Disegnare forme base) ed il Capitolo 10 (Draw tecniche avanzate) nella Guida di Draw.
Punti di incollaggio e connettori
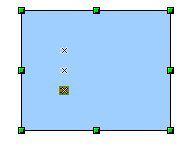
In Draw tutti gli oggetti hanno dei punti di incollaggio invisibili. Molti oggetti hanno quattro punti di incollaggio, come mostrato nella Figura 19.
I punti di incollaggio sono diversi dalle maniglie ( i piccoli quadrati blu o verdi intorno ad un oggetto). Dovete utilizzare le maniglie per muovere o ridimensionare un oggetto; mentre dovete utilizzare i punti di incollaggio per attaccare i connettori ad un oggetto.
Potete aggiungere più punti di incollaggio, e personalizzarli, usando la barra degli strumenti con lo stesso nome. I punti di incollaggio diventano visibili nel momento in cui cliccate sull'icona Punti di incollaggio [[Image:]]sulla barra degli strumenti Disegno e poi spostate la parte terminale del connettore sull'oggetto..
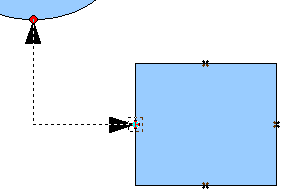
I connettori sono un tipo di freccia o linea la cui parte terminale si ancora ai punti di incollaggioo di altri oggetti. Qunado spostate l'altro oggetto, il connettore si muove con esso. I connettori sono particolarmente utili per realizzare organigrammi. Potrete riorganizzare i blocchi dei vostri organigrammi e tutti gli oggetti collegati resteranno alloro posto.
Figura 20 mostra due oggetti di Draw ed un connettore.
Draw ha diverse funzioni avanzate per i connettori. Potete cambiare tipo di connettore utilizzando il menù contestuale o aprendo la barra mobile dei connettori (fate clic sull'icona Connectori [[Image:]]). Per maggiori informazioni sui connettori o sui punti di incollaggio, vedere il Capitolo 9 (Organigrammi, Diagrammi di flusso, ed altro)nella Guida di Draw.
The spacing (resolution) of the grid points can be adjusted under Tools > Options > OpenOffice.org-Draw > Grid. See also Chapter 8 (Tips and Tricks) in the Draw Guide.
Hold down the Alt key to extend the line symmetrically outward from the start point (the line extends to each side of the start point equally). This lets you draw straight lines by starting from the middle of the line.
The line just drawn has all the default attributes, such as color and line type. To change the line attributes, click on the line to select it and then use the tools in the Line and Filling toolbar; or for more control, right-click on the line and choose Line to open the Line dialog.
Drawing an arrow
Arrows are drawn like lines. Draw classifies arrows as a subgroup of lines: Lines with arrowheads. They are shown in the information field on the status bar only as lines. Click on the Line Ends with Arrow icon ![]() to draw an arrow.
to draw an arrow.
Drawing lines and arrows
Click on the small black triangle on the Lines and Arrows ![]() icon to open a floating toolbar with ten tools for drawing lines and arrows. Alternatively, you can click directly on the symbol to repeat the last-used command chosen from this toolbar. In both cases, the last-used command will be stored on the toolbar to make it quicker to call it up again.
icon to open a floating toolbar with ten tools for drawing lines and arrows. Alternatively, you can click directly on the symbol to repeat the last-used command chosen from this toolbar. In both cases, the last-used command will be stored on the toolbar to make it quicker to call it up again.
Drawing a rectangle or square
Drawing rectangles is similar to drawing straight lines, except that you use the Rectangle icon ![]() from the Drawing Toolbar. The (imaginary) line drawn with the mouse corresponds to the diagonal of the rectangle. In addition, the outline of the future rectangle changes shape as you drag the mouse around. The outline is shown as a dashed line until you release the mouse button, when the rectangle is drawn.
from the Drawing Toolbar. The (imaginary) line drawn with the mouse corresponds to the diagonal of the rectangle. In addition, the outline of the future rectangle changes shape as you drag the mouse around. The outline is shown as a dashed line until you release the mouse button, when the rectangle is drawn.
Hold down the Shift key to draw a square. Hold down the Alt key to draw a rectangle starting from its center. To combine the effects, hold down both the Shift and Alt keys simultaneously.
Drawing a circle or ellipse
To draw an ellipse (also called an oval) or a circle, use the Ellipse icon ![]() from the Drawing Toolbar. (A circle is simply an ellipse where the two axes are the same length.) The ellipse drawn is the largest ellipse that would fit inside the (imaginary) rectangle drawn with the mouse.
from the Drawing Toolbar. (A circle is simply an ellipse where the two axes are the same length.) The ellipse drawn is the largest ellipse that would fit inside the (imaginary) rectangle drawn with the mouse.
There are three other ways to draw an ellipse or circle:
- Hold down the Shift key while drawing to force the ellipse to be a circle.
- Hold down the Alt key to draw a symmetrical ellipse or circle from the center instead of dragging corner to corner.
- Hold down the Ctrl key while drawing to snap the ellipse or circle to grid lines.
Drawing curves
The tools for drawing curves or polygons are on the toolbar that appears when you click the Curve icon ![]() on the Drawing toolbar. This toolbar contains eight tools.
on the Drawing toolbar. This toolbar contains eight tools.
If you move the mouse cursor over one of the icons, a tooltip pops up with a description of the function. For a more detailed description of the handling of Bézier curves (curves and filled curves), see Chapter 10 (Advanced Draw Techniques) in the Draw Guide.
Polygons
Draw the first line from the start point with the left mouse button held down. As soon as you release the mouse button, a first corner point is drawn, and you can move the mouse to see how the second line will look. Every mouse click sets another corner point. A double-click ends the drawing. A filled polygon automatically joins the last point to the first point to close off the figure and fills it with the current standard fill color. A polygon without filling will not be closed at the end of the drawing.
Polygon 450
Just as with ordinary polygons, these will be formed from lines but with angles of 45 or 90 degrees between them.
Freeform Line
With this tool you can draw just like with a pencil. Press and hold the left mouse button and move the mouse. It is not necessary to end the drawing with a double-click. Just release the mouse button and the drawing is completed. If you have selected Freeform Line, Filled, the end point is joined automatically to the start point and the object is filled with the appropriate color.
Writing text
Use the Text tool ![]() to write text and select the font, color, size, and other attributes. Click on an empty space in the workspace to write the text at that spot or drag an area to write inside the dragged frame. Press Enter to drop to the next line.
to write text and select the font, color, size, and other attributes. Click on an empty space in the workspace to write the text at that spot or drag an area to write inside the dragged frame. Press Enter to drop to the next line.
When you have finished typing text, click outside the text frame. Double-click on the text at any time to edit it.
When you type text, the upper toolbar includes the usual paragraph attributes: indents, first line, and tab stops.
You can change the style of all or part of the text. The Styles and Formatting window also works here (select Format > Styles and Formatting or press F11 to launch), so you can create Graphics styles that you can reuse for other text frames. Graphics styles affect all of the text within a text frame. To style parts of the text, use direct formating with the toolbar.
Text frames can also have fill colors, shadows, and other attributes, just like any other Draw object. You can rotate the frame and write the text at any angle. These options are available by right-clicking on the object.
Use the Callout tool, located on the Drawing toolbar, to create callouts (also known as captions or figure labels).
If you double-click on an object or press F2 (or the Text icon in the Drawing toolbar) when an object is selected, text is written in the center of the object and remains within the object. Nearly any kind of object contains such an additional text element. These texts have slight differences to those in text frames concerning position and hyphenation.
For more about text, see Chapter 2 (Drawing Basic Shapes) and Chapter 10 (Advanced Draw Techniques) in the Draw Guide.
Gluepoints and connectors
All Draw objects have associated invisible gluepoints. Most objects have four gluepoints.
Gluepoints are different from handles (the small blue or green squares around an object). Use the handles to move or resize an object; use the gluepoints to attach connectors to an object.
You can add more gluepoints, and customize gluepoints, using the toolbar of the same name. Gluepoints become visible when you click the Gluepoints icon ![]() on the Drawing toolbar and then move the end of a connector over the object.
on the Drawing toolbar and then move the end of a connector over the object.
Connectors are a type of line or arrow whose ends dock to glue points on other objects. When you move the other object, the connector moves with it. Connectors are particularly useful for making organizational charts. You can reorganize the blocks of your chart and all the connected objects stay connected.
The figure below shows two Draw objects and a connector.
Draw has a range of advanced connector functions. You can change connector types using the context menu or by opening the floating Connectors toolbar (click on the Connectors icon ![]() ). For more about connectors and gluepoints, see Chapter 9 (Organization Charts, Flow Diagrams, and More) in the Draw Guide.
). For more about connectors and gluepoints, see Chapter 9 (Organization Charts, Flow Diagrams, and More) in the Draw Guide.
| Content on this page is licensed under the Creative Common Attribution 3.0 license (CC-BY). |

