برگزیدن گزینههایی که بر کل اپنآفیس اثر میگذارند
این بخش برخی تنظیماتی را پوشش میدهد که روی تمام برنامههای تشکیلدهنده اپنآفیس اِعمال می شوند و مخصوصاً در زمان استفاده از Writer مهم هستند. دیگر گزینههای عمومی، در فصل ۲ (تنظیم اپنآفیس) در راهنمای آغاز به کار، بحث شدهاند.
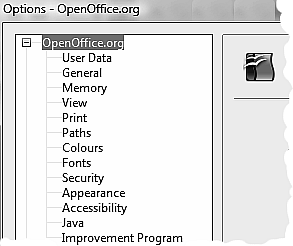
Tools > Options را کلیک کنید. این فهرست در جعبه سمت چپ منوط به اینکه کدام یک از برنامههای اپنآفیس باز است، تغییر میکند. تصاویر در این فصل فهرستی را نشان میدهند که مانند زمانی است که دستهبندی OpenOffice.org یا OpenOffice.org Writer با کلیک روی نماد + بسط یافته است.
از OpenOffice.org علامت + را از بخش دست چپ کادر محاورهای Options – OpenOffice.org کلیک کنید. فهرستی از زیربخشها پایین میافتد. انتخاب آیتمی از زیربخشها باعث میشود که طرف دست راست کادر محاورهای، گزینههای مربوط را نشان بدهد.
Contents
گزینههای دادههای کاربر
از آنجا که ویژگی بازبینی اپنآفیس تغییرات و توضیحات شما را با نام یا حرف اول نام و نام خانوادگی در دادههای کاربر علامتگذاری میکند شما خواهید خواست که مطمئن شوید نام و حرف اول نام و نام خانواگیتان آنجا ظاهر شود.
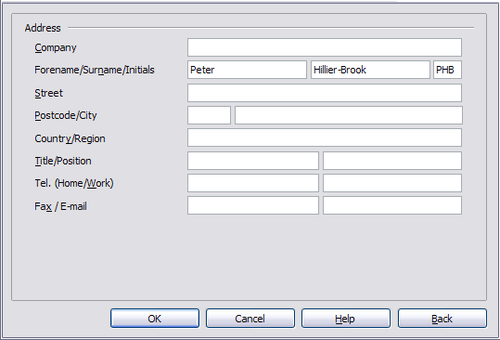
در کادر محاوره گزینهها، OpenOffice.org > User Data را کلیک کنید.
فرم را پر کنید یا اطلاعات اشتباه را اصلاح کنید یا حذف کنید.
گزینههای عمومی
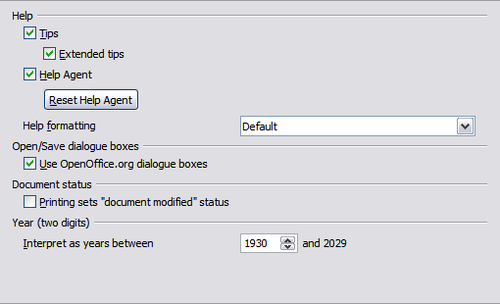
در کادر محاورهای گزینهها، OpenOffice.org > General را کلیک کنید. گزینههایی که روی این صفحه در دسترس هستند در زیر شرح داده شدهاند.
Help - Tips
وقتی Help Tips فعال هستند، زمانی که شما مکاننما را بدون کلیک کردن روی یک آیکون یا فیلدی روی پنجره اصلی اپنآفیس نگه بدارید؛ یک یا دو کلمه ظاهر میشوند.
Help - Extended tips
وقتی Extended tips فعال هستند شرح خلاصهای از کارکرد آن آیکون خاص یا دستور منو یا فیلدی روی کادر محاوره ظاهر میشود وقتی شما مکاننما را بالای آن آیتم نگه بدارید.
Help Agent
برای خاموش کردن Help Agent (مشابهِ Office Assistant مایکروسافت) این گزینه را از انتخاب درآورید. برای بازگرداندن رفتار پیشفرض Help Agent گزینه Reset Help Agent را کلیک کنید.
Help formatting
High contrast یک تنظیم سیستمعاملی است که الگوی رنگ سیستم را تغییر میدهد تا خوانایی افزایش یابد. برای نمایش راهنما در کنتراست بالا (اگر سیستمعامل کامپیوترتان از این پشتیبانی میکند) یکی از شیوهنامههای با کنتراست بالا را از فهرست پایینرونده برگزینید. برای ویندوز XP گزینههای سبک با کنتراست بالا در زیر شرح داده شدهاند.
| سبک با کنتراست بالا | جلوههای بصری |
|---|---|
| پیشفرض | متن مشکلی روی زمینه سفید |
| کنتراست بالا #۱ | متن زرد روی زمینه مشکی |
| کنتراست بالا #۲ | متن سبز روی زمینه مشکی |
| کنتراست بالای مشکی | متن سفید روی زمینه مشکی |
| کنتراست بالای سفید | متن مشکی روی زمینه سفید |
Open/Save محاورههای
برای استفاده از کادرهای محاوره Open و Save برای سیستمعاملتان گزینه Use OpenOffice.org dialogs را از انتخاب درآورید. زمانی که این گزینه انتخاب شده باشد کادرهای محاوره Open و Save تأمینشده با اپنآفیس استفاده خواهند شد. برای اطلاعات بیشتر درباره کادرهای محاوره Open و Save فصل ۱ (مقدمه اپنآفیس) در راهنمای آغاز به کار را ببینید.
Document status
انتخاب کنید که آیا در زمان چاپ سند، تعداد دفعات تغییر سند شمارش شوند یا نه. اگر این گزینه انتخاب شده است دفعه بعدی که پس از چاپ، سند را میبندید تاریخ چاپ در خواص سند به عنوان یک تغییر ذخیره میشود و به شما اعلان خواهد شد که سند را دوباره ذخیره کنید حتا اگر هیچ تغییری در سند ایجاد نکرده باشید.
Year (two digits)
چگونگی تفسیر سالهای دو رقمی را تعیین میکند. برای مثال اگر سال دو رقمی به ۱۹۳۰ تنظیم شده است و شما تاریخ ۱/۱/۳۰ یا قبلتر از آن را را داخل سندتان وارد کردهاید تاریخ به صورت ۱/۱/۱۹۳۰ یا قبلتر تفسیر میشود. یک تاریخ نزدیکتر به صورت قرن زیر تفسیر میشود. تاریخ ۱/۱/۲۰ به صورت ۱/۱/۲۰۲۰ تفسیر میشود.
View options
The choices of View options affect the way the document window looks and behaves.
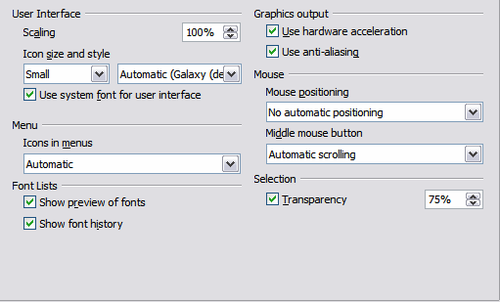
In the Options dialog box, click OpenOffice.org > View. On the page displayed, set the options to suit your personal preferences. Some of them are described below.
User Interface – Scaling
If the text in the help files and on the menus of the OOo user interface is too small or too large, you can change it by specifying a scaling factor. Sometimes a change here can have unexpected results, depending on the screen fonts available on your system. However, it does not affect the font size of the text in your documents.
User Interface – Icon size and style
The first box specifies the display size of toolbar icons (Automatic, Small, or Large). The Automatic icon size option uses the setting for your operating system. The second box specifies the icon set (theme); here the Automatic option uses an icon set compatible with your operating system and choice of desktop: for example, KDE or Gnome on Linux.
User Interface – Use system font for user interface
If you prefer to use the system font (the default font for your computer and operating system), instead of the font provided by OOo, for the user interface, select this option.
User interface – Screen font antialiasing
(Not available in Windows.) Select this option to smooth the screen appearance of text. Enter the smallest font size to apply antialiasing.
Menu – icons in menus
Select this option if you want icons as well as words to be visible in menus.
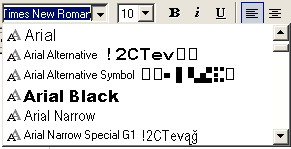
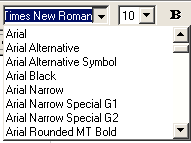
Font Lists - Show preview of fonts
When you select this option, the font list looks like the left picture below, with the font names shown as an example of the font; with the option deselected, the font list shows only the font names, not their formatting (right pictures). The fonts you will see listed are those that are installed on your system.
Font Lists - Show font history
When you select this option, the last five fonts you have assigned to the current document are displayed at the top of the font list.
3D view – Use OpenGL
Specifies that all 3D graphics from Draw and Impress will be displayed in your system using OpenGL-capable hardware. If your system does not have OpenGL-capable hardware, this setting will be ignored.
3D view – Use OpenGL – Optimized output
Select this option for optimized OpenGL output. Disable the optimization in case of graphical errors of 3D output.
3D view – Use dithering
The Use dithering option uses dithering to display additional colors when the computer’s graphics system offers less than the optimal 16 million (24-bit) colors. Dithering creates the illusion of new colors and shades by varying the pattern of color pixels. Varying the patterns of black and white dots, for instance, produces different shades of grey.
3D view – Object refresh during interaction
Specifies that if you rotate or move a 3-D object, the full display is rotated or moved and not a grid frame.
Mouse positioning
Specifies if and how the mouse pointer will be positioned in newly opened dialog boxes.
Middle mouse button
Defines the function of the middle mouse button.
- Automatic scrolling – dragging while pressing the middle mouse button shifts the view.
- Paste clipboard – pressing the middle mouse button inserts the contents of the “Selection clipboard” at the cursor position.
The “Selection clipboard” is independent of the normal clipboard that you use by Edit > Copy/Cut/Paste or their respective keyboard shortcuts. Clipboard and the “Selection clipboard” can contain different contents at the same time.
| Function | Clipboard | Selection clipboard |
|---|---|---|
| Copy content | Edit > Copy Control+C | Select text, table, or object. |
| Paste content | Edit > Paste Control+V pastes at the cursor position. | Clicking the middle mouse button pastes at the mouse pointer position. |
| Pasting into another document | No effect on the clipboard contents. | The last marked selection is the content of the selection clipboard. |
Print options
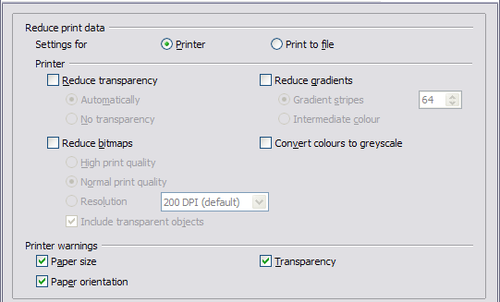
Set the print options to suit your default printer and your most common printing method.
In the Options dialog box, click OpenOffice.org > Print.
The print-related options are shown below. Look at the Printer warnings section near the bottom. Here you can choose whether to be warned if the paper size or orientation specified in your document does not match the paper size or orientation available for your printer. Having these warnings turned on can be quite helpful, particularly if you work with documents produced by people in other countries where the standard paper size is different from yours.
Path options
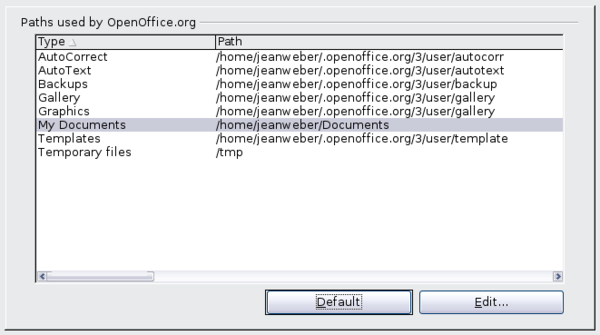
You can change the location of files associated with, or used by, OpenOffice.org to suit your working situation. In a Windows system, for example, you might want to store documents by default somewhere other than My Documents.
In the Options dialog, click OpenOffice.org > Paths.
To make changes, select an item in the list and click Edit. On the Select Paths dialog (not shown), add or delete folders as required, and then click OK to return to the Options dialog. Note that some items have at least two paths listed: one to a shared folder (which might be on a network) and one to a user-specific folder (normally on the user’s personal computer).
Color options
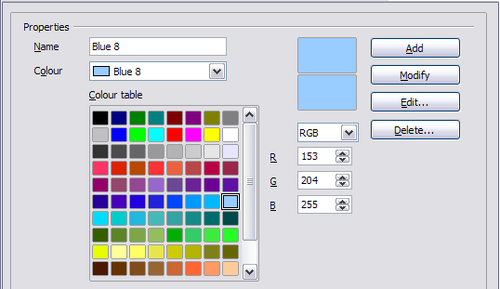
On the OpenOffice.org – Colors page, you can specify colors to use in OOo documents. You can select a color from a color table, edit an existing color, or define new colors. These colors will then be available in color selection palettes in OOo.
Font options
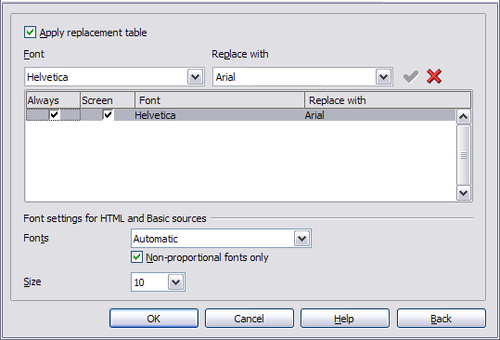
You can define replacements for any fonts that might appear in your documents. If you receive from someone else a document containing fonts that you do not have on your system, OpenOffice.org will substitute fonts for those it does not find. You might prefer to specify a different font from the one the program chooses.
On the OpenOffice.org > Fonts page:
- Select the Apply Replacement Table option.
- Select or type the name of the font to be replaced in the Font box. (If you do not have this font on your system, it will not appear in the drop-down list in this box, so you need to type it in.)
- In the Replace with box, select a suitable font from the drop-down list of fonts installed on your computer.
- The check mark to the right of the Replace with box turns green. Click on this check mark. A row of information now appears in the larger box below the input boxes. Select the options under Always and Screen.
In the bottom section of the dialog, you can change the typeface and size of the font used to display source code such as HTML and Basic (in macros).
Security options
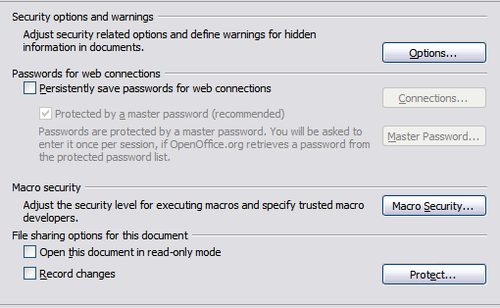
Use the OpenOffice.org – Security page to choose security options for saving documents and for opening documents that contain macros.
Security options and warnings
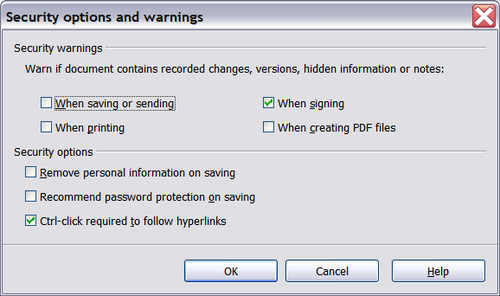
If you record changes, save multiple versions, or include hidden information or notes in your documents, and you do not want some of the recipients to see that information, you can set warnings to remind you to remove this information, or you can have OOo remove some information automatically. Note that (unless removed) much of this information is retained in a file whether the file is in OpenOffice.org’s default OpenDocument format, or has been saved to other formats, including PDF.
Click the Options button to open a separate dialog with specific choices.
Remove personal information on saving. Select this option to always remove user data from the file properties when saving the file. To manually remove personal information from specific documents, deselect this option and then use the Delete button under File > Properties > General.
Ctrl-click required to follow hyperlinks. In older versions of OOo, clicking on a hyperlink in a document opened the linked document. Now you can choose whether to keep this behavior (by unchecking this box). Many people find creation and editing of documents easier when accidental clicks on links do not activate the links.
The other options on this dialog should be self-explanatory.
Macro security
Click the Macro Security button to open the Macro Security dialog (not shown here), where you can adjust the security level for executing macros and specify trusted sources.
File sharing options for this document
Select the Open this document in read-only mode option to restrict this document to be opened in read-only mode only. This option protects the document against accidental changes. It is still possible to edit a copy of the document and save that copy with the same name as the original.
Select the Record changes option to enable recording changes. This is the same as Edit - Changes – Record. To allow other users of this document to apply changes, but prevent them from disabling change recording, click the Protect buton and enter a password.
Appearance options
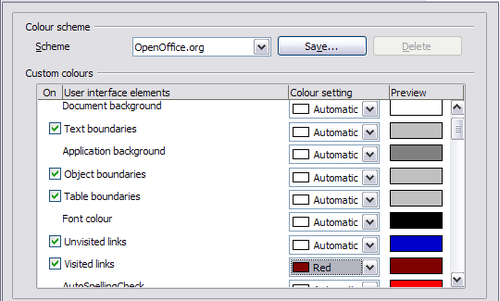
Writing, editing, and page layout are often easier to do when you can see as much as possible of what is going on in your document. You may wish to make visible such items as text, table, and section boundaries (in Writer documents), page breaks in Calc, and grid lines in Draw or Writer. In addition, you might prefer different colors (from OOo’s defaults) for such items as note indicators or field shadings.
On the OpenOffice.org – Appearance page, you can specify which items are visible and the colors used to display various items.
- To show or hide items such as text boundaries, select or deselect the options next to the names of the items.
- To change the default colors for items, click the down-arrow in the Color Setting column by the name of the item and select a color from the pop-up box.
- To save your color changes as a color scheme, click Save, type a name in the Scheme box; then click OK.
| Content on this page is licensed under the Creative Common Attribution 3.0 license (CC-BY). |
