Suivi des modifications dans un document
- Sélection de texte
- Couper, copier et coller du texte
- Recherche et remplacement de texte et de formatage
- Insertion de caractères spéciaux
- Formatage des paragraphes
- Formatage des caractères
- Formatage automatique
- Création de listes à puces et numérotées
- Utilisation des notes de bas de page et de fin
- Vérification orthographique
- Utilisation des outils linguistiques
- Utilisation du dictionnaire des synonymes
- Utilisation du dictionnaire de coupure des mots
- Utilisation de l'AutoCorrection
- Utilisation de la complétion des mots
- Utilisation des AutoTextes
- Numérotations des lignes
- Annulation et restauration de modifications
- Suivi des modifications dans un document
- Insertion de notes
- Lien vers une autre partie du document
- Travail avec les hyperliens
- Trucs et astuces
Contents
Introduction
Vous pouvez utiliser plusieurs méthodes pour suivre les modifications faites dans un document.
- Réaliser vos modification sur une copie du document (stockée dans un répertoire différent, sous un autre nom ou les deux), puis utiliser Write pour combiner les deux fichiers et afficher les modifications que vous avez faites. Cliquez sur Édition > Comparer le document. Cette technique est particulièrement utile si vous êtes la seule personne à travailler sur le document dans la mesure ou cela évite d'augmenter la taille et la complexité du fichier causées par les autres méthodes.
- Enregistrer des versions qui sont stockées comme des parties du fichier original. Cependant cette méthode peut causer des problèmes avec des documents de taille non triviale ou très complexe, notamment si vous avez beaucoup de versions. Évitez cette méthode si vous le pouvez.
- Utiliser le suivi des modifications de Writer (souvent appelé lignes rouges ou marques de révision) pour afficher où vous avez ajouté ou supprimé du matériel ou modifié le formatage. Plus tard, vous ou d'autres personnes peuvent revoir le document et accepter ou rejeter les modifications.
Préparer un document pour la relecture
Lorsque vous envoyez un document à quelqu'un pour qu'il le révise ou l'édite, en premier lieu, vous le préparerez de façon à ce que l'éditeur ou le relecteur n'ait pas à se souvenir qu'il doit activer les marques de révision. Après avoir protégé le document, tout utilisateur doit saisir le mot de passe correcte pour désactiver la fonction ou accepter et rejeter les modifications.
- Ouvrez le document. Pour vérifier s'il contient de multiples versions, cliquez sur Fichier > Versions. Si de multiples versions sont listées, enregistrez la version actuelle comme un document séparé avec un nom différent et utilisé ce document comme exemplaire de relecture.
- Avec l'exemplaire de relecture ouvert, assurez-vous que l'enregistrement des modifications est activé. Le menu Édition > Modifications > Enregistrer a une coche en regard lorsque l'enregistrement est actif
- Cliquez sur Éditions > Modification > Protéger l'historique. Dans la boîte de dialogue de saisie du mot de passe, saisissez un mot de passe (deux fois) et cliquez sur OK.
Recording changes
See Chapter 2 (Setting up Writer) for instructions on setting up how your changes will be displayed.
- To begin tracking (recording) changes, click Edit > Changes > Record. To show or hide the display of changes, click Edit > Changes > Show.
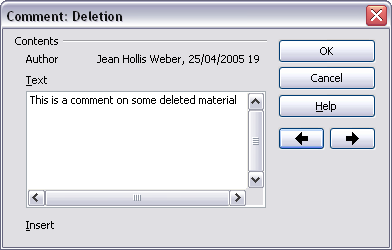
- To enter a comment on a marked change, place the cursor in the area of the change and then click Edit > Changes > Comment. In addition to being displayed as an extended tip, the comment is also displayed in the list in the Accept or Reject Changes dialog box. To move from one marked change to the next, use the arrow buttons. If no comment has been recorded for a change, the Text field is blank.
- To stop recording changes, click Edit > Changes > Record again.
Accepting or rejecting changes and comments
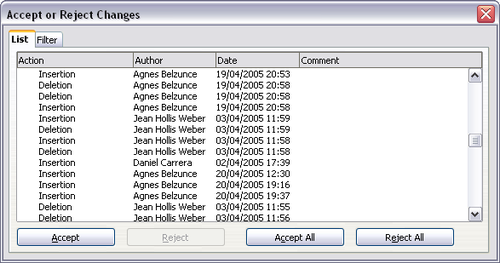
- Click Edit > Changes > Accept or Reject. The Accept or Reject Changes dialog box opens.
- When you select a change in the dialog box, the actual change is highlighted in the document, so you can see what the editor changed.
- Click Accept or Reject to accept or reject the selected change. You can also click Accept All or Reject All if you do not want to review the changes individually.
Changes that have not yet been accepted or rejected are displayed in the list. Accepted changes are removed from the list and appear in the text without any marking.
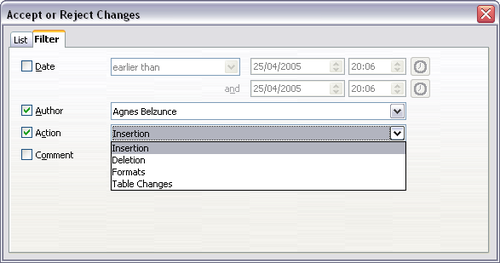
To show only the changes of certain people or only the changes on specific days or various other restrictions, use the Filter page on the Accept or Reject Changes dialog box. After specifying the filter criteria, return to the List page to see those changes that meet your criteria.
Merging modified documents
The processes discussed to this point are effective when you have one reviewer at a time. Sometimes, however, multiple reviewers all return edited versions of a document at the same time. In this case, it may be quicker to review all of these changes at once, rather than one review at a time. For this purpose, you can merge documents in Writer.
To merge documents, all of the edited documents need to have recorded changes in them.
- Open one copy.
- Click Edit > Changes > Merge Document and select and insert another copy of the document to be merged with the first.
- After the documents merge, the Accept or Reject Changes dialog box opens, showing changes by more than one reviewer. If you want to merge more documents, close the dialog box and then repeat step 2.
- Repeat until all copies are merged.
All recorded changes are now included in the open copy. Save this file under another name.
Comparing documents
Sometimes reviewers may forget to record the changes they make. This is not a problem with Writer because you can find the changes if you compare documents.
In order to compare documents, you need to have the original document and the one that is edited. To compare them:
- Open the edited document.
- Select Edit > Compare Document.
- The Insert dialog box appears. Select the original document and click Insert.
Writer finds and marks the changes and displays the Accept or Reject Changes dialog box. From this point, you can go through and accept or reject changes procedure as described earlier.
| Content on this page is licensed under the Creative Common Attribution 3.0 license (CC-BY). |


