Difference between revisions of "Documentation/Writer for Students/Labels"
m |
|||
| (2 intermediate revisions by the same user not shown) | |||
| Line 6: | Line 6: | ||
|NextPage=Documentation/Writer for Students/Help | |NextPage=Documentation/Writer for Students/Help | ||
}}__NOTOC__ | }}__NOTOC__ | ||
| − | + | You won’t need this for your studies. But in the course of a traineeship or at your work place | |
| − | # | + | you might well be asked to print out labels for a bulk mailing or write a form letter. Here’s |
| − | # | + | how to go about it: |
| − | # | + | # Create a new spreadsheet: '''File › New › Spreadsheet'''. |
| − | + | # Use the first line for the '''Column headings: Name, Street, City, Phone, Mobile, Mail'''. Fill in the lines below with all relevant information using one line per person. | |
| − | + | # Save the spreadsheet under some meaningful name such as '''Addresses'''. The file ending '''.ods''' will be automatically appended. | |
| − | + | # Open the menu File › New › Database. Choose the third option '''Connect to an existing database''' and select '''Spreadsheet''' from the drop-down menu. Confirm '''Next'''. Browse to the spreadsheet you saved in previous step (i.e. the file '''Addresses'''), tick the option '''Read only''' and '''Open''' it. Press the '''Next''' button. Leave '''Yes, register the database for me''' (this means you will be able to access it from any OpenOffice window). Remove the tick from '''Open the database for editing''' and press '''Finish'''. Give your new database the same name as your spreadsheet, that is '''Addresses''' and '''Save''' it in the same directory as the file '''addresses'''. The database will automatically receive the suffix .odb, so you end up with two separate files with the same name but different suffixes. The database will now close automatically because in reality it contains no data, it is simply a window onto your spreadsheet which does contain the actual data. | |
| + | # Open the menu '''File › New › Labels'''. Select your '''Database''' from the dropdown list, i.e. '''Addresses''', and the pertaining '''Table''' from the drop-down list immediately below, that is '''sheet1'''. Just below that open the list of '''Database Fields'''. You will see the six fields you created in first step: '''Name, Street, City, Phone, Mobile, Mail'''. Copy the first one, i.e. '''Name''', onto the blank label using the black arrow pointing left. Insert a new line under '''Name''' by pressing '''Enter'''. Now copy the field '''Street''', insert two new lines, and finally copy '''City'''. The remaining fields '''Phone, Mobile''' and '''Mail''' are of no interest to you for the purpose of your bulk mail, so just ignore them. Open the tab '''Format''' and insert the values listed in table 9 and illustration 33 (these apply to A4-paper with 3 x 8 labels). Press button '''New document'''. At this point a new A4 page will appear with 24 labels, each one with the three field names as in illustration 34. You can now print your document on sheets with selfadhesive labels. During the printing process the place holders will get substituted by the actual names, streets and cities listed in your spreadsheet. (The programme also offers you the alternative to print to a text file instead of a physical printer.) | ||
{| class="wikitable" style="margin: 1em auto;background: white;border: 1" | {| class="wikitable" style="margin: 1em auto;background: white;border: 1" | ||
| Line 32: | Line 33: | ||
| Rows || 8 | | Rows || 8 | ||
|} | |} | ||
| − | <center>'''Table | + | <center>'''Table 9: Sizes and spacing for a 3x8 layout paper size A4'''</center><br> |
<div style="overflow: hidden"> | <div style="overflow: hidden"> | ||
| Line 38: | Line 39: | ||
[[File:wfs027-format_menu.png|none]] | [[File:wfs027-format_menu.png|none]] | ||
</div> | </div> | ||
| − | '''Illustration | + | '''Illustration 33: The Format menu of the module "Labels": insert values shown and then press "New Document"'''<br><br> |
<div style="overflow: hidden"> | <div style="overflow: hidden"> | ||
| Line 44: | Line 45: | ||
[[File:wfs028-placeholders_labels.png|none]] | [[File:wfs028-placeholders_labels.png|none]] | ||
</div> | </div> | ||
| + | '''Illustration 34: The new file in format A4 contains place holders which will be replaced by actual addresses while printing (whether to printer or to file)''' | ||
| − | + | To create a bulk letter you basically follow the same steps. You start with a simple text file. When you get to the part “My dear friend ”, open '''Insert › Fields › Other › Database › Mail merge fields'''. You will be presented with a list of databases. Select the one you need, i.e. '''Addresses › sheet1'''. Pressing the ► next to '''sheet1''' will open up a list of all your fields ('''Name, Street, City''' etc.). Click on '''Name''' and now all the names will be inserted automatically one after the other, one per each copy of your letter, after the “My dear friend ”. | |
| − | + | ||
| − | To create a bulk letter you basically follow the same steps. | + | |
<br /> | <br /> | ||
<br /> | <br /> | ||
Latest revision as of 14:30, 6 September 2015
- Introduction
- Theory
- Document Structure
- Chapter Headings
- Chapter Numbering
- Table of Contents
- Outline
- Navigator
- Text Body
- Paragraph styles overview
- Reusing styles
- Default Page Formatting
- Title Page
- Papers without a Title Page
- Pages with and without numbering
- Roman Page Numbering
- Group Work
- Proofreading
- Numbered lists and bullets
- Line numbering
- Cross-references
- Footnotes
- Bibliography
- Quotes
- Tables
- Charts
- Pictures
- Snapshots
- Presentations & Graphics
- Cross tables (Statistics)
- Extra Long Web Adresses
- Fonts
- Emphasis
- Special Characters
- Non separable combinations
- Shortcut keys
- Mouse clicks
- PDFs
- Saving your files
- Several files open at once
- Search and replace
- Spell Check
- Synonyms
- Document Infos
- Labels and Form letters
- Help
- Installing Program
- Microsoft Word
- Practice I
- Practice II
You won’t need this for your studies. But in the course of a traineeship or at your work place you might well be asked to print out labels for a bulk mailing or write a form letter. Here’s how to go about it:
- Create a new spreadsheet: File › New › Spreadsheet.
- Use the first line for the Column headings: Name, Street, City, Phone, Mobile, Mail. Fill in the lines below with all relevant information using one line per person.
- Save the spreadsheet under some meaningful name such as Addresses. The file ending .ods will be automatically appended.
- Open the menu File › New › Database. Choose the third option Connect to an existing database and select Spreadsheet from the drop-down menu. Confirm Next. Browse to the spreadsheet you saved in previous step (i.e. the file Addresses), tick the option Read only and Open it. Press the Next button. Leave Yes, register the database for me (this means you will be able to access it from any OpenOffice window). Remove the tick from Open the database for editing and press Finish. Give your new database the same name as your spreadsheet, that is Addresses and Save it in the same directory as the file addresses. The database will automatically receive the suffix .odb, so you end up with two separate files with the same name but different suffixes. The database will now close automatically because in reality it contains no data, it is simply a window onto your spreadsheet which does contain the actual data.
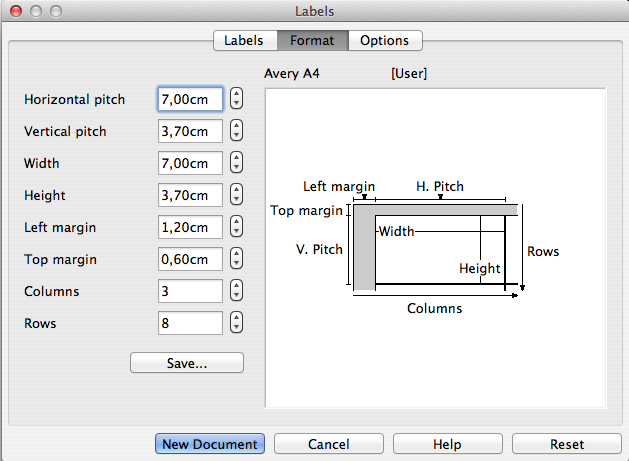
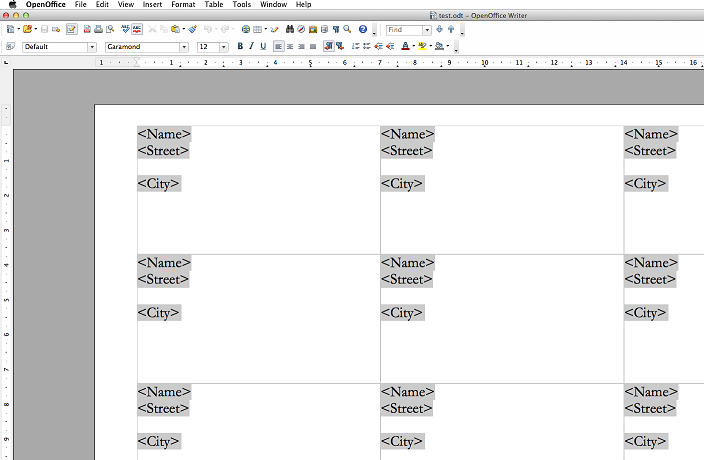
- Open the menu File › New › Labels. Select your Database from the dropdown list, i.e. Addresses, and the pertaining Table from the drop-down list immediately below, that is sheet1. Just below that open the list of Database Fields. You will see the six fields you created in first step: Name, Street, City, Phone, Mobile, Mail. Copy the first one, i.e. Name, onto the blank label using the black arrow pointing left. Insert a new line under Name by pressing Enter. Now copy the field Street, insert two new lines, and finally copy City. The remaining fields Phone, Mobile and Mail are of no interest to you for the purpose of your bulk mail, so just ignore them. Open the tab Format and insert the values listed in table 9 and illustration 33 (these apply to A4-paper with 3 x 8 labels). Press button New document. At this point a new A4 page will appear with 24 labels, each one with the three field names as in illustration 34. You can now print your document on sheets with selfadhesive labels. During the printing process the place holders will get substituted by the actual names, streets and cities listed in your spreadsheet. (The programme also offers you the alternative to print to a text file instead of a physical printer.)
| Horizontal pitch | 7,00 cm |
| Vertical pitch | 3,70 cm |
| Width | 7,00 cm |
| Height | 3,70 cm |
| Left margin | 1,20 cm |
| Top margin | 0,60 cm |
| Columns | 3 |
| Rows | 8 |
Illustration 33: The Format menu of the module "Labels": insert values shown and then press "New Document"
Illustration 34: The new file in format A4 contains place holders which will be replaced by actual addresses while printing (whether to printer or to file)
To create a bulk letter you basically follow the same steps. You start with a simple text file. When you get to the part “My dear friend ”, open Insert › Fields › Other › Database › Mail merge fields. You will be presented with a list of databases. Select the one you need, i.e. Addresses › sheet1. Pressing the ► next to sheet1 will open up a list of all your fields (Name, Street, City etc.). Click on Name and now all the names will be inserted automatically one after the other, one per each copy of your letter, after the “My dear friend ”.

