Difference between revisions of "Documentation/UserGuide/Writer/Intro/AutoText"
(Autotext is localized) |
Sahlers621 (Talk | contribs) |
||
| Line 3: | Line 3: | ||
{{DISPLAYTITLE:Working with AutoTexts}} | {{DISPLAYTITLE:Working with AutoTexts}} | ||
| − | + | In an empty paragraph in a Writer document, write "dt" (without quotes) and press {{Key|F3}}: a long paragraph with a sample text will be introduced (note: "dt" stands for "dummy text" and different acronyms may apply to non-English versions: use {{Menu|Edit|AutoText}} to see the one appropriate for your language). Now, type "fn" (again, without quotes) and press {{Key|F3}}: a one row and two columns table will be introduced, with a Math object on the left cell and a variable on the other. | |
| − | Both examples show what AutoText does and their use: introduce a document snip previously defined | + | Both examples show what AutoText does and their use: introduce a document snip previously defined in any place, only using an abbreviation and a keyboard shortcut. |
= Inserting an AutoText = | = Inserting an AutoText = | ||
| − | The faster way to insert an AutoText is to use the abbreviation followed by {{Key|F3}}. The problem with this method is | + | The faster way to insert an AutoText is to use the abbreviation followed by {{Key|F3}}. The problem with this method is the need to remember all the abbreviations and their functions. |
With {{Menu|Edit|AutoText}} ({{Key|Ctrl|F3}}) we will have a list of all the available AutoTexts, but there is an easier method: [[Documentation/UserGuide/UI#Toolbars|Activating the Insert toolbar]], we will have a button with a list of all the AutoTexts with their abbreviations: one click on the element on the list will introduce the autotext on the document | With {{Menu|Edit|AutoText}} ({{Key|Ctrl|F3}}) we will have a list of all the available AutoTexts, but there is an easier method: [[Documentation/UserGuide/UI#Toolbars|Activating the Insert toolbar]], we will have a button with a list of all the AutoTexts with their abbreviations: one click on the element on the list will introduce the autotext on the document | ||
| Line 17: | Line 17: | ||
= Defining an AutoText = | = Defining an AutoText = | ||
| − | + | In any document, select what you want to use for an AutoText. The content can be anything: text, tables, pictures, frames, sections... everything. With the content selected {{Menu|Edit|Autotext}}{{Documentation/Caution|If the AutoText contains a table, it is necessary to select at least one line before and one line after the table, otherwise only the content and not the table itself will go into the AutoText.}} | |
[[File:AOO-AutoText.png|600px]] | [[File:AOO-AutoText.png|600px]] | ||
| − | Under "Name" and "Shortcut" | + | Under "Name" and "Shortcut" set a name and an abbreviation for the AutoText. In the box to the left choose where the new AutoText must be classified. |
| − | With the option "Display remainder of the name as suggestion while typing" enabled, Writer will try to guess if the user | + | With the option "Display remainder of the name as suggestion while typing" enabled, Writer will try to guess if the user wants to insert an AutoText while writing so if you start to type the AutoText name Writer will suggest it, pressing {{Key|Enter}} the AutoText will be introduced. |
| − | To the right of the window, the {{Button|Categories...}} button | + | To the right of the window, the {{Button|Categories...}} button allows you to create new categories to classify the AutoTexts. |
| − | Also to the right, the {{Button|AutoText}} button | + | Also to the right, the {{Button|AutoText}} button shows a drop down menu with different options, like create a new AutoText. {{Button|Path...}} defines where to save the AutoTexts. |
From the options at the bottom of the page, the first two change how links are saved on the AutoText while the "Show preview" is only valid for existing AutoText: it will not work with new ones. | From the options at the bottom of the page, the first two change how links are saved on the AutoText while the "Show preview" is only valid for existing AutoText: it will not work with new ones. | ||
Revision as of 02:24, 9 February 2013
Template:Documentation/DraftPage
In an empty paragraph in a Writer document, write "dt" (without quotes) and press F3 : a long paragraph with a sample text will be introduced (note: "dt" stands for "dummy text" and different acronyms may apply to non-English versions: use Edit → AutoText to see the one appropriate for your language). Now, type "fn" (again, without quotes) and press F3 : a one row and two columns table will be introduced, with a Math object on the left cell and a variable on the other.
Both examples show what AutoText does and their use: introduce a document snip previously defined in any place, only using an abbreviation and a keyboard shortcut.
Inserting an AutoText
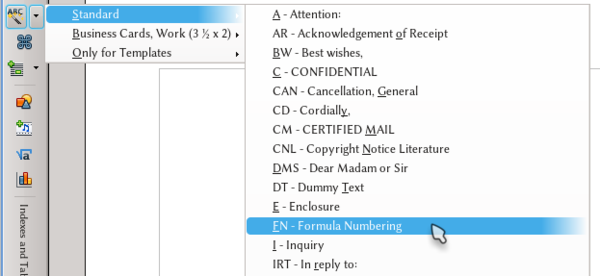
The faster way to insert an AutoText is to use the abbreviation followed by F3 . The problem with this method is the need to remember all the abbreviations and their functions.
With Edit → AutoText ( Ctrl + F3 ) we will have a list of all the available AutoTexts, but there is an easier method: Activating the Insert toolbar, we will have a button with a list of all the AutoTexts with their abbreviations: one click on the element on the list will introduce the autotext on the document
Defining an AutoText
In any document, select what you want to use for an AutoText. The content can be anything: text, tables, pictures, frames, sections... everything. With the content selected Edit → Autotext| If the AutoText contains a table, it is necessary to select at least one line before and one line after the table, otherwise only the content and not the table itself will go into the AutoText. |
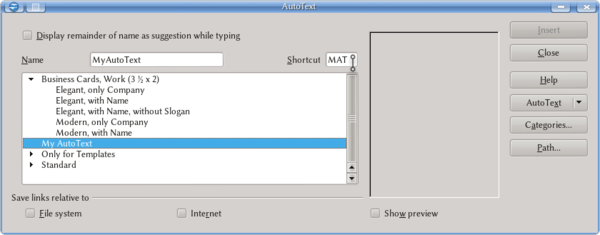
Under "Name" and "Shortcut" set a name and an abbreviation for the AutoText. In the box to the left choose where the new AutoText must be classified.
With the option "Display remainder of the name as suggestion while typing" enabled, Writer will try to guess if the user wants to insert an AutoText while writing so if you start to type the AutoText name Writer will suggest it, pressing ↵ Enter the AutoText will be introduced.
To the right of the window, the Categories... button allows you to create new categories to classify the AutoTexts.
Also to the right, the AutoText button shows a drop down menu with different options, like create a new AutoText. Path... defines where to save the AutoTexts.
From the options at the bottom of the page, the first two change how links are saved on the AutoText while the "Show preview" is only valid for existing AutoText: it will not work with new ones.
Editing an AutoText
On the same menu used to create the AutoText, it is possible to select an existing one from the list: the AutoText... button now offers the possibility to modify or even eliminate the AutoText.
Selecting Edit, a document will be opened with the AutoText. It is enough to modify that document and save it.

