Customizing OpenOffice.org
- Introduction
- Sharing Files with Microsoft Office Users
- Importing other Microsoft Office Files
- General Differences in Use between OpenOffice.org and Microsoft Office
- Differences in Use between Writer and Word
- Differences in Use between Calc and Excel
- Differences in Use between Impress and PowerPoint
- Customizing OpenOffice.org
| < Previous Page | [[{{{Next}}}|Next Page
>]] |
Customizing toolbars
Using the Alt key to drag icons on the toolbars does not work in OpenOffice.org 2.0. The other concepts for customizing the toolbars in OpenOffice.org are similar to those in Microsoft Office. The specific steps are outlined below.
Customizing toolbars
You can get to the toolbar customization menu in three ways:
- Tools > Customize > Toolbars tab.
- Click the arrow at the end of any toolbar and choose Customize Toolbar.
- View > Toolbars > Customize > Toolbars tab (same as Microsoft Office).

However, rather than dragging buttons onto the toolbar as is required in Microsoft Office, you need to use the Customize dialog:
- OpenOffice.org <name of the program (example: Writer)> Toolbars: Activate the drop-down list to select the toolbar.
- Toolbar Content: The checkboxes determine whether the button gets displayed or not.
- The Move Up or Move Down buttons change the order.
- If the function you require is not already listed for the toolbar, use the Add button to insert it.
- Use Modify for things like changing an icon, renaming, or restoring the default settings.
| There is no in-built tool-button editor. To use a custom icon, save it to the {install path}/share/config/symbol directory in *.bmp format. OOo automatically searches this directory for new icons each time the Customize Buttons dialog is opened. Custom icons must be 16 x 16 pixels in size and cannot contain more than 256 colors. |
Creating a new toolbar
To create a new toolbar:
- Select Tools > Customize > Toolbars tab.
- Click New to display a dialog where you can name the new toolbar. Click OK.
- Customize the new toolbar as above.
Customizing menus is not significantly different in OOo than in Microsoft Office. The specific steps are outlined below. You can even set the menu font to be the font used by the system.
To customize menu content:
- Select Tools > Customize > Menus tab (Figure 2).
- In the Save In drop-down list, choose whether to save this changed menu for the application (for example, Writer) or for a selected document.
- In OpenOffice.org <name of the program (example: Writer)> Menus, select the menu you want to customize in the Menu drop-down list.

To add a function:
- Menu Content: Select the top level menu entry.
- Click the Add button.
- Select in the Add Commands dialog the new menu item using the Category and Command list boxes.
- Click Add to insert that function into the menu. When finished, click Close.
The font used in OOo for menus is different from that used in Microsoft Office, which is the system font. If you want to change the font to the one used in Office:
- Tools > Options > OpenOffice.org > View.
- Check Use system font for user interface.
- Click OK.
Customizing shortcut keys
Customizing shortcut keys requires a different procedure from that used in Microsoft Office. In OOo use the following steps:
- Tools > Customize > Keyboard tab.
- On the Keyboard tab of the Customize dialog (Figure 3), select the desired shortcut key in the top list box labeled Shortcut keys.
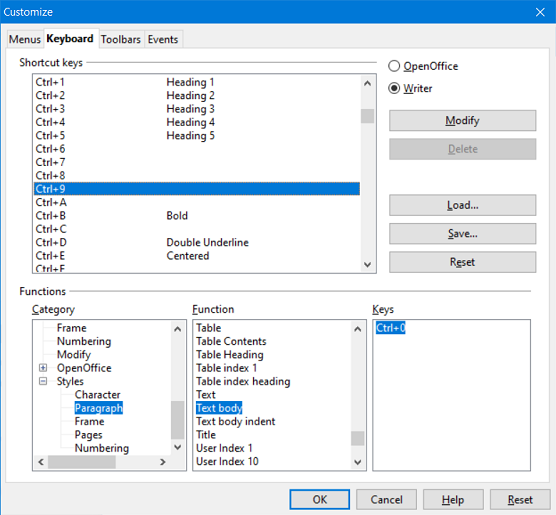
- Select the Category, for the command, and the actual Function in the bottom list boxes.
- In the top right corner of the dialog, select whether the shortcut key is to be OOo-wide or just for the current application (Writer for example).
- Click Modify.

| The Alt key is not available for shortcut keys. A macro that overcomes this limitation is in AltKeyHandler.sxw, available from http://homepages.paradise.net.nz/hillview/OOo/. |
Customizing word entry and editing
AutoCorrect/AutoFormat
A feature in OOo is the ability to have exceptions for AutoCorrect/AutoFormat rules. For example, you can have “Correct TWo INitial Capitals” in operation but exclude situations where two capitals are desired, like OOo. To set up exceptions:
- Tools > AutoCorrect.
- Click on the Exceptions tab.

Undo and redo
To specify how many “undos” are available:
Tools > Options > OpenOffice.org > Memory > Number of steps.
Checking spelling
To set up the Spellcheck options in OpenOffice.org, use:
Tools > Options > Language Settings > Writing Aids
The Spellcheck options are consistent across all OOo applications.
| Unlike the default dictionaries, custom dictionaries are not compressed. Using too many custom dictionaries, or those containing more than 1000 entries, reduces performance while proofing. |
Installing other language dictionaries
To install dictionaries of other languages select File > Wizards > Install new dictionaries. An OOo document will open with links to different languages that you can install. Follow the prompts to install them.
Security settings
To set up virus protection for macro and Java security settings, use:
Tools > Options > OpenOffice.org > Security
For other security-related issues, see Password Protection and Privacy Options in the chapter General Differences in Use between OpenOffice.org and Microsoft Office.
Personal settings
To find out where these customizations are stored, use:
Tools > Options > OpenOffice.org > Paths
The dialog shows that the information, by default, is stored in a folder called “user”.
Storing configurations in a template
This section describes how to store changes to menus, keyboard shortcuts, the status bar and toolbars in a template so that the customizations are automatically loaded when you work on a document based on that template.
- Create and save the template that is to have the configurations saved into it. A back-up of the template, without the configuration changes, is a good precaution too.
- Make the desired changes to the configuration. (See “Customizing menus”, “Customizing toolbars” and “Customizing shortcut keys” above.) Note that any changes you do not want as standard will have to be undone.
- Tools > Customize.
- At each step of customization of the template, that is for each tab of the dialog that you want to change, choose the desired template (the one first created and saved in step 1) and click Save.
- Overwrite the file—the warning message that is displayed can be ignored.
- Undo the pre-existing changes that are not wanted (as was noted in step 2).
| Content on this page is licensed under the Creative Common Attribution 3.0 license (CC-BY). |