Difference between revisions of "Documentation/UserGuide/Draw/Styles"
(Created page with "{{Documentation/DraftPage}} {{DISPLAYTITLE:Using Styles on Draw}} Definition / use of styles on Draw Category:Documentation Category:Documentation/Draw") |
|||
| Line 3: | Line 3: | ||
{{DISPLAYTITLE:Using Styles on Draw}} | {{DISPLAYTITLE:Using Styles on Draw}} | ||
| − | + | = Introduction = | |
| + | |||
| + | Sometimes, it is necessary to be sure that a set of object all have the same set of properties, like same background, same line width/color, same font for the associated text, etcetera. This coherence in formatting object can be easily attained with the use of styles. | ||
| + | |||
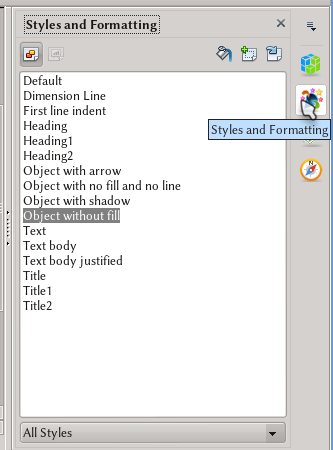
| + | The tool to manage and apply styles is the Stylist, available either on the Sidebar or as standalone panel that opens with {{Button|F11}} or {{Menu|Format|Styles and formatting}}. Both versions of the Stylist, the standalone panel and the corresponding deck on the sidebar, work the same way. | ||
| + | |||
| + | [[File:AOO-Draw-Stylist.png]] | ||
| + | |||
| + | = The Stylist = | ||
| + | |||
| + | On top of the Styles and Formatting deck/window, it is possible to find five buttons. The fist one is for graphic styles. The second one, "Presentation Styles" is greyed out because those styles can only be used on Impress: on Draw, there is only one kind of style. | ||
| + | The last three buttons are: | ||
| + | |||
| + | *'''Fill format mode''': Selecting a style from the list and then this button, it is possible to apply the style to several objects without the need to select the style again each time. | ||
| + | *'''New style from selection''': applying manual formatting to an object and then clicking on that button, a new style will be created with the selected characteristics. | ||
| + | *'''Update style''': If you manually modify the properties of an object and then click that button, the style associated with that object will be updated with the changes. | ||
| + | |||
| + | {{Documentation/Caution|By updating a style this way, the formatting of all object that use that style will be updated too.}} | ||
| + | |||
| + | The area below those buttons show a list of the available styles. With a right click it is possible to either edit an existing style or to create a new one. | ||
| + | |||
| + | Below the list of styles, a menu offers the possibility to "filter" the styles: | ||
| + | |||
| + | *'''Hierarchical''': As in Writer, styles can depend on others, sharing some characteristics. This filtering mode will show all the available styles evidencing which style depends on which one. | ||
| + | *'''All Styles''': will display all existing styles. This is the default view. | ||
| + | *'''Applied Styles''': display only the styles actually used on the document. | ||
| + | *'''Custom Styles''': display only those styles created by the user. | ||
| + | |||
| + | |||
[[Category:Documentation]] [[Category:Documentation/Draw]] | [[Category:Documentation]] [[Category:Documentation/Draw]] | ||
Revision as of 12:43, 15 June 2013
Template:Documentation/DraftPage
Introduction
Sometimes, it is necessary to be sure that a set of object all have the same set of properties, like same background, same line width/color, same font for the associated text, etcetera. This coherence in formatting object can be easily attained with the use of styles.
The tool to manage and apply styles is the Stylist, available either on the Sidebar or as standalone panel that opens with F11 or Format → Styles and formatting. Both versions of the Stylist, the standalone panel and the corresponding deck on the sidebar, work the same way.
The Stylist
On top of the Styles and Formatting deck/window, it is possible to find five buttons. The fist one is for graphic styles. The second one, "Presentation Styles" is greyed out because those styles can only be used on Impress: on Draw, there is only one kind of style. The last three buttons are:
- Fill format mode: Selecting a style from the list and then this button, it is possible to apply the style to several objects without the need to select the style again each time.
- New style from selection: applying manual formatting to an object and then clicking on that button, a new style will be created with the selected characteristics.
- Update style: If you manually modify the properties of an object and then click that button, the style associated with that object will be updated with the changes.
The area below those buttons show a list of the available styles. With a right click it is possible to either edit an existing style or to create a new one.
Below the list of styles, a menu offers the possibility to "filter" the styles:
- Hierarchical: As in Writer, styles can depend on others, sharing some characteristics. This filtering mode will show all the available styles evidencing which style depends on which one.
- All Styles: will display all existing styles. This is the default view.
- Applied Styles: display only the styles actually used on the document.
- Custom Styles: display only those styles created by the user.
