Difference between revisions of "Documentation/SL/How Tos/Določanje obsega podatkov"
(→Določanje obsega podatkov: Prva različica prevoda prvega podpoglavja.) |
(→Selecting a Range: Prva roka prevoda drugega podpoglavja.) |
||
| Line 34: | Line 34: | ||
{{Spacer|50}} | {{Spacer|50}} | ||
| − | == | + | ==Izbor obsega podatkov== |
| − | + | Potem, ko ste vnesli obsege podatkov, izberite tistega, s katerim želite delati, na naslednji način: | |
| − | # | + | # V menijih izberite '''Podatki > Izberi obseg'''. |
| − | # | + | # Izberite obseg, ki ga želite, in kliknite '''V redu'''.<br>Obseg podatkov se bo v vašem dokumentu pokazal osvetljen (označen). |
{{Spacer|50}} | {{Spacer|50}} | ||
Revision as of 12:47, 4 May 2008
Contents
Kako določimo obseg podatkov za uporabo s funkcijami za filtriranje in razvrščanje
Določanje obsega podatkov
Delo z obsegi podatkov vam omogoča, da enostavno izberete obseg podatkov, enostavno delo pri razvrščanju ali filtriranju podatkov z uporabo glav stolpcev/vrstic in se tako izognete nevarnosti ročne manipulacije s podatki!

- Vnesite podatke in jih uredite, kot to običajno počnete,
- označite celice, za katere želite, da postanejo vaš obseg podatkov; ne pozabite vključiti glav stolpcev,
- kliknite na Podatki > Določi obseg ...
V ozadju boste videli obseg podatkov, ki ste ga izbrali. - Podajte ime za obseg podatkov, ki je določen v polju Obseg.
Če obseg ni enak želenemu, kliknite ikono poleg polja Obseg in izberite drug obseg. - Kliknite gumb Dodatno, prikažejo se dodatne možnosti:
- Ne pozabite potrditi polja Vsebuje glave stolpcev, da bodo pri razvrščanju podatkov upoštevane glave.
- Polje Vstavi ali izbriši celice omogoča, da v izbranem obsegu vstavljate nove podatke ali jih brišete.
- Označeno polje Obdrži oblikovanje pove OpenOffice.org, da obdrži oblikovanje vseh novih podatkov, ki bi jih vnesli naknadno.
- Potrditveno polje Ne shrani uvoženih podatkov se nanaša na podatke, ki jih kličemo iz zbirke podatkov, tako da ti ne bodo shranjeni skupaj z vašo datoteko.
- Kliknite V redu, tako da se pogovorno okno zapre in da se vrnete v svoj dokument.
Določite poljubno število obsegov podatkov; edino, kar morate storiti, je to, da ponovite zgoraj opisane korak in v pogovornem oknu kliknete gumb Dodaj. Enako velja, če želite izbrisati obseg podatkov: izberite želeni obseg podatkov in kliknite ustrezni gumb v pogovornem oknu.
Izbor obsega podatkov
Potem, ko ste vnesli obsege podatkov, izberite tistega, s katerim želite delati, na naslednji način:
- V menijih izberite Podatki > Izberi obseg.
- Izberite obseg, ki ga želite, in kliknite V redu.
Obseg podatkov se bo v vašem dokumentu pokazal osvetljen (označen).
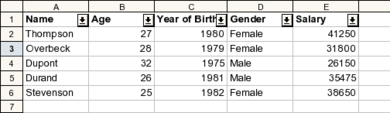
Sorting Data
Here is the range we're going to work on:

To sort your data:
- Select the range that you want to work with
- Select Data > Sort from the menu
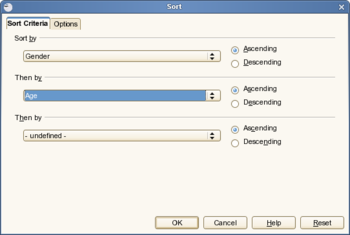
On the Sort Criteria tab you can define up to 3 criteria. Here, we've decided to do an ascending sort, first by Gender, then by Age. - Specify the sort options on the Options tab
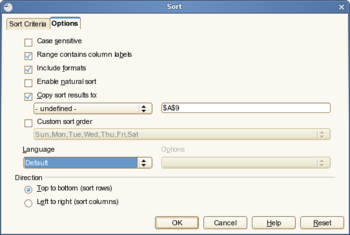
All of these options will enable you to edit your sort operation in the same table or a similar table at the area you have specified previously (in our example, we chose to copy the result just below the first table).


Here is the result :

Filtering Data
Standard Filter
The use of filters is as simple as sorting:
- Select the range that you want to work with
- Select Data > Filter > Standard Filter... from the menu
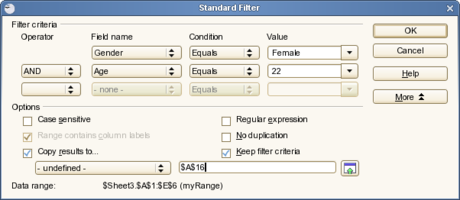
- Fill in the data field names on which you want to base your filter by selecting them in the drop-down menu.
- Here again, you can use up to 3 criteria with Boolean operators (and, or) and other conditions. The value is represented by the data on which the filter is to be carried out in relation to the field name chosen.
- The More button, enables you to edit a table, taking into account regular expressions, case sensitivity or duplicates.

Here's the result:

Autofilter
The Autofilter is slightly different from the standard filter. In order to understand what it does, let's use it and see what we get.
- Select the range of data, including column names.
- Select Data > Filter > Autofilter from the menu

There is a small button with an arrow next to each field name. Click on the one next to the field Name to see what it does.

As you will have noticed, the list of names represents the filter criteria and you can apply them differently to each column. If you select Standard, the Standard Filter dialog appears.
Let's click on Dupont and observe the result obtained: The criteria corresponding to the name Dupont, and only Dupont, are displayed.
To cancel the filter operation:
- Select the range
- Select Data > Filter > Autofilter from the menu
Advanced Filter
The advanced filter is a filter that lets you use more than 3 filter criteria, up to a maximum of 8.
In order to use this filter, you have to create an array in which you'll enter the criteria. Let's start from the example we already have:
- Copy the row with the field names of your range (Name, Age...) into empty cells on your sheet, for example at row 10
- Enter your sort criteria, under each column. Note that criteria on a same 'row' are combined by an OR, while criteria in the same column are combined as AND. In order to enter names with the equals sign, don't forget to put in quotation marks (). Here's the result

In this example, we are searching for people whose age is less than 25 AND (since the criterion appears under the preceding one) whose salary is greater than 35000. Here are the results after applying the filter:

So, after having created your array
- Select the data range to which the filter should apply.
- Select Data > Filter > Advanced Filter from the menu.
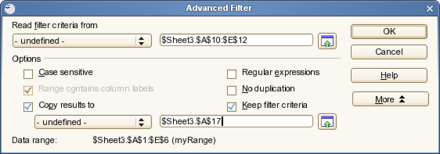
- In the window that appears, select the array that you defined at rows 10 to 12 using the selection button.
- In the options (click More), also indicate where you want your filtered data to appear (we put it at row 17)
- Click OK.

| Content on this page is licensed under the GNU Free Documentation License (FDL). |