Documentation/OOoAuthors User Manual/Writer Guide/Working with Styles
This is Chapter 7 of the OpenOffice.org 2.x Writer Guide (Third edition), produced by the OOoAuthors group. A PDF of this chapter is available from the OOoAuthors Guides page at OpenOffice.org.
<< User Manuals page
<< Writer Guide Table of Contents
<< Chapter 6 Introduction to Styles |
Chapter 8 Working with Graphics >>
Contents
- 1 Introduction
- 2 Applying styles
- 3 Modifying styles
- 4 Creating new (custom) styles
- 5 Copying and moving styles
- 6 Deleting styles
- 7 Working with paragraph styles
- 8 Working with conditional paragraph styles
- 9 Working with frame styles
- 10 Working with list (numbering) styles
- 11 Using outline-numbering styles
- 12 Working with page styles
Introduction
A style is a set of formats that you can apply to selected pages, text, frames, and other elements in your document to quickly change their appearance. When you apply a style, you apply a whole group of formats at the same time.
OpenOffice.org Writer supports the following types of styles:
- Page styles include margins, headers and footers, borders, and backgrounds.
- Paragraph styles control all aspects of a paragraph's appearance, such as text alignment, tab stops, line spacing, borders, and character formatting.
- Character styles affect properties of the selected text within a paragraph, such as the font and size of text and bold and italic formats.
- Frame styles are used to format graphic and text frames, including borders, backgrounds, columns, and how text wraps around the frame.
- List styles apply similar alignment, numbering or bullet characters, and fonts to numbered or bulleted lists.
OpenOffice.org (OOo) comes with many predefined styles. You can use the styles as provided, modify them, or create new styles, as described in this chapter.
The importance of styles in OpenOffice.org is covered in Chapter 6 (Introduction to Styles). That chapter also introduces three of the five types of styles in Writer (page, paragraph, and character), and it describes how and why to use them in Writer documents.
This chapter describes the general use of styles in Writer and provides more examples of using all five types of styles.
Applying styles
In order to use a style in OpenOffice.org , you need to apply it. OOo provides several ways to apply styles:
- Using the Styles and Formatting window.
- Using Fill Format mode.
- Using the Apply Style list.
- Assigning styles to shortcut keys.
- Using AutoFormat: see Chapter 3 (Working with Text).
- Using conditional styles.
Using the Styles and Formatting window
- To open the Styles and Formatting window, do any one of the following:
- Click on the
 icon located at the left-hand end of the object bar.
- Choose Format > Styles and Formatting.
- Press F11.
- Click on one of the icons at the top left of the Styles and Formatting window to display a list of styles in a particular category, such as paragraph or character.
- To apply a character style to existing text, select the text and then double-click on the name of the style in the Character Styles list. To apply any other style, put the cursor in the paragraph, frame, or page you want to modify and double-click on the name of the style. You can select more than one paragraph or frame and apply the same style to all of them at the same time.
Tip: You can move the Styles and Formatting window to a convenient position on the screen or dock it to an edge.

Styles and Formatting window for Writer.
Tip: At the bottom of the Styles and Formatting window is a drop-down list. In Figure 1 it shows Automatic, meaning the list shows only the styles that are applied automatically by OOo. You can choose to show all styles or other groups, such as custom styles.
Using Fill Format mode
Use Fill Format to apply a style to many different areas quickly without having to go back to the Styles and Formatting window and double-click every time. This method is useful when you need to format many scattered paragraphs, words, or other items with the same style, and it may be easier to use than making multiple selections first and then applying a style to all of them.
- Open the Styles and Formatting window and select the style you want to apply.
- Click the Fill Format mode icon
 . The mouse pointer changes to this icon.
- To apply a paragraph, page, or frame style, hover the mouse over the paragraph, page, or frame and click. To apply a character style, hold down the mouse button while selecting the characters, Clicking on a word applies the character style for that word. Repeat this step until you made all the changes for that style.
- To quit Fill Format mode, click the Fill Format mode icon again or press the Esc key.
| When this mode is active, a right-click anywhere in the document undoes the last Fill Format action. Be careful not to accidentally right-click and thus undo actions you want to keep. |
Using the Apply Style list
When a style is in use in a document, the style name appears on the Apply Style list at the left end of the formatting bar, to the right of the Styles and Formatting icon.

The Apply Style list.
To apply a style from this list, click on the desired style or use the up or down arrow keys to move through the list, then press Enter to apply the highlighted style.
Tip: Select More... at the bottom of the list to open the Styles and Formatting window.
Assigning styles to shortcut keys
OOo provides a set of predefined keyboard shortcuts that allow you to quickly apply styles. You can modify these shortcuts and create your own.
Tip: Some shortcuts are predefined, such as Ctrl+1 for the Heading 1 paragraph style and Ctrl+2 for Heading 2.
- Click Tools > Customize > Keyboard.
- On the Keyboard page of the Customize dialog box, choose the shortcut keys you want to assign a style to. In this example, we have chosen Ctrl+9.
- In the Functions section at the bottom of the dialog box, scroll down in the Category list to Styles. Click the + sign to expand the list of styles.
- Choose the category of the style. The Function list will display the names of the available styles for the selected category. The example in Figure 3 shows some of OOo's predefined paragraph styles.
- To assign Ctrl+9 to the Text Body paragraph style, select Text Body in the Function list, and then click Modify. Ctrl+9 now appears in the Keys list.
- When you are done assigning shortcuts, click OK to close the dialog box.

Defining keyboard shortcuts for applying styles.
Currently, the only way to use Alt key or multi-key combinations is through a macro. See AltKeyHandler.sxw and KeyHandler.sxw, available from http://homepages.paradise.net.nz/hillview/OOo/.
Modifying styles
OpenOffice.org provides several ways to modify styles:
- Change a style using the Style dialog box
- Update a style from a selection
- Use AutoUpdate (paragraph and frame styles only)
- Load or copy styles from another document or template
You can change both predefined and custom (user-created) styles.
Tip: Any changes made to a style are effective only in the current document. To change styles in more than one document, change the template—see Chapter 10 (Working with Templates)—or copy the styles into the other documents as described in Copying and moving styles.
Changing a style using the Style dialog box
To change an existing style using the Style dialog box, right-click on the style in the Styles and Formatting window and select Modify from the pop-up menu.
The dialog box displayed depends on the type of style selected. Below is an example of the dialog box for a paragraph style. Each style's dialog box has several tabs. Some properties on these dialog boxes are described later in this chapter.

Example of Paragraph Style dialog box.
Updating a style from a selection
Let's use paragraph styles as an example.
- Open the Styles and Formatting window.
- Create a new paragraph (or modify an existing paragraph) and edit all the properties you want to go into the style (such as indentation, font properties, alignment, among others).
- Select the paragraph by clicking anywhere in the paragraph.
- In the Styles and Formatting window, select the style you want to update (single-click, not double-click) and then click on the New Style from Selection icon and select Update Style.
Caution: Make sure that there are unique properties in this paragraph. For example, if there are two different font sizes or font styles, that particular property will remain the same as before.

Updating a style from a selection.
The procedure to update another type of style (like character, page, or frame styles) is the same. Just select the item in question, select the style you want to update, and choose Update Style.
Using AutoUpdate (paragraph and frame styles only)
If the AutoUpdate checkbox is selected on the Organizer page of the Paragraph Style or Frame Style dialog box, applying direct formatting to a paragraph or frame using this style in your document automatically updates the style itself.
Tip: If you are in the habit of manually overriding styles in your document, be sure that AutoUpdate is not enabled.
Loading or copying styles from another document or template
You can update styles by copying or loading them from a template or another document. See Copying and moving styles.
Creating new (custom) styles
In addition to using the predefined styles provided by OOo, you can add new custom (user-defined) styles. OOo provides three ways to add styles.
- Create a new style using the Style dialog box.
- Create a new style from a selection.
- Drag and drop a selection to create a new style.
Creating a new style using the Style dialog box
Open the Styles and Formatting window. Right-click on a style and select New. The style that you choose will be the basis for this new style. If you do not want too many of the options preset for you, choose the Default style.
The dialog box displayed depends on the type of style selected. Figure 6 shows an example of a Style dialog box for a new paragraph style. The dialog boxes and choices for defining new styles are the same as for modifying existing styles.
Tip: An exception to the above rule is conditional styles, which have a different dialog box. See Working with conditional paragraph styles for more information.
Linking styles
You can link a new style to an existing style. For example, suppose that the style mystyle specifies a font size of 12. Then you create another style (mystyle2) linked to mystyle and specifies underlined text. If you modify mystyle to font size 20, mystyle2 inherits the new font size but still underlines the text.

Linking a new paragraph style to an existing style.
Tip: If styles are linked, changing the base style changes all the linked styles. Sometimes this is exactly what you want; other times it is not. It pays to plan ahead. Many predefined styles are already linked to other styles.
Creating a new style from a selection
You can create a new style from the formatting of an object in the current document. For instance, you can change the formatting of a paragraph or frame until it appears as you like, and then you can turn that object's formatting into a new style. This procedure can save time, because you do not have to create a new style as described above and remember all of the formatting settings.
- Change the formatting of the object (paragraph, frame, etc) to your liking.
- Open the Styles and Formatting window. From the icons at the top of the window, choose the type of style to create (paragraph, character, and so on).
- In the document, select the item to save as a style.
- In the Styles and Formatting window, click the New Style from Selection icon.
- In the Create Style dialog box, type a name for the new style. The list shows the names of existing custom styles of the selected type, if any. Click OK to save the new style.
Dragging and dropping a selection to create a style
You can drag and drop a text selection into the Styles and Formatting window to create a new style.
- Open the Styles and Formatting window.
- Select some text and drag it to the Styles and Formatting window.
- In the Create Style dialog box, type a name for the new style. The list shows the names of existing custom styles of the selected type, if any. Click OK to save the new style.
- If the Paragraph Styles list is showing in the Styles and Formatting window, a new paragraph style will be added to the list. If Character Styles are active, the character style will be added to the list.
Copying and moving styles
When you create a style in a document, it is available only within that document. Styles always stay with a document. So, for example, if you e-mail a document to another person, the styles go with it.
Having created a style, you may want to transfer the style to another document. You can copy or move styles from one template or document to another in two ways:
Using the Template Management dialog box
To copy or move styles using the Template Management dialog:
- Click File > Templates > Organize.
- At the bottom of the Template Management dialog box, choose either Templates or Documents, as needed. For example, if you are copying styles between two documents, both entries should say Documents.
- To load styles from a file, click the File button. When you return to this window, both lists show the selected file as well as all the currently open documents.
- Double-click on the name of the template or document, and then double-click the Styles icon to show the list of individual styles.
- To copy a style, hold down the Control key and drag the name of the style from one list to the other.
- Repeat for each style you want to copy or move. When you are finished, click Close.

Choosing to copy styles from a document, not a template.

Copying a style from one document to another.
Caution: If you do not hold down the Control key when dragging, the style will be moved from one list to the other. The style will be deleted from the list you are dragging it from.
Loading styles from a template or document
You can copy styles by loading them from a template or another document. This method copies all styles, or groups of styles, at one time.
- Open the document to copy styles into.
- In the Styles and Formatting window, click on the New Style from Selection icon, and then on Load Styles (see Updating a style from a selection).
- On the Load Styles dialog, find and select the template you want to copy styles from.
- Select the checkboxes for the categories of styles to be copied. Select Overwrite if you want the styles being copied to replace any styles of the same names in the document you're copying them into.
- Click OK to copy the styles. You will not see any change on screen.
| To copy the styles from another document, click the From File button to open a window from which you can select the required document. |

| Content on this page is licensed under the Public Documentation License (PDL). |
Deleting styles
It is not possible to delete OOo's predefined styles from a document or template, even if they are not in use. However, custom styles can be deleted.
To delete an unwanted style, right-click on it in the Styles and Formatting window and choose Delete. If the style is in use, the message shown below appears.

Deleting an applied style.
Caution: Make sure the style is not in use before deletion. Otherwise, all objects with that style will return to the default style and retain their formatting as manual formatting. This can be very problematic in a long document
Tip: If an unwanted style is in use, use Find & Replace to replace it with a substitute style before deleting it.
If the style is not in use, the message shown below appears.

Deleting a style that is not in use.
Working with paragraph styles
Chapter 6 (Introduction to Styles) covers the basics of using paragraph styles. This chapter looks at some advanced properties of paragraph styles and ways that you can use other features in OOo in conjunction with paragraph styles to do specific tasks like:
- Controlling page breaks
- Controlling tab stops
- Specifying a relative font size
- Selecting a language for a paragraph style
- Rotating the text in a paragraph style
- Kerning text (a feature that adjusts the letter spacing to make text more readable)
- Using styles in outlining
- Including chapter or section names in page headers
Controlling page breaks
Writer automatically flows text from one page to the next. If you do not like the default settings, you can change them on the Text Flow page of the Paragraph Style dialog box.
Automatic page or column breaks
The Options section of the Text Flow page of the Paragraph Style dialog box provides settings to control what happens when a paragraph does not fit on the bottom of a page.

Options for controlling automatic page or column breaks.
Do not split paragraph means that the paragraph is never split across two pages. If it does not fit on the bottom of one page, the entire paragraph moves to the top of the next.
Keep with next paragraph is appropriate for headings or the lead-in sentence to a list, to ensure that it is not the last paragraph on a page.
Orphan control and Widow control. Widows and orphans are typographic terms. An orphan is the first line of a paragraph printed alone at the bottom of a page or column. A widow is the last line of a paragraph which appears alone at the top of the next page or column. Use these options to allow paragraphs to split across pages or columns but require at least 2 or more lines to remain together at the bottom or top of a page or column. You can specify how many lines must remain together.
Required page or column breaks
You can require a paragraph to start on a new page or column and specify the style of the new page. A typical use is for chapter titles that you always want to start on a new page. This topic is covered in more detail in Chapter 4 (Formatting Pages).
On the Text Flow page of the Paragraph Style dialog box:
- In the Breaks section, select Insert. Make sure that Type is set to Page and Position to Before.
- Select With Page Style and choose the page style from the list.
- To continue page numbering from the previous chapter, leave Page number set at 0. To start each chapter's page numbering at 1, set Page number to 1.
- Click OK.
-

Setting a paragraph style to always start on a new page.

Controlling tab stops
Using tabs to space out material on a page is not recommended (depending on what you are trying to accomplish, a borderless table is usually a better choice), but if you do use tabs, do not use the default tabs set in Tools > Options > OpenOffice.org Writer > General (shown below); instead, define your own tab settings, as described in this section.

Selecting a default tab stop interval.
If you use the default tab interval and then send the document to someone else who has chosen a different default tab interval, tabbed material will change to use the other person's tab settings. This may cause a major formatting problem, as shown below.

Default tab settings might be different.
To avoid this problem, specify all the tab settings for the paragraph, using the Tabs page of the Paragraph Style dialog box.
Here you can choose the type of tab: left, right, centered, or decimal; the character to be used as a decimal point; and the fill character—the characters that appear between the end of the text before the tab and the beginning of the text after the tab. A common use of a fill character is the dots between a heading and a page number in a table of contents.

Specifying tab stops for a paragraph style.
Specifying a relative font size
If you are creating a style based on another style, you can specify a font size relative to that other style—either as a percentage or as a plus or minus point value (-2pt or +5pt). Relative font sizes are commonly used for Web pages.
For example, the paragraph style Heading 1 is based on the paragraph style Heading. The font size of the paragraph style Heading is 14pt, and the font size of paragraph style Heading 1 is specified as 115%. Thus the resultant font size of text in a paragraph formatted with paragraph style Heading 1 is 14pt x 115% = 16.1pt.
To specify a percentage font size, in the Paragraph Style dialog box, go to the Font tab. In the Size box, enter the percentage amount followed by the symbol % (see below). Similarly, you can enter a plus or minus sign followed by the number of points to be added or subtracted from the base font size.
To change from a relative font size back to an absolute font size, enter the desired font size in points followed by the letters “pt".

Selecting a type size based on a percentage.
It is also possible to use a Percentage Font size for character styles. See the note in Selecting a language for a paragraph style.
Selecting a language for a paragraph style
The language you select for a document (on Tools > Options > Language Settings > Languages) determines the dictionary used for spell checking, thesaurus and hyphenation, the decimal and thousands delimiter used, and the default currency format.
Within the document, you can apply a separate language to any paragraph style. This setting has priority over the language of the whole document. On the Font tab of the Paragraph Style dialog box, languages with installed dictionaries are marked in the Language list by a small ABC icon. When you check spelling, OOo will use the correct dictionary for paragraphs with this style.

Selecting a language for a paragraph style.
Note: You can assign a language to selected pieces of text in a paragraph using character styles, also on the Font page. This assignment has priority over the paragraph style and document language.
Rotating the text in a paragraph style
Two common uses for rotated paragraphs are to put portrait headers and footers on a landscape page and to fit headings above narrow table columns.

A table with rotated headings.
Chapter 4 (Formatting Pages) describes how to create portrait headers and footers on landscape pages by rotating characters. You can achieve the same effect by defining a separate header or footer paragraph style specifically for landscape pages.
As an example, we will apply rotated table headings to a preexisting table.
- Create a new paragraph style. Name it Table Heading Rotated.
- On the Position page of the Paragraph Style dialog box, in the Rotation / scaling section, select 90 degrees. Click OK to save the new style.
- Select the heading row of the table and apply the new style. Any text in the cells of the heading row is now rotated.
- If the headings are aligned to the top of the cells, you may want to change the alignment to the bottom of the cells. To do this, click the Bottom button on the Table toolbar.

Rotating a paragraph 90 degrees.

Aligning text to the bottom of cells.
Kerning text
Kerning means increasing or decreasing the amount of space between pairs of letters to improve the overall appearance of the text. Kerning automatically adjusts the character spacing for specific letter combinations. It is only available for certain font types and, for printed documents, only works if your printer supports it.

Kerning disabled (left) and enabled (right).
To turn kerning on, go to the Position page of the Paragraph Style dialog box. In the Spacing section, select the Pair kerning checkbox.
![]()
Turning on kerning of letters in a font.
Using styles in outlining
Outline numbering is the feature that automatically numbers sections of a document, for example 1, 1.1, 1.2, 2 and 2.1. When sections are added or deleted, the numbering is automatically corrected.
Paragraph styles are the key to OOo's outline numbering feature. The default paragraph styles assigned to outline levels are the heading styles supplied with OOo: Heading 1, Heading 2, and so on. However, you can substitute any styles you wish, including custom (user-defined) styles.
OOo's outline numbering feature is used for more than numbering headings. The paragraph styles specified on the Outline Numbering dialog box determine which headings appear in the table of contents—see Chapter 12 (Tables of Contents, Indexes, and Bibliographies)—and some fields commonly used in headers and footers, as described in Including chapter or section names in page headers.
Choosing paragraph styles for outline levels
If you are using the default heading styles for the headings in your outline, and you are not using heading numbering, you do not need to do anything on the Outline Numbering dialog box. Setting up heading numbering is not covered in this chapter.
To use custom styles in place of the default heading styles:
- Click Tools > Outline Numbering to open the Outline Numbering dialog box.
- Click the number in the Level box corresponding to the heading for which you want to change the paragraph style.
- In the Numbering section, choose from the drop-down list of paragraph styles the style you want to assign to that heading level. For example, when setting up a chapter in the Writer Guide, I would click Level 1 and choose OOoHeading1 (a custom style defined for the OOoAuthors project) to replace Heading 1.
- Repeat for each outline level that you want to change. Click OK when done.

Choosing paragraph styles for outline levels.
Including chapter or section names in page headers
In addition to page numbers, headers and footers often include the name of the chapter or section. Because these names change from one chapter or section to the next, you need to use a field that displays information relevant to each page.
- Click Insert > Fields > Other to open the Fields dialog box.
- On the Document page, select Chapter in the Type list. The Format list now shows four choices.

Including the chapter name in page header.
The Layer box determines which outline level is displayed in the field. For example, Layer 1 always displays the most recently found heading that has the paragraph style selected for Level 1 in the Outline Numbering dialog box, Layer 2 displays the most recent heading with the paragraph style selected for Level 2 in outline numbering, and so on.
Note: A Chapter field in a page header always picks up the highest heading level on a page, even if you have specified a lower level in the Layer box. For example, if a page has a Heading 1 and a Heading 2 on it, then a Layer 2 Chapter name field in the header of that page will display the Heading 1 paragraph, not the first Heading 2 paragraph, as intended. In a footer, the layers work as intended.
Working with conditional paragraph styles
A conditional paragraph style is another way of formatting text differently in different parts of your document. In some cases, you may find it saves time to use conditional styles rather than switching between styles as you type.
Making a paragraph style conditional means it changes its formatting depending on where it is used. For example, you may want the style MyTextBody to be black by default but turn white when inside a frame with a blue background.
Probably the most common use for conditional formatting is with single style outlining. Single-style outlining is a type of outline numbering designed with a Numbering style, rather than with Tools > Outline Numbering. Instead of using different styles, it changes the number formatting whenever you press the Tab key to create a subordinate heading.
The only trouble with single-style outlining is that all levels look the same. That is where a conditional paragraph style comes in handy. Assign the paragraph style to an outline numbering style in the Numbering page and then open the Condition page (Figure 26). There, you can assign the levels of the outline numbering style to other paragraph styles. Then, when you press the Tab key while using the paragraph style, each level of the outline takes on different formatting, making single-style outlining even more convenient than it is on its own.
Note: Predefined styles (other than Text Body) such as Default, Heading 1, and Heading 2 cannot be set to be conditional.
Caution: If you want to make a style conditional, you have to do it while the style window still is open for the first time. After the window closes, the Condition tab no longer appears in the window.
Defining the conditional style
When you create a conditional style, you are saying “in this condition make this style look like that other style". For example, “When typing into a footer, make this style look like the my_footer paragraph style; when typing into a table, make this style look like the table_text paragraph style".
In addition to setting the normal (unconditional) properties of the style, you need to define which other style it will look like in different situations. You do this on the Condition tab.
To set up a conditional paragraph style:
- Define a new paragraph style.
- Select all the paragraph properties for the style. Do not click OK!
- Click the Condition tab.
- Select the Conditional Style checkbox.
- Select the first condition in the Context list (left side of the dialog box) and select the style you want for this condition in the right-hand list.
- Click Apply. The name of the paragraph style appears in the middle list.
- Repeat steps 5 and 6 for each condition you want to have linked to a different style.
- Click OK.
-
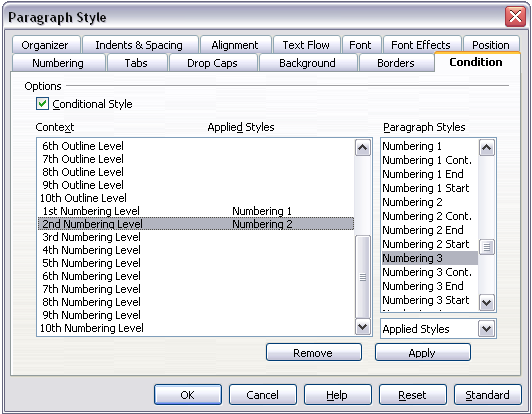
Condition page for paragraph styles.

When the style is selected, you will see that the formatting of your text depends on the context.
Working with frame styles
Frames are often used as containers for text or graphics. To provide consistency in the appearance of frames used for similar purposes, it is a good idea to define styles for frames. For example, you might want photographs to be enclosed in a frame with a drop-shadowed border, line drawings in a frame with a plain border, marginal notes in a frame without a border but with a shaded background, and so on.
Writer provides several predefined frame styles, which you can modify as needed; and you can define other frame styles. The technique for defining and applying frame styles is similar to that for other styles.
Tip: There is considerable overlap between the uses of frames and of sections for some page layout purposes. You may find it useful to take a look at Chapter 4 (Formatting Pages) for information about the use of frames and sections.
How frame styles work
When an object is added to Writer, it is automatically enclosed in a frame of a predetermined type. The frame sets how the object is placed on the page, as well as how it interacts with other elements in the document. You can edit the frame by modifying the frame style it uses or by using a manual override when a frame is added to the document.
Because frames and objects are used together, it sometimes is easy to forget they are separate elements. In some cases, such as charts, you can edit the frame and object separately, so the distinction is worth remembering.
Unlike other elements that use styles, frames can be defined only partly by their style because their use can vary so much. Several elements of frames, such as the anchor and protected elements, need to be defined manually for individual frames.
You can format a frame manually when you select Insert > Frame. The dialog box that opens contains all the settings available when frame styles are set up, as well as some only available when the frame is inserted. As with other styles, the most efficient way to format frames is in the Styles and Formatting window.
Planning the styles
If you are using a mix of graphics, you may want to define two related styles, one with a border line for graphics with white backgrounds and one without a border for all other backgrounds. You also may want to design one or more frames for text only.
Otherwise, the default frame styles (listed in Table 1) cover most users' needs. The only significant addition that many users might need is one or more styles for text frames.
Table 1. Various frame styles and their uses
| Style | Comments and Use | |
| Formula | The frame style used for formulas. The default includes AutoSize, which adjusts the size of the frame to the formula. | |
| Frame | The default frame style. | |
| Graphics | The default style for graphics. The defaults include autosizing to fit the graphic, no text wrap, and a thin border around the frame. These are reasonable defaults, except for the border. Unless the background of the graphic is white and the document's background also is white, the border usually is unnecessary. | |
| Labels | The default style for use with File > New > Labels. It seems to be used by OpenOffice.org automatically and is not intended for users at all. | |
| Marginalia | A style for placing a frame beside the left margin. As the name suggests, the Marginalia style is intended for comments added in the margin of text. The style also is useful for creating sideheads—headings against the left margin, which often are used in technical documentation. To set up sideheads, create body text styles with two inches or more indentation from the left. Then, place the cursor at the start of a body text paragraph, add the frame, and apply the Marginalia style. | |
| OLE | The default style for OLE objects and floating frames. The default places the frame at the top and center of a body of text. | |
| Watermark | The default style for a watermark, a graphic placed as the background to a body of text. The default is a Through wrap, with text passing over the frame and anything in it. The graphic should be faint enough that text still is readable over top of it. |
Formatting frames
You can access frame settings by selecting New or Modify in the Styles and Formatting window for a frame style or by selecting Insert > Frame from the menu. Once a frame is added to a document, you can double-click the frame to open the Frame dialog box or modify the style in the Styles and Formatting window.
Frame settings are available from the following tabbed pages:
- Type page: sets the size and position of the frame. One of the most useful options here is AutoSize, which automatically adjusts the frame to the object it contains. If the frame style is one used automatically, then this option should be selected.
- Options page: sets whether the contents of the frame are printed and able to be edited in a read-only document. The tab also sets the text direction, which is useful if you are using the frame for contents in a language that uses right-to-left text direction.
- Wrap page: sets how text is positioned in relation to the frame and how close text comes to a frame. If you want the frame contents to stand out from the paragraphs around it, set the wrap to None. This probably is the single most important tab for frames.
- Background page: sets the background color or graphic. This tab is useful mostly for text frames in complex page layouts, in which a text frame has an appearance different from the general background of the page.
- Border page: sets the line around the frame, if any. Many beginning designers make the mistake of adding a border to every frame. However, when a colored background distinctly marks the division between the frame's contents and the rest of the page, borders are unnecessary.
- Columns page: sets the number of columns used in the frame. This tab can be ignored unless the frame is being used for text.
- Macro page: sets a macro to use with the frame. These options are useful only in an on-line Writer or HTML document.
Applying frame styles
Whenever you insert an object into a document, it will automatically have a frame around it. Some designers like to add frame styles to introduce variation. For example, you could have two different frame styles for graphics: one that is centered for small graphics and another that is left-aligned for graphics that take up the entire width of the main frame. In such a case, you will need to add at least one frame style.
To apply a style to a frame:
- Select the frame.
- Bring up the Styles and Formatting window (for example, by pressing F11).
- Click the Frame Styles icon (the third one from the left).
- Double-click the frame style you want.
Tip: When a frame is selected, the Apply Style list at the left of the formatting toolbar displays frame styles. You can use this to change the style of a frame.
Most of a frame's design can be set in the style. However, the following options must be set manually:
- Anchoring: how the frame is positioned in relation to the rest of the page's contents (Format > Anchor).
- Arrangement: the frame's position in a stack of objects (Format > Arrange).
- Adding a hyperlink: so that a click on the frame opens a Web page or another document in an HTML file (Insert > Hyperlink).
The right-click menu also has items for anchoring and arrangement, as well as for wrap and alignment.
-
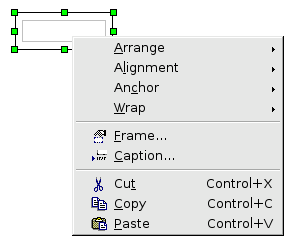
A frame’s right-click menu has positioning options.

Working with list (numbering) styles
You can define the appearance of lists by using list (numbering) styles, which include styles for bullet lists as well as numbered lists.
OOo uses the terms “numbering style" and “list style" inconsistently, but they are the same thing. For example, the tooltip in the Styles and Formatting window says “List Styles", but its style dialog box says “Numbering Style".
After setting up a list style, you can associate it with one or more paragraph styles. To create a hierarchy of numbered paragraphs, use a series of list styles and define other (unnumbered) paragraphs to fit the indentation or spacing patterns of the numbered paragraphs.
Example of list style usage
This example shows how to have Arabic numbers (1, 2, 3) with no following punctuation, lined up as shown in the illustration below:
- In the Styles and Formatting window, select List Styles (top), and either All or Hierarchical in the box at the bottom. If you want to create a new style, right-click on the window and select New; then define the style. However, the following example uses one of the OOo-supplied style names: List 1.
- Select List 1, right-click and select Modify. On the Numbering Style dialog box, either choose a predefined style on the Numbering Style tab or design a new style on the Options tab. We will use the Options tab.
- Choose 1, 2, 3 in the Numbering box and delete anything in the Before and After boxes. In the Level box, leave 1-10 (the default) highlighted.
- On the Position page, increase Spacing to text from the default to, say, 0.65cm and change Numbering alignment to Right. Increase the Minimum space numbering <-> text value, if necessary. The values depend on the typeface, type size, and personal preference. Try a few combinations to see what looks best.
- Click OK to set the changes. Now the modified style can be used. If the style has already been used in the document, those paragraphs in this style will now reflect the changes.
List-numbering style
Designing a list-numbering style.
Positioning a list
Setting spacing and alignment in a list-numbering style.
You can apply this numbering style directly to any paragraph or assign it to a paragraph style.
To assign a numbering style to a paragraph style, open the Paragraph Style dialog box (see page 5), go to the Numbering page and choose the numbering style defined. (The name of the paragraph style does not have to match the name of the numbering style.)
Apply numbering style
Choosing a numbering style for a paragraph style
Using outline-numbering styles
Outline numbering (sometimes called multi-level numbering) is a numbered list with indented numbered sections. Rather than just a list of numbered items (1,2,3...), an outline-numbered list may have item 1, then indented items numbered 1,2,3; or i,ii,iii; or some other numbering method before the main number 2.
With outline-numbering styles you can achieve any combination of numbering formats you want. To set up outline numbering styles assigned to paragraph styles, follow the procedure for ordinary numbered lists but use the Outline tab.
Tip: The selections under Tools > Outline Numbering may be sufficient; you may not need to use outline-numbering styles.
You can modify the predefined style, or define a new style. This example uses one of the supplied styles, Numbering 1.
As an example, we will use outline-numbering to produce the following effect:
- I. Level-1 list item
- A. Level-2 list item
- i. Level-3 list item
- a) Level-4 list item
Instructions:
- In the Styles and Formatting window, choose Numbering Styles and select a style such as Numbering 1. Right-click on the style and select Modify.
- On the Numbering Style dialog box, go to the Outline page, where you will find that one style matches our requirements. Click once on that style.
- To modify the layout of the list, use the Options tab. Notice that the preview on the right shows the outline selected. In the Level box on the left, select 1, then 2, 3, and 4 and see how the information in the Numbering and After boxes changes. Use the Options page to set different punctuation; for example, a period (full stop) after “a" on level 4 instead of a parenthesis.
- To make the indentation at each level greater or less than the default, change it on the Position page. Select the heading level, then make any changes in the indentation, spacing, or numbering alignment.
- Repeat for each heading level as required, then click OK to save the style.

Choosing a predefined outline-numbering style.

Checking the outline numbering for level-1 list items.

Numbering style for level-2 list items.
Tip: With outline numbering you can define different bullet styles for the different levels of a bullet list. Use the Bullets tab of the Numbering Style dialog box (not shown) to select the basic style. Return to the Options tab to customize the bullet for each indent level. Here you can set bullets to any character. See the Graphics tab for more bullets.
Applying the different levels of a list-numbered paragraph style
To apply the different levels of a list-numbered paragraph style:
- Type the first paragraph and apply the List 1 style. Notice that the level-1 list number is added automatically.
- Select View > Toolbars > Bullets and Numbering to display the Bullets and Numbering toolbar.
- Press Enter to start the next paragraph. To make it a level-2 list item, click the Demote one level icon on the object bar. The number applied to this paragraph has changed to a level-2 number.
- Continue typing list items, moving each paragraph up or down levels as needed.

| 1 Bullets On/Off | 8 Insert Unnumbered Entry | |
| 2 Numbering On/Off | 9 Move Up | |
| 3 Numbering Off | 10 Move Down | |
| 4 Up One Level | 11 Move Up with Subpoints | |
| 5 Down One Level | 12 Move Down with Subpoints | |
| 6 Move Up (One Level) with Subpoints | 13 Restart Numbering | |
| 7 Move Down (One Level) with Subpoints | 14 Bullets and Numbering |
Bullets and Numbering toolbar
Tip: One option is to enter all the list paragraphs first and apply the levels afterwards.
You can use keyboard shortcuts to move paragraphs up or down the outline levels. Place the cursor at the beginning of the numbered paragraph and press:
- Tab Down a level
- Shift+Tab Up a level
To insert a tab stop at the beginning of a numbered paragraph (that is, after the number but before the text), press Control+Tab.
Working with page styles
In Writer, page styles define the basic layout of pages, including page size, margins, headers and footers, borders and backgrounds, number of columns, and so on.
Writer comes with several page styles, which you can modify as you wish, and you can define your own. You can have one or many page styles in a single document.
Note: All pages in a Writer document are based on styles. If you do not specify a page style, Writer uses the Default page style.
To change the layout of individual pages, either define a new page style or use one of the techniques (sections, frames, or tables) described in Chapter 4 (Formatting Pages).
This section describes one use of page styles. Other uses are discussed in Chapter 6 (Introduction to Styles) and Chapter 4 (Formatting Pages).
Tip: Any modifications of page styles, including the Default page style, apply only to the document you are working on. If you want the changes to be the default for all documents, you need to put the changes into a template and make that template the default template. See Chapter 10 (Working with Templates) for details.
Setting up a book chapter sequence of pages
Book chapters typically start on a right-hand page, with the first page of the chapter having a different layout from the rest of the pages. The other pages in the chapter are “mirrored" for double-sided printing. For example, page numbers in the header or footer may be positioned on the outside edge of pages and a wider margin (allowing for binding) may be placed on the inside edge.
Table 2 shows the properties of two page styles (Right Page and Default) set up for a typical book chapter's sequence of pages.
Table 2. Properties of customized page styles to be used in a book chapter
| Page Style | Desired effect | Property: setting | |
| Right Page | First page always on the right (an odd numbered page) | Page > Page Layout: Right | |
| No header or footer | Header > Header on: Not selected | ||
| Top margin of page larger than on other pages | Page > Margins > Top: 6.00cm | ||
| Default | Mirrored margins | Page > Page Layout: Mirrored | |
| Header with page number on the top outside of the page, and chapter title in the top middle center of the page | Header > Header on: Selected Header > Header > Same content left/right: Not selected |
The figure below illustrates the transitions from Right Page to Default, with the change of header between left and right pages shown by the # symbol.

Right Page and then Default page style with different header for alternate pages
To apply this page scenario:
- Set up the page styles.
- On the Styles and Formatting window, click the Page Styles icon
 (fourth from left) to display a list of page styles.
 - Right-click on Right Page and select Modify from the pop-up menu.
- On the Organizer page of the Page Style: Right Page dialog box, change Next Style to Default.
- On the Page page, specify a larger left margin for binding, and a larger top margin to move the chapter title down the page.
- On the Header and Footer pages, be sure the Header on and Footer on checkboxes are not selected. Click OK to save your changes.
- On the Styles and Formatting window, in the list of page styles, right-click on Default and select Modify from the pop-up menu.
- On the Organizer page of the Page Style: Default dialog box, be sure Next Style is Default.
- On the Page page of the Page Style: Default dialog box, select Mirrored for Page layout and set the Inner and Outer margins to the same width as the Left and Right margins, respectively, on the Right Page style.
- On the Header page of the Page Style: Default dialog box, select the Header on checkbox and deselect the Same content left/right checkbox. Click OK to save your changes.
- Set up the Heading 1 paragraph style to start on a new right-hand page.
- In the Styles and Formatting window, right-click on Heading 1 and select Modify.
- On the Text Flow page of the Paragraph Style dialog box, in the Breaks section, select Insert, With Page Style, and Right Page. Click OK to save your changes.
- To start a new chapter, apply the paragraph style Heading 1 to the first paragraph, which will be the title of the chapter.
- To set up the headers:
- On a left page, put the cursor in the header and insert a page number field on the left (Insert > Fields > Page Number).
- Press Tab to put the cursor in the middle and insert a Chapter reference:
Press Control+F2 to display the Fields dialog box.
On the Document page, for Type select Chapter and for Format select Chapter name. Make sure that Layer is set to 1, and then click Insert. - On a right page, put the cursor in the header, press Tab, insert a Chapter reference, press Tab again, and insert a page number field.
- If you need to adjust the tab stops for the header, modify the Header paragraph style. Do not manually adjust the tab stops.

Specifying the next style after the first page of a chapter.

Setting page margins and layout for the Right Page style.

Setting page margins and layout for the Default page style.

Setting up the header properties for the Default page style.

Setting a paragraph style to start on a page of a selected style.
Note: By default, paragraph style Heading 1 is assigned to Outline Level 1. The assignment of paragraph styles to outline levels is done through Tools > Outline Numbering.

Inserting a chapter title into the header of a page.
| Content on this page is licensed under the Creative Common Attribution 3.0 license (CC-BY). |