Tracking changes to a document
- Selecting text
- Cutting, copying, and pasting text
- Moving paragraphs quickly
- Finding and replacing text and formatting
- Inserting special characters
- Formatting paragraphs
- Formatting characters
- Autoformatting
- Creating numbered or bulleted lists
- Using footnotes and endnotes
- Checking spelling
- Using the thesaurus
- Hyphenating words
- Using AutoCorrect
- Using word completion
- Using AutoText
- Line numbering
- Undoing and redoing changes
- Tracking changes to a document
- Linking to another part of a document
- Working with hyperlinks
- Tips and tricks
Contents
Introduction
You can use several methods to keep track of changes made to a document.
- Make your changes to a copy of the document (stored in a different folder, under a different name, or both), then use Writer to combine the two files and show the changes you made. Click Edit > Compare Document. This technique is particularly useful if you are the only person working on the document, as it avoids the increase in file size and complexity caused by the other methods.
- Save versions that are stored as part of the original file. However, this method can cause problems with documents of nontrivial size or complexity, especially if you save a lot of versions. Avoid this method if you can.
- Use Writer's change marks (often called "redlines" or "revision marks") to show where you have added or deleted material or changed formatting. Later, you or another person can review and accept or reject each change.
| Not all changes are recorded. For example, changing a tab stop from align left to align right and changes in formulas (equations) or linked graphics are not recorded. |
Preparing a document for review
When you send a document to someone else to review or edit, you may want to prepare it first so that the editor or reviewer does not have to remember to turn on the revision marks. After you have protected the document, any user must enter the correct password in order to turn off the function or accept or reject changes.
- Open the document. To check whether it contains multiple versions, click File > Versions. If multiple versions are listed, save the current version as a separate document with a different name and use this new document as the review copy.
- With the review copy open, make sure that change recording is turned on. The Edit > Changes > Record menu item has a check mark next to it when recording is turned on.
- Click Edit > Changes > Protect Records. On the Enter Password dialog box, type a password (twice) and click OK.
| Passwords must contain at least five characters. It is not necessary to password protect the document while preparing it for review. |
Recording changes
See Chapter 2 (Setting up Writer) in the Writer Guide for instructions on setting up how your changes will be displayed.
- To begin tracking (recording) changes, click Edit > Changes > Record. To show or hide the display of changes, click Edit > Changes > Show.
- To enter a comment on a marked change, place the cursor in the area of the change and then click Edit > Changes > Comment. In addition to being displayed as an extended tip, the comment is also displayed in the list in the Accept or Reject Changes dialog box. To move from one marked change to the next, use the arrow buttons. If no comment has been recorded for a change, the Text field is blank.
- To stop recording changes, click Edit > Changes > Record again.
| Hold the mouse pointer over a marked change; you will see a Help Tip showing the type of change, the author, date, and time of day for the change. If Extended Tips are enabled, you will also see any comments recorded for this change. |

Inserting notes
To insert a note that is not associated with a recorded change:
- Place the cursor at the text you want to comment on, then click Insert > Note.
- On the Insert Note dialog box, type your note. Click the Author button to insert your initials and the date and time.
-
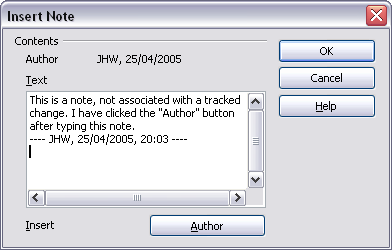 Inserting a note.

To view a note, move the mouse pointer over the note marker (displayed as a small yellow rectangle). Writer displays the note in a Tip above the text. You can also double-click on the note to see it inside the Edit Note dialog box. If you have trouble viewing or selecting notes this way, you can use the Navigator instead: expand the list of notes, select the one you want, right-click on it, select Note, and then select Edit to display the Edit Note dialog box.
The Edit Note dialog box looks much like the Insert Note dialog box, with the addition of forward and back arrow buttons if the document contains more than one note.
| You can change the color of the note marker using the Tools > Options > OpenOffice.org > Appearance dialog box. (In the Text Document section, look for Note Indicator.) |
Accepting or rejecting changes and comments
- Click Edit → Changes → Accept or Reject. The Accept or Reject Changes dialog box opens.
- When you select a change in the dialog box, the actual change is highlighted in the document, so you can see what the editor changed.
- Click Accept or Reject to accept or reject the selected change. You can also click Accept All or Reject All if you do not want to review the changes individually.

Changes that have not yet been accepted or rejected are displayed in the list. Accepted changes are removed from the list and appear in the text without any marking.
To show only the changes of certain people or only the changes on specific days or various other restrictions, use the Filter page on the Accept or Reject Changes dialog box. After specifying the filter criteria, return to the List page to see those changes that meet your criteria.

Merging modified documents
The processes discussed to this point are effective when you have one reviewer at a time. Sometimes, however, multiple reviewers all return edited versions of a document at the same time. In this case, it may be quicker to review all of these changes at once, rather than one review at a time. For this purpose, you can merge documents in Writer.
To merge documents, all of the edited documents need to have recorded changes in them.
- Open one copy.
- Click Edit > Changes > Merge Document and select and insert another copy of the document to be merged with the first.
- After the documents merge, the Accept or Reject Changes dialog box opens, showing changes by more than one reviewer. If you want to merge more documents, close the dialog box and then repeat step 2.
- Repeat until all copies are merged.
All recorded changes are now included in the open copy. Save this file under another name.
Comparing documents
Sometimes reviewers may forget to record the changes they make. This is not a problem with Writer because you can find the changes if you compare documents.
In order to compare documents, you need to have the original document and the one that is edited. To compare them:
- Open the edited document.
- Select Edit > Compare Document.
- The Insert dialog box appears. Select the original document and click Insert.
Writer finds and marks the changes and displays the Accept or Reject Changes dialog box. From this point, you can go through and accept or reject changes procedure as described earlier.
| Content on this page is licensed under the Creative Common Attribution 3.0 license (CC-BY). |