Adding an image to the Gallery
From Apache OpenOffice Wiki
You may wish to add to the Gallery any images that you use frequently, for example, a company logo. You can then very easily insert these graphics into a document later.
To add images to the Gallery, proceed as follows:
- Open the Gallery.
- Select the theme where you want to add images, or you can create a new theme. To create a new theme:
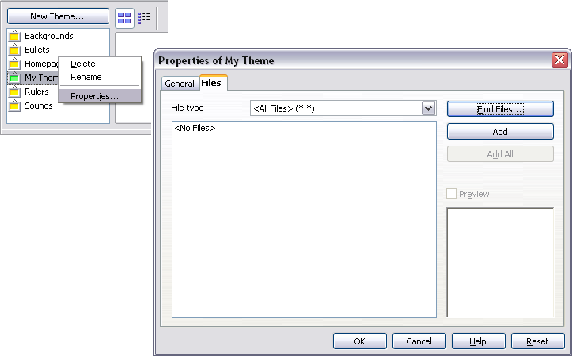
- Click the New Theme button above the list box of Themes. The Properties of New Theme dialog box opens, which is similar to the one shown below.
- Select the General tab and enter an appropriate name for the new theme in the text box.
- Select the Files tab, skip step 3, and continue with step 4.
- Right-click on the desired theme and select Properties in the pop-up menu. This will display a window from which to select the files to be added.
- On the Files page, click the Find Files button. The Select path dialog box opens.
- You can enter the path for the file's directory in the Path text box, or you can navigate to locate the file's directory.
- Use the File type drop-down list to help limit the search.
- Press the Select button to start the search.
- A list of graphic files will be displayed in the window. You can use the File type filter again to further limit the search.
- Select the files to add. To select more than one file, hold the Control key down while you click on each file.
- Finally, click Add.
- When you have finished working with the Gallery, you can click on its icon
 to close it.
| Content on this page is licensed under the Creative Common Attribution 3.0 license (CC-BY). |
