Difference between revisions of "Documentation/OOoAuthors User Manual/Impress Guide/Printing, Emailing, Exporting, and Saving Slide Shows"
| Line 1: | Line 1: | ||
This is Chapter '''10''' of '''OpenOffice.org 2.x Impress Guide''' (first edition), produced by the [http://oooauthors.org/ OOoAuthors group]. A PDF of this chapter is available from the [http://documentation.openoffice.org/manuals/oooauthors2/ OOoAuthors Guides page] at OpenOffice.org. | This is Chapter '''10''' of '''OpenOffice.org 2.x Impress Guide''' (first edition), produced by the [http://oooauthors.org/ OOoAuthors group]. A PDF of this chapter is available from the [http://documentation.openoffice.org/manuals/oooauthors2/ OOoAuthors Guides page] at OpenOffice.org. | ||
| − | [[ | + | [[Documentation/OOoAuthors_User_Manual| << User Manuals page]]<br> |
[[Impress Guide| << Impress Guide Table of Contents]]<br> | [[Impress Guide| << Impress Guide Table of Contents]]<br> | ||
[[Impress Guide/Slide Shows| << Chapter 9 Slide Shows]] | | [[Impress Guide/Slide Shows| << Chapter 9 Slide Shows]] | | ||
Revision as of 21:47, 10 October 2007
This is Chapter 10 of OpenOffice.org 2.x Impress Guide (first edition), produced by the OOoAuthors group. A PDF of this chapter is available from the OOoAuthors Guides page at OpenOffice.org.
<< User Manuals page
<< Impress Guide Table of Contents
<< Chapter 9 Slide Shows |
Chapter 11 Setting Up and Customizing Impress >>
Contents
Introduction
General information about printing documents from OOo is provided in the Getting Started guide. This chapter describes some items of particular interest to users of Impress.
Quick printing
Click the Print File Directly icon [[Image:]] to send the entire document to the default printer defined for your computer.
Controlling printing
Impress provides many options for printing a presentation: with multiple slides on one page, with a single slide per page, with notes, as an outline, with date and time, with page name, and more.
For more control over printing a presentation, choose File > Print to display the Print dialog.

The Print dialog.
On the Print dialog, you can choose:
- Which printer to use (if more than one are installed on your system) and the properties of the printer—for example, orientation (portrait or landscape), which paper tray to use, and what paper size to print on. The properties available depend on the selected printer; consult the printer’s Selecting default print optionsdocumentation for details.
- What slides to print, how many copies to print, and in what order to print them.
- Pages prints the slide numbers you list in the box. Use hyphens to indicate ranges and commas or semicolons to separate ranges; for example: 1, 5, 11-14, 34-40.
- Selection prints selected objects. This choice is available only when you have selected one or more objects on a slide (in Normal view).
- What items to print. Click the Options button to display the Printer Options dialog.
Selecting printer options for a presentation
Selections on the Printer Options dialog apply to this printing of this presentation only. To specify default printing options for Impress, see Selecting default print options.

Selecting printer options for a presentation.
Some items of interest on the Printer Options dialog include:
Under Contents:
- Drawing prints one slide per page, full page, in landscape.
- Notes prints a single slide per page with any notes entered for that slide in Notes View.
- Handouts prints the slides in reduced size on the page, from a single slide up to six slides per page. To choose how many slides print on each page, first switch to Handout view, then choose Format > Modify Layout. Click the thumbnail image showing how many slide per page you want to print, then click OK. Now follow the print instructions above and choose Handouts.
- Outline prints the title and headings of each slide in outline format.
Under Quality:
- Default prints the presentation in color on a color printer or in grayscale on a mono printer, including all background colors and images. If you have used a dark background (which looks good when projected), the slides may not be very readable when printed, especially on handouts with small images.
- Grayscale prints in black, white and grayscale on both color and mono printers, and does not print background colors or images.
- Black & white prints in black, white and grayscale and does not print background colors or images.
Under Print, you can choose additional elements to be printed in the page margin. If you marked Brochure in the Page options area, the only available selection in this area is Hidden pages.
- Page name includes the name of the slide. Not available with brochure printing.
- Date prints the current date at time of printing. Not available with brochure printing.
- Time prints the current time. Not available with brochure printing.
- Hidden pages prints the slides that are marked as hidden in the presentation.
Under Page options:
- Default prints the slides full size.
- Fit to page scales down slides so they fit on the paper in the printer.
- Tile pages prints several slides on a page, if the slides are smaller than the paper.
- Brochure is discussed in Printing a brochure.
- Paper tray from printer settings specifies that the paper tray to be used is the one defined in the printer setup.
Selecting default print options
Selections on the Printer Options dialog over-ride any default settings. To specify default settings for printing, use Tools > Options > OpenOffice.org Impress > Print. The page displayed contains the same choices as the Printer Options dialog.
Other printer settings are found in Tools > Options > OpenOffice.org > Print, as shown below. Use this page to specify quality settings for printing, and whether to have OOo warn you if the paper size or orientation of your document does not match the printer settings.

Print options for OpenOffice.org.
Printing in black and white on a color printer
You may wish to print documents in black and white on a color printer, to save expensive color ink or toner or to make handouts of slides with dark backgrounds easier to read. Several choices are available.
To print the current document in black and white or grayscale:
- Click File > Print to open the Print dialog.
- Click Properties to open the properties dialog for the printer. The available choices vary from one printer to another, but you should find an option for Color. See your printer’s help or user manual for more information.
- The choices for color may include black and white or grayscale. Choose one of these. Grayscale is best if you have any graphics in the document. Click OK to confirm your choice and return to the Print dialog, then click OK again to print the document.
To set up OOo to print all color text and graphics as grayscale:
- Click Tools > Options > OpenOffice.org > Print to display the Print Options dialog.
- Select the Convert colors to grayscale checkbox. Click OK to save the change.
To set up Impress to print all color text as black, and all graphics as grayscale:
- Click Tools > Options > OpenOffice.org Writer > Print.
- Under Quality, select the Grayscale or Black & white checkbox. Click OK to save the change.
Printing a brochure
You can print a presentation with two slides on each side of a sheet of paper, arranged so that when the printed pages are folded in half, the slides are in the correct order to form a booklet or brochure.
To print a brochure on a single-sided printer:
- Click File > Print. In the Print dialog, click Properties and be sure the printer is set to the same orientation (portrait or landscape) as specified in the page setup for your document. (Usually the orientation does not matter, but it does for brochures.)
- Click Options. In the Pages section of the Printer Options dialog, choose Brochure and Right pages. Click OK twice to print the first side of each page.
- Flip the pages and put them back into the printer, new side up, and in the correct orientation. You may need to experiment a bit to find out what the correct arrangement is for your printer.
- Click File > Print and check Properties to make sure the printer setup is still correct.
- Click Options again. In the Pages section of the Printer Options dialog, choose Brochure and Left page. Click OK twice to print the second side of each page.
- If your printer can do double-sided printing, then click on the checkboxes for both Left and Right along with Brochure.
Exporting to PDF
OpenOffice.org Impress can export presentations to PDF (Portable Document Format). This industry-standard file format for file viewing is ideal for sending the file to someone else to view using Adobe Reader or other PDF viewers.
Quick export to PDF
Click the Export Directly as PDF icon [[Image:]] to export the entire presentation using the default PDF settings. You are asked to enter the file name and location for the PDF file, but you do not get a chance to choose a page range or the print quality.
Controlling PDF content and quality
For more control over the content and quality of the resulting PDF, use File > Export as PDF. You are asked to enter the location and file name of the PDF to be created, and then the PDF Options dialog opens. This dialog has four pages, described in this section. Make your selections, and then click Export.
General page of PDF Options dialog
On the General page, you can choose which pages to include in the PDF, the type of compression to use for images (which affects the quality of images in the PDF), and other options.
General page of PDF Options dialog
General page of PDF Options dialog.
Range section
- All: Exports the entire document.
- Pages: To export a range of slides, use the format 3-6 (pages 3 to 6). To export single slides, use the format 7;9;11 (slides 7, 9, and 11). You can also export a combination of slide ranges and single slides, by using a format like 3-6;8;10;12.
- Selection: Exports whatever material is selected.
Images section
- Lossless compression: Images are stored without any loss of quality. Tends to make large files when used with photographs. Recommended for other images.
- JPEG compression: Allows for varying degrees of quality. A setting of 90% tends to work well with photographs (small file size, little perceptible loss).
- Reduce image resolution: Lower-DPI (dots per inch) images have lower quality.
Note EPS images with embedded previews are exported only as previews. EPS images without embedded previews are exported as empty placeholders.
General section
- Tagged PDF: Includes special tags into the corresponding PDF tags. Some tags that are exported are table of contents, hyperlinks, and controls. This option can increase file sizes significantly.
- Export notes: Exports notes in Writer and Calc documents as PDF notes. You may not want this!
- Export bookmarks: Exports headings as “bookmarks” (a table of contents list displayed by some PDF readers, including Adobe Reader).
- Create PDF form - Submit format: Choose the format of submitting forms from within the PDF file. This setting overrides the control’s URL property that you set in the document. There is only one common setting valid for the whole PDF document: PDF (sends the whole document), FDF (sends the control contents), HTML, and XML. Most often you will choose the PDF format.
- Export automatically inserted blank pages: Not used in Impress.
Initial View page of PDF Options dialog
On the Initial View page, you can choose how the PDF opens by default in a PDF viewer. The selections should be self-explanatory.
Initial View page of PDF Options dialog
Initial View page of PDF Options dialog.
User Interface page of PDF Options dialog
On the User Interface page, you can choose more settings to control how a PDF viewer displays the file. Some of these choices are particularly useful when you are creating a PDF to be used as a presentation or a kiosk-type display.
User Interface page of PDF Options dialog
User Interface page of PDF Options dialog.
Window options section
- Resize window to initial page. Causes the PDF viewer window to resize to fit the first page of the PDF.
- Center window on screen. Causes the PDF viewer window to be centered on the computer screen.
- Open in full screen mode. Causes the PDF viewer to open full-screen instead of in a smaller window.
- Display document title. Causes the PDF viewer to display the document’s title in the title bar.
User interface options section
- Hide menubar. Causes the PDF viewer to hide the menu bar.
- Hide toolbar. Causes the PDF viewer to hide the toolbar.
- Hide window controls. Causes the PDF viewer to hide other window controls.
Transitions section
Includes Impress slide transition effects in the respective PDF effects.
Bookmarks section
Select how many heading levels are displayed as bookmarks, if Export bookmarks is selected on the General page.
Security page of PDF Options dialog
As of OOo 2.0.4, PDF export includes options to encrypt the PDF (so it cannot be opened without a password) and apply some digital rights management (DRM) features.
Note Permission settings are effective only if the user’s PDF viewer respects the settings.
- With an open password set, the PDF can only be opened with the password. Once opened, there are no restrictions on what the user can do with the document (for example, print, copy, or change it).
- With a permissions password set, the PDF can be opened by anyone, but its permissions can be restricted. See below.
- With both the open password and permission password set, the PDF can only be opened with the correct password, and its permissions can be restricted.
Security page of PDF Options dialog
Security page of PDF Options dialog.
The figure below shows the pop-up dialog displayed when you click the Set open password button on the Security page of the PDF Options dialog.
Setting a password to encrypt a PDF
Setting a password to encrypt a PDF.
After you set a password for permissions, the other choices on the Security page become available. These selections should be self-explanatory.
Exporting as a Flash file
Macromedia Flash file format (.SWF) was created to store animation for web pages. Because almost all browsers play Flash movies (the Adobe Flash Player is available as a free download for those without Flash-capable browsers), these files can be viewed by just about anyone. With OpenOffice.org, you can export your Impress slide show as a .SWF file. To download the latest Adobe Flash Player for your operating system, go to: http://www.adobe.com/products/flashplayer/
Note: Saving in Flash format does not retain animation and slide transitions.
To export the presentation as a Flash (.SWF) file:
- Choose File > Export.
- Select the location where you want the file saved and type a name for the file.
- Under File Format, choose Macromedia Flash (SWF) (.swf) and click Save.
Exporting as web pages (HTML files)
You can export presentations as a series of web pages that can be viewed in any browser.
Note Saving as web pages (HTML format) does not retain animation and slide transitions.
- Select File > Export and choose HTML Document as the file type.
- Create a folder for the files, supply a name for the resulting HTML file, and click Save. The HTML Export Wizard opens.
- Choose the design for all of the pages, either from an existing design or by creating a new one.
If you have not previously saved a design, the Existing Design choice is not available. - Click Next to select the type of web pages to create.
- Standard HTML: one page for each slide, with navigation links to move from slide to slide.
- Standard HTML with frames: one page with a navigation bar on the left-hand side; uses slide title as navigation links. Click on links to display pages in right-hand side.
- Automatic: one page for each slide, with each page set with the Refresh meta tag so a browser automatically cycles from one page to the next.
- WebCast: generates an ASP or Perl application to display the slides. Unfortunately OOo has no direct support for PHP as yet.
- Decide how the images will be saved (GIF or JPG) and what resolution to use.
When choosing a resolution, consider what the majority of your viewers might have. If you use a high resolution, then a viewer with a medium-resolution monitor will have to scroll sideways to see the entire slide—probably not desirable. - If Create title page was chosen in step 4, supply the information for it on the next page. The title contains an author name, e-mail address and home page, along with any additional information you want to include.
This page of the Wizard does not display if Create title page was not chosen. - Choose the navigation button style to use to move from one page to another. If you do not choose any, OOo will create a text navigator.
- Select the color scheme for the web pages. Available schemes include the document’s existing scheme, one based upon browser colors, and a completely user-defined scheme. You can save a new scheme so that it will appear on the first page of the HTML export wizard.
- Click Create to generate the HTML files. If this is a new design, a small dialog pops up. If you might want to reuse this design, you can give it a name and save it. Otherwise, click Do Not Save.
Note: Depending on the size of your presentation and the number of graphics it contains, the HTML export function creates many HTML, JPG, and GIF files. If you simply save to your desktop (not in a specific folder), these separate HTML and graphics files will be all over your desktop. So be sure to create a folder to hold all the files.

HTML Export Step 1.

HTML Export – Choosing publication type.

HTML Export – Choosing graphics type.

HTML Export – Title page information.

HTML Export – Choosing navigation style.

HTML Export – Choosing color scheme.

Naming the design.
E-mailing a presentation
OOo provides several ways to quickly and easily send a Writer document as an e-mail attachment in one of three formats: .ODP (OpenDocument Presentation, OOo’s default format), .PPT (Microsoft PowerPoint format), or PDF.
To send the current document in .ODP format:
- Choose File > Send > Document as E-mail. OpenOffice.org opens a new e-mail in your default e-mail program. The document is attached.
- In your e-mail program, enter the recipient, subject and any text you want to add, then send the e-mail.
File > Send > E-mail as OpenDocument Presentation has the same effect.
If you choose E-mail as Microsoft PowerPoint, OOo first creates a .PPT file and then opens your e-mail program with the .PPT file attached. The .PPT file is not saved on your computer.
Similarly, if you choose E-mail as PDF, OOo first creates a PDF using your default PDF settings (as when using the Export Directly as PDF toolbar button) and then opens your e-mail program with the .PDF file attached. The PDF file is not saved on your computer.
Tip: If you want to keep a copy of the .PPT or .PDF file as well as e-mailing it to someone, first save or export the presentation into the required format, then attach it to an e-mail in the usual way.
Digital signing of documents
To sign a document digitally, you need a personal key, the certificate. A personal key is stored on your computer as a combination of a private key, which must be kept secret, and a public key, which you add to your documents when you sign them. You can get a certificate from a certification authority, which may be a private company or a governmental institution.
When you apply a digital signature to a document, a kind of checksum is computed from the document’s content plus your personal key. The checksum and your public key are stored together with the document.
When someone later opens the document on any computer with a recent version of OpenOffice.org, the program will compute the checksum again and compare it with the stored checksum. If both are the same, the program will signal that you see the original, unchanged document. In addition, the program can show you the public key information from the certificate. You can compare the public key with the public key that is published on the web site of the certificate authority.
Whenever someone changes something in the document, this change breaks the digital signature.
On Windows operating systems, the Windows features of validating a signature are used. On Solaris and Linux systems, files that are supplied by Thunderbird, Mozilla or Firefox are used. For a more detailed description of how to get and manage a certificate, and signature validation, see “Using Digital Signatures” in the OOo Help.
To sign a document:
- Choose File > Digital Signatures.
- If you have not saved the document since the last change, a message appears. Click Yes to save the file.
- After saving, you see the Digital Signatures dialog. Click Add to add a public key to the document.
- In the Select Certificate dialog, select your certificate and click OK.
- You see again the Digital Signatures dialog, where you can add more certificates if you want. Click OK to add the public key to the saved file.
A signed document shows an icon [[Image:]] in the status bar. You can double-click the icon to view the certificate.
Opening and saving a PowerPoint file
OpenOffice.org’s Impress file format is highly compatible with Microsoft’s PowerPoint format. You can open a PowerPoint presentation in Impress, edit it, then save it in its original PowerPoint format or in Impress format. You can also create a new presentation in Impress and save it as a PowerPoint file, for sharing your presentation with those who have yet to discover OpenOffice.org. What you cannot do is open an Impress file in PowerPoint—yet. (Filters are being developed.)
Saving an Impress file as a PowerPoint file
- Choose File > Save As from the menu bar.
- Select the location where you want the PowerPoint file saved and type a name for the file.
- Under File type, choose Microsoft PowerPoint 97/2000/XP (.ppt).
- Click Save. The message shown below will appear. Click Yes to confirm that you want to save the file in Microsoft PowerPoint format. You can select the checkbox to not show the message again.
-
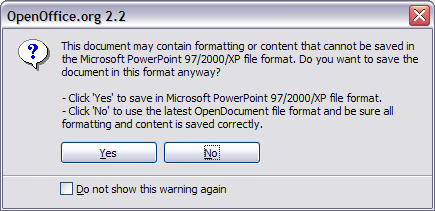
Warning message when saving in Microsoft PowerPoint format.
-

Note: Recommendation: always save your work in Impress OpenDocument format (.odp) before saving in Microsoft format. Keep the Impress file as your working copy: if you need to change the presentation, change it in the Impress version and then save it again as PowerPoint. You are much less likely to have problems than if you open a file previously saved in PowerPoint format, edit it, and save it again.
Opening a PowerPoint file in Impress
If you receive a file from someone in PowerPoint format and need to edit it in Impress, here is how to:
- In OpenOffice.org, choose File > Open from the menu bar.
- Under File type, choose All files (*.*) or Presentations or Microsoft PowerPoint 97/2000/XP from the drop-down list.
- Navigate to the PowerPoint file, select it, and click Open.
The PowerPoint file can now be edited and saved as an Impress file or a PowerPoint file. To save the file as an Impress file, choose OpenDocument Presentation (.odp) as the File Type.
| Content on this page is licensed under the Creative Common Attribution 3.0 license (CC-BY). |