Documentation/OOoAuthors User Manual/Impress Guide/Managing the Gallery themes
- Inserting pictures
- Formatting pictures
- Creating an image map
- Managing the Gallery themes
| [[{{{PrevPage}}}|< Previous Page
]] |
[[{{{NextPage}}}|Next Page
>]] |
Managing the Gallery themes
Graphics in the Gallery are grouped by themes, such as Bullets, Rulers, and 3D Effects. The box on the left of the gallery window lists the available themes. Click on a theme to see its graphics displayed in the Gallery window.
The default themes are locked; no items can be added or deleted from these themes. The locked themes are easily recognizable by right-clicking on them; the only available option in the pop-up menu is Properties.
In a default installation, only the My themes theme is customizable, although new themes can be added as explained in Adding a new theme to the Gallery.
Adding images to the Gallery
You can add new images to existing themes which you created or that can be edited. There are two ways to add an image to an existing theme.
Method 1 (selecting a file):
- Right-click on the theme name in the list of themes and choose Properties from the pop-up menu.
- Click the Files tab, if necessary.
- Click Add.
- Select a file and click Open. The image is added to the theme.
Method 2 (drag and drop):
- Open the document containing an image you want to add to the Gallery, and display the Gallery theme to which you want to add it.
- Position the mouse pointer above the image, without clicking.
- If the mouse pointer changes to a hand symbol, the image refers to a hyperlink. In this case, press the Alt key while you click the image, to select it without executing the respective link. If the mouse pointer does not change to a hand symbol, you can simply click the image to select it.
- Once the image is selected, evident from the green selection handles around it, release the mouse button. Click again on the image, keeping the mouse button pressed for more than two seconds. Without releasing the mouse button, drag the image into the document.
- Release the mouse button.
Deleting images from the Gallery
To delete an image from a theme:
- Right-click on the image in the Gallery window.
- Choose Delete from the pop-up menu. A message appears, asking if you want to delete this object.
- Click Yes.
Note The image is deleted from the Gallery only. The original image file is not deleted.
All the images in a gallery are actually linked files. From time to time it is beneficial to update the gallery theme to make sure that all the files are still there. To do so, right-click n the theme where you added at least one file and then select Update from the pop-up menu.
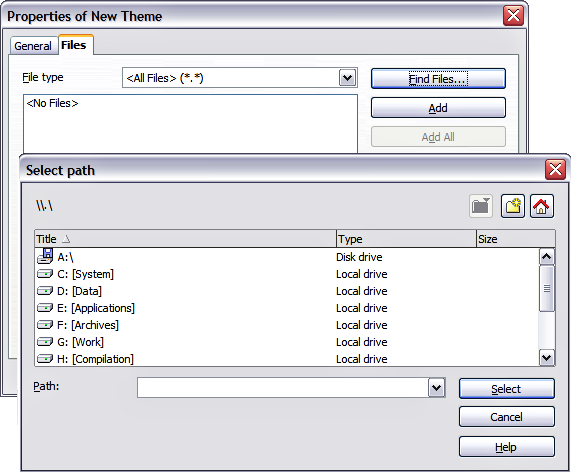
Adding a new theme to the Gallery
- Click the New Theme button above the list of themes.
- Click the General tab and type a name for the new theme.
- Click the Files tab.
- Click Find Files. The Select Path dialog opens. Browse to the folder that contains the image files for the new theme and click OK.
- Back on the Files tab, either click on Add All to install all of the files in the selected folder, or use File Type and/or select one or more files from the displayed list, and click on Add to install a selection of files to the new theme.
- Click OK when finished.
Setting up a new theme in the Gallery.

Note: The files do not show in the large box under the File Type box; and under the General tab, the Contents will display as "0 Objects," but the chosen files will be inserted into the new theme. Remember, you can always add or delete image files later.
| Content on this page is licensed under the Creative Common Attribution 3.0 license (CC-BY). |