Difference between revisions of "Documentation/OOoAuthors User Manual/Impress Guide/Formatting pictures"
| (One intermediate revision by the same user not shown) | |||
| Line 24: | Line 24: | ||
The corner handles resize both the width and the height of the graphic object simultaneously, while the other four handles only resize one dimension at a time. | The corner handles resize both the width and the height of the graphic object simultaneously, while the other four handles only resize one dimension at a time. | ||
| − | {{ | + | {{Tip| To retain the original proportions of the graphic, ''Shift+click'' one of the corner handles, then drag. Be sure to release the mouse button '''before''' releasing the ''Shift'' key.}} |
For more accurate resizing of the graphic object, use the Position and Size dialog described in [[Documentation/OOoAuthors User Manual/Impress Guide/Formatting Graphic Objects|Chapter 6]] (Formatting Graphic Objects). | For more accurate resizing of the graphic object, use the Position and Size dialog described in [[Documentation/OOoAuthors User Manual/Impress Guide/Formatting Graphic Objects|Chapter 6]] (Formatting Graphic Objects). | ||
| − | {{ | + | {{Warn| Be aware that re-sizing a bit-mapped (raster) image will adversely affect the resolution, causing some degree of blurring. It is better to externally size your picture before insertion into your presentation, if possible.}} |
==Rotating a picture== | ==Rotating a picture== | ||
Latest revision as of 19:59, 14 July 2018
This section discusses the formatting of pictures inserted with one of the methods explained in Inserting pictures.
Moving a picture
- Click the picture, if necessary, to show the green resizing handles.
- Move the pointer over the picture until the pointer changes shape. On most operating systems, the cursor associated with moving objects is a four headed arrow, but it may also be a hand or some other symbol.
- Click and drag the picture to the desired position.
- Release the mouse button.
For a more accurate placement of the picture, use the Position and Size dialog described in Chapter 6 (Formatting Graphic Objects).
Resizing a picture
- Click the picture, if necessary, to show the green resizing handles.
- Position the pointer over one of the green resizing handles. The pointer changes shape giving a graphical representation of the direction of the resizing.
- Click and drag to resize the picture.
- Release the mouse button when satisfied with the new size.
The corner handles resize both the width and the height of the graphic object simultaneously, while the other four handles only resize one dimension at a time.
| To retain the original proportions of the graphic, Shift+click one of the corner handles, then drag. Be sure to release the mouse button before releasing the Shift key. |
For more accurate resizing of the graphic object, use the Position and Size dialog described in Chapter 6 (Formatting Graphic Objects).
Rotating a picture
As for the position and the size, rotation of a picture can be done manually or using a dedicated dialog. The Rotation dialog is described in Chapter 6 (Formatting Graphic Objects). To rotate a picture manually, do as follows:
- Select the picture if necessary so that the green handles around it show.
- Click the Rotate button
 on the Drawing toolbar. This toolbar is usually located at the bottom the screen, but it can be undocked and used as a floating toolbar. If the toolbar is not showing, select View > Toolbars > Drawing. The Drawing toolbar is discussed in detail in Chapter 5 (Creating Graphic Objects).
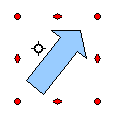
- Eight red circular handles replace the green square handles. Move the mouse over one of the corner handles and the mouse cursor shape will change. Click the mouse and move in the direction in which you want to rotate the picture.
- When satisfied, release the mouse button.
At step 2 a black crosshair with a circle appears in the middle of the picture: this represents the pivot point for the rotation. Normally the center of the picture will be just fine, but on some occasions you may wish to rotate around a corner or even around a point outside the picture; to do that, click on the crosshair and drag it to the desired position before applying the rotation, as shown in the figure above.
To restrict the rotation angles to multiples of 15 degrees, press the Shift key while rotating the graphic. This is very handy to rotate pictures of right angles, for example from portrait to landscape or vice versa.
Formatting using the Picture toolbar
When a picture is selected, the Picture toolbar becomes available. This toolbar provides a number of formatting options which are described in this section. If the picture toolbar does not show when an image is selected, display it by selecting View > Toolbars > Picture from the menu bar.
Applying filters
Use the left-most icon on the toolbar to apply various filters to the selected picture. The best way to judge if a filter works for your picture is to try it (step 4 of the following procedure explains how to undo). To apply a filter:
- Select the image so that the green handles around it show.
- Click on the magic wand icon
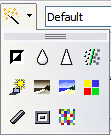
 in the Picture toolbar. The toolbar will expand to show the icons below.
 - Select the filter to apply. To show the name of the filter, hover the mouse pointer over the icon and wait for the tooltip to appear.
- If not satisfied with the effect obtained, before doing anything else click the Undo button or select Edit > Undo: Bitmap Graphic Filter from the menu bar or press Control+Z.
Table 1 describes briefly each of the available graphic filters and their effects. See the Documentation/OOoAuthors User Manual/Draw Guide for examples of the effects.
Table 1: Graphic filters and their effects
Changing the Graphics mode
Use the next box in the Picture toolbar to change the mode of the image. Choose between:
- Default: no changes to the graphic object.
- Grayscale: the image is converted to scales of gray.
- Black/White: each pixel of the image is converted to black or white depending on the brightness value.
- Watermark: adjusts the brightness of the image making it suitable to be used as a watermark. For more information on creating watermarks, refer to Chapter 2.
Adjusting the color
Clicking the color adjustment button ![]() on the Picture toolbar opens the color adjustment dialog.
on the Picture toolbar opens the color adjustment dialog.
Use this dialog to modify the individual color components of the image (red, green, blue) as well as the brightness, contrast, and gamma of the image. If the result is not satisfactory, press Control+Z to restore the default values.
Setting the object transparency
Modify the percentage value in the Transparency box ![]() on the Picture toolbar to make the image more transparent. Note that this is different from the transparency settings for a line or a shape (described in Chapter 5).
on the Picture toolbar to make the image more transparent. Note that this is different from the transparency settings for a line or a shape (described in Chapter 5).
Adjusting the line, area and shadow settings
These settings are not very commonly used for images, with the exception of the shadow setting that applies a shadow to the image.
Cropping pictures
To start cropping a picture, select the Crop icon ![]() on the Picture toolbar.
on the Picture toolbar.

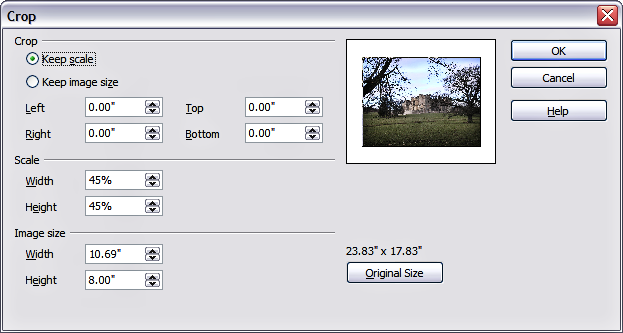
The options available when cropping a picture.
The Crop dialog has the following options:
- Keep scale / Keep image size buttons: when Keep scale is selected (default), cropping the image does not alter the scale of the picture. When Keep image size is selected, cropping produce enlargement (for positive cropping values), shrinking (for negative cropping values), or distortion of the image so that the image size remains constant.
- Left, Right, Top, and Bottom: the function of these boxes changes according to the choice made between Keep scale and Keep image size. In both cases, when a value is entered in one of these boxes, the image is cropped by that amount. For example, a value of 3cm in the Left box will cut 3cm from the left side of the picture.
- When Keep scale is selected, the size of the image also changes, so in this example the width will be reduced by 3 cm. If Keep image size is selected instead, the remaining part of the image is enlarged (positive values for cropping) or shrunk (negative values for cropping) so that the width and height of the image remains unchanged.
- Note that the Width and Height fields change as you enter the values when in this mode. Use the thumbnail next to these fields to determine the correct amount by which to crop.
- Scale Width and Height: specify in percentages the scaling of the picture. The size of the image changes accordingly.
- Image size: specify the size of the image in your preferred unit of measurement. The image enlarges or shrinks accordingly.
- Original size: when clicked, restores the original image size.
Deleting a picture
- Click on the picture, if necessary, to show the green resizing handles.
- Press Delete.
| Content on this page is licensed under the Creative Common Attribution 3.0 license (CC-BY). |


