Controlling printing
Contents
Options for printing
Impress provides many options for printing a presentation: with multiple slides on one page, with a single slide per page, with notes, as an outline, with date and time, with page name, and more.
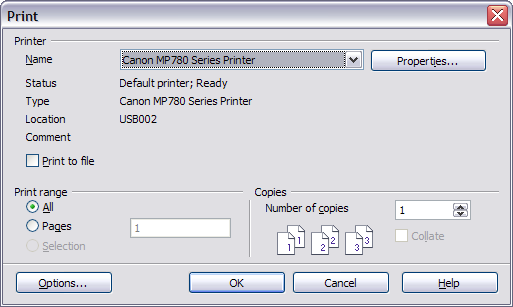
For more control over printing a presentation, choose File > Print to display the Print dialog.
On the Print dialog, you can choose:
- Which printer to use (if more than one are installed on your system) and the properties of the printer—for example, orientation (portrait or landscape), which paper tray to use, and what paper size to print on. The properties available depend on the selected printer; consult the printer’s Selecting default print options documentation for details.
- What slides to print, how many copies to print, and in what order to print them.
- Pages prints the slide numbers you list in the box. Use hyphens to indicate ranges and commas or semicolons to separate ranges; for example: 1, 5, 11-14, 34-40.
- Selection prints selected objects. This choice is available only when you have selected one or more objects on a slide (in Normal view).
- What items to print. Click the Options button to display the Printer Options dialog.
Selecting printer options for a presentation
Selections on the Printer Options dialog apply to this printing of this presentation only. To specify default printing options for Impress, see Selecting default print options.

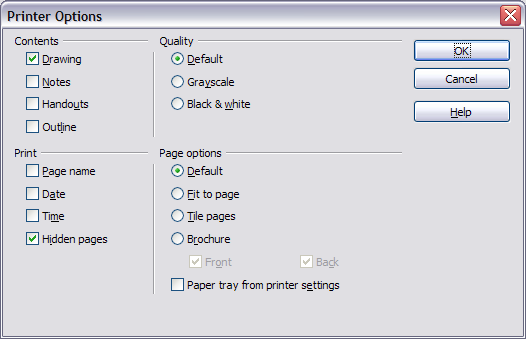
Selecting printer options for a presentation.
Some items of interest on the Printer Options dialog include:
Under Contents:
- Drawing prints one slide per page, full page, in landscape.
- Notes prints a single slide per page with any notes entered for that slide in Notes View.
- Handouts prints the slides in reduced size on the page, from a single slide up to six slides per page. To choose how many slides print on each page, first switch to Handout view, then choose Format > Modify Layout. Click the thumbnail image showing how many slide per page you want to print, then click OK. Now follow the print instructions above and choose Handouts.
- Outline prints the title and headings of each slide in outline format.
Under Quality:
- Default prints the presentation in color on a color printer or in grayscale on a mono printer, including all background colors and images. If you have used a dark background (which looks good when projected), the slides may not be very readable when printed, especially on handouts with small images.
- Grayscale prints in black, white and grayscale on both color and mono printers, and does not print background colors or images.
- Black & white prints in black, white and grayscale and does not print background colors or images.
Under Print, you can choose additional elements to be printed in the page margin. If you marked Brochure in the Page options area, the only available selection in this area is Hidden pages.
- Page name includes the name of the slide. Not available with brochure printing.
- Date prints the current date at time of printing. Not available with brochure printing.
- Time prints the current time. Not available with brochure printing.
- Hidden pages prints the slides that are marked as hidden in the presentation.
Under Page options:
- Default prints the slides full size.
- Fit to page scales down slides so they fit on the paper in the printer.
- Tile pages prints several slides on a page, if the slides are smaller than the paper.
- Brochure is discussed in Printing a brochure.
- Paper tray from printer settings specifies that the paper tray to be used is the one defined in the printer setup.
Selecting default print options
Selections on the Printer Options dialog over-ride any default settings. To specify default settings for printing, use Tools > Options > OpenOffice.org Impress > Print. The page displayed contains the same choices as the Printer Options dialog.
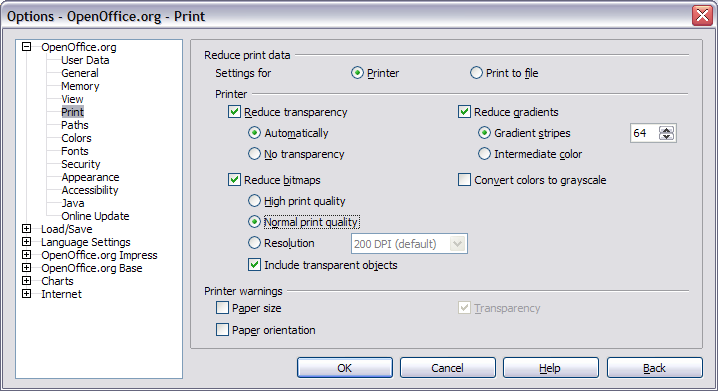
Other printer settings are found in Tools > Options > OpenOffice.org > Print, as shown below. Use this page to specify quality settings for printing, and whether to have OOo warn you if the paper size or orientation of your document does not match the printer settings.

Print options for OpenOffice.org.
Printing in black and white on a color printer
You may wish to print documents in black and white on a color printer, to save expensive color ink or toner or to make handouts of slides with dark backgrounds easier to read. Several choices are available.
To print the current document in black and white or grayscale:
- Click File > Print to open the Print dialog.
- Click Properties to open the properties dialog for the printer. The available choices vary from one printer to another, but you should find an option for Color. See your printer’s help or user manual for more information.
- The choices for color may include black and white or grayscale. Choose one of these. Grayscale is best if you have any graphics in the document. Click OK to confirm your choice and return to the Print dialog, then click OK again to print the document.
To set up OOo to print all color text and graphics as grayscale:
- Click Tools > Options > OpenOffice.org > Print to display the Print Options dialog.
- Select the Convert colors to grayscale checkbox. Click OK to save the change.
To set up Impress to print all color text as black, and all graphics as grayscale:
- Click Tools > Options > OpenOffice.org Writer > Print.
- Under Quality, select the Grayscale or Black & white checkbox. Click OK to save the change.
| Content on this page is licensed under the Creative Common Attribution 3.0 license (CC-BY). |
