Documentation/OOoAuthors User Manual/Getting Started/Working with text
This is the second part of Chapter 6 of Getting Started with OpenOffice.org 2.x (Third edition), produced by the OOoAuthors group. A PDF of this chapter is available from the OOoAuthors Guides page at OpenOffice.org.
<< User Manuals page
<< Getting Started Table of Contents
<< Chapter 5 Setting up OpenOffice.org |
Chapter 7 Getting Started with Calc >>
The other parts of this chapter are:
<< Introducing Writer | Formatting pages >>
Contents
- 1 Working with text
- 1.1 Selecting items that are not consecutive
- 1.2 Cutting, copying, and pasting text
- 1.3 Moving paragraphs quickly
- 1.4 Finding and replacing text and formatting
- 1.5 Inserting special characters
- 1.6 Setting tab stops and indents
- 1.7 Checking spelling
- 1.8 Using AutoCorrect
- 1.9 Using word completion
- 1.10 Using AutoText
- 1.11 Inserting dashes and non-breaking spaces
- 2 Formatting text
- 3 Undoing and redoing changes
- 4 Tracking changes to a document
Working with text
Working with text (selecting, copying, pasting, moving) in Writer is similar to working with text in any other program. OOo also has some convenient ways to select items that are not next to each other, move paragraphs quickly, and paste unformatted text.
Selecting items that are not consecutive
To select nonconsecutive items (as shown in Figure 4) using the mouse:
- Select the first piece of text.
- Hold down the Control key and use the mouse to select the next piece of text.
- Repeat as often as needed.
- Now you can work with the selected text (copy it, delete it, change the style, or whatever).
Note: Macintosh users: substitute the Command key when instructions in this chapter say to use the Control key.
To select nonconsecutive items using the keyboard:
- Select the first piece of text. (For more information about keyboard selection of text, see the topic "Navigating and selecting with the keyboard" in the Help.)
- Press Shift+F8. This puts Writer in "ADD" mode. The word ADD appears on the status bar.
- Use the arrow keys to move to the start of the next piece of text to be selected. Hold down the Shift key and select the next piece of text.
- Repeat as often as needed. Now you can work with the selected text.
- Press Esc to exit from this mode.

Figure 4. Selecting items that are not next to each other.
Cutting, copying, and pasting text
Cutting and copying text in Writer is similar to cutting and copying text in other applications. After selecting text, you can use the mouse or the keyboard for these operations.
Cut: Use Edit > Cut or the keyboard shortcut Control+X or the Cut icon on the toolbar. ![]()
Copy: Use Edit > Copy or the keyboard shortcut Control+C or the Copy icon. ![]()
Paste: Use Edit > Paste or the keyboard shortcut Control+V or the Paste icon. ![]()
If you simply click on the Paste icon, any formatting the text has (such as bold or italics) is retained. To make the pasted text take on the formatting of the surrounding text where it is being pasted, click the triangle to the right of the Paste icon and select Unformatted text from the menu (Figure 5).

Figure 5. Paste menu.
Moving paragraphs quickly
- Put the cursor anywhere in the paragraph.
- Press and hold the Control key and then press the up-arrow or down-arrow key.
The paragraph will move to before the previous paragraph or after the next paragraph in your document. To move more than one paragraph at a time, select at least part of both paragraphs before pressing the Control+arrow keys.
If you are using the Solaris operating system, the key combination is Control+AltGr+arrow keys.
Tip: If your paragraphs suddenly jump from one place to another, the most likely reason is that you have accidentally pressed one of these key combinations.
Finding and replacing text and formatting
Writer has a Find and Replace feature that automates the process of searching for text inside a document. In addition to finding and replacing words and phrases, you can:
- Use regular expressions (wildcards) to fine-tune a search (see the Help for details).
- Find and replace specific formatting (see the Writer Guide for more information).
- Find and replace paragraph styles (see the Writer Guide for more information).
To display the Find & Replace dialog (Figure 6), use the keyboard shortcut Control+F or select Edit > Find & Replace.
- Type the text you want to find in the Search for box.
- To replace the text with different text, type the new text in the Replace with box.
- You can select various options such as matching the case, matching whole words only, or doing a search for similar words. See below for some other choices.
- When you have set up your search, click Find. To replace text, click Replace instead.
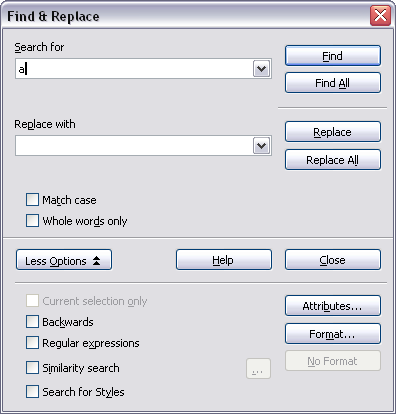
Figure 6. Expanded Find & Replace dialog.

Tip: If you click Find All, OOo selects all instances of the search text in the document. Similarly, if you click Replace All, OOo will replace all matches.
Caution: Use Replace All with caution; otherwise, you may end up with some hilarious (and highly embarrassing) mistakes. A mistake with Replace All might require a manual, word by word, search to fix.
Inserting special characters
A "special" character is one not found on a standard English keyboard. For example, © ¾ æ ç ñ ö ø ¢ are all special characters. To insert a special character:
- Place the cursor where you want the character to appear.
- Click Insert > Special Character to open the Special Characters window (Figure 7).
- Select the characters you wish to insert, in order, then click OK. The selected characters are shown in the lower left of the dialog. As you select a character, it is shown on the lower right, along with its numerical code.
Note: Different fonts include different special characters. If you do not find a particular special character, try changing the Font selection.

Figure 7. The Special Characters window.
Tip: Notice that the characters selected appear in the bottom-left corner of the window.
Setting tab stops and indents
The horizontal ruler shows both the default tab stops and any that you have defined. To set the measurement unit and the spacing of default tab stops, go to Tools > Options > OpenOffice.org Writer > General.
You can also set or change the measurement unit by right-clicking on the ruler to open a list of units, as shown in Figure 8. Click on one of them to change the ruler to that unit.

Figure 8. Ruler showing default tab stops.
Double-click on a part of the ruler that is not between the left and right indent icons to open the Indents & Spacing page of the Paragraph dialog. To fine-tune tab stop settings, double-click anywhere between the left and right indent icons on the ruler itself to open the Tabs page of the Paragraph dialog.
Checking spelling
Writer provides a spelling checker, which can be used in two ways.
![]() AutoSpellcheck checks each word as it is typed and displays a wavy red line under any misspelled words. Once the word is corrected, the line disappears.
AutoSpellcheck checks each word as it is typed and displays a wavy red line under any misspelled words. Once the word is corrected, the line disappears.
![]() To perform a separate spelling check on the document (or a text selection), click the Spellcheck button. This checks the document or selection and opens the Spellcheck dialog if any misspelled words are found.
To perform a separate spelling check on the document (or a text selection), click the Spellcheck button. This checks the document or selection and opens the Spellcheck dialog if any misspelled words are found.
Here are some more features of the spelling checker:
- You can right-click on a word with a wavy underline, to open a powerful context menu. If you select from the suggested words on the menu, the selection will replace the misspelled word in your text.
- You can change the dictionary language (for example, to Spanish, French or German) on the Spellcheck dialog.
- You can add a word to the dictionary. Click Add in the Spellcheck dialog and pick the dictionary to add it to.
- The Options dialog of the Spellcheck tool has a number of different options such as whether to check uppercase words and words with numbers. It also allows you to manage custom dictionaries, that is, add or delete dictionaries, and add or delete words in a dictionary.
- On the Font page of the Paragraph Styles dialog, you can set paragraphs to be checked in a specific language (different from the rest of the document). See Chapter 7 (Working with Styles) in the Writer Guide for more information.
Using AutoCorrect
Writer's AutoCorrect function has a long list of common misspellings and typing errors, which it corrects automatically. For example, "hte" will be changed to "the". Select Tools > AutoCorrect to open the AutoCorrect dialog. There you can define which strings of text are corrected and how. In most cases, the defaults are fine.
Tip: AutoCorrect is turned on by default. To turn it off, uncheck Format > AutoFormat > While Typing.
- To stop Writer from replacing a specific spelling, use Tools > AutoCorrect > Replace, highlight the word pair and click Delete.
- To add a new spelling to correct, type it into the Replace and With boxes and click New.
- See the different pages of the dialog box for the wide variety of other options available to fine-tune AutoCorrect.
Tip: AutoCorrect can be used as a quick way to insert special characters. For example, (c) will be autocorrected to ©. You can add your own special characters.
Using word completion
If Word Completion is enabled, Writer tries to guess which word you are typing and offers to complete the word for you. To accept the suggestion, press Enter. Otherwise continue typing.
Tip: Many people prefer not to use Word Completion. If you do not want to use it, select Tools > AutoCorrect > Word Completion and uncheck Enable Word Completion.
You can customize word completion from the Tools > AutoCorrect > Word Completion page:
- Add (append) a space automatically after an accepted word.
- Show the suggested word as a tip (hovering over the word) rather than completing the text as you type.
- Change the maximum number of words remembered for word completion and the length of the smallest words to be remembered.
- Delete specific entries from the word completion list.
- Change the key that accepts a suggested entry—the options are Right arrow, End key, Return (Enter), and Space bar.
Note: Automatic word completion only occurs after you type a word for the second time in a document.
Using AutoText
AutoText allows you to assign text, tables, graphics and other items to a key combination. For example, rather than typing "Senior Management" every time you use that phrase, you might just type "sm" and press F3. Or you can save a formatted Note (like the one on this page) as AutoText and then insert a copy by typing "note" and pressing F3.
To assign some text to an AutoText shortcut:
- Type the text into your document.
- Select the text so it is highlighted.
- Select Edit > AutoText (or press Control+F3).
- Enter a name for your shortcut. Writer will suggest a one-letter shortcut, which you can change.
- Click the AutoText button on the right and select New (text only) from the menu.
- Click Close to return to your document.
Tip: If the only option under the AutoText button is Import, either you have not entered a name for your AutoText or there is no text selected in the document.
AutoText is especially powerful when assigned to fields. See Chapter 14 (Working with Fields) in the Writer Guide for more information.
Inserting dashes and non-breaking spaces
You can insert a dash by using the Special Characters window or by using AutoCorrect. For more about AutoCorrect, see "Controlling OOO's AutoCorrect functions" in Chapter 5 (Setting up OpenOffice.org) and Using AutoCorrect.
– is an en-dash; that is, a dash the width of the letter "n" in the font you are using. It is U+2013 (scroll down to the General Punctuation section in the Special Characters window). To enter an en-dash using AutoCorrect, type at least one character, a space, two hyphens, another space, and at least one more letter, then a space. The two hyphens will be replaced by an en-dash.
— is an em-dash; that is, a dash the width of the letter "m" in the font you are using. It is U+2014. To enter it using AutoCorrect, type at least one character, two hyphens, and at least one more character, then a space. The two hyphens will be replaced by an em-dash.
To insert a non-breaking space (to keep characters together, for example in a telephone number), press Control+Space on the keyboard.
Formatting text
Using styles
Styles are central to using Writer efficiently. Styles enable you to easily format your document consistently, and to change the format with minimal effort. A style is a named set of formatting options. Writer defines several types of styles, for different types of elements: characters, paragraphs, pages, frames, and lists. For information on the advantages of styles, and how to use them, see Chapter 13 (Working with Styles) in this book. The use of styles is described in detail in Chapter 6 (Introduction to Styles) and Chapter 7 (Working with Styles) in the Writer Guide.
Formatting paragraphs
You can apply many formats to paragraphs using the buttons on the Formatting toolbar. Figure 9 shows the Formatting toolbar as a floating toolbar, customized to show only the buttons for paragraph formatting.
Tip: It is highly recommended that you use paragraph styles rather than manually formatting paragraphs, especially for long or standardized documents.

| 1 Open Styles and Formatting window | 8 Line Spacing: 1.5 | |
| 2 Apply Style | 9 Line Spacing: 2 | |
| 3 Align Left | 10 Numbering On/Off | |
| 4 Centered | 11 Bullets On/Off | |
| 5 Align Right | 12 Decrease Indent | |
| 6 Justified | 13 Increase Indent | |
| 7 Line Spacing: 1 | 14 Paragraph format dialog |
Figure 9. The Formatting toolbar, showing buttons for paragraph formatting.
Figure 10 shows examples of the different alignment options.

Figure 10. Text alignment options.
Formatting characters
You can apply many formats to characters using the buttons on the Formatting toolbar. Figure 11 shows the Formatting toolbar as a floating toolbar, customized to show only the buttons for character formatting.
Tip: It is highly recommended that you use character styles rather than manually formatting characters.

| 1 Open Styles and Formatting window | 9 Subscript | |
| 2 Apply Style | 10 Increase Font | |
| 3 Font Name | 11 Reduce Font | |
| 4 Font Size | 12 Font Color | |
| 5 Bold | 13 Highlighting | |
| 6 Italic | 14 Background Color | |
| 7 Underline | 15 Open Character Format dialog | |
| 8 Superscript |
Figure 11: Formatting toolbar, showing buttons for character formatting.
Tip: To remove manual formatting, select the text and click Format > Default Formatting, or right-click and select Default Formatting from the pop-up menu.
Autoformatting
You can set Writer to automatically format parts of a document according to the choices made on the Options page of the AutoCorrect dialog (Tools > AutoCorrect > Options).
Tip: If you notice unexpected formatting changes occurring in your document, this is the first place to look for the cause.
Some common unwanted or unexpected formatting changes include:
- Horizontal lines. If you type three or more hyphens (---), underscores (___) or equal signs (===) on a line and then press Enter, the paragraph is replaced by a horizontal line as wide as the page. The line is actually the lower border of the preceding paragraph.
- Bulleted and numbered lists. A bulleted list is created when you type a hyphen (-), star (*), or plus sign (+), followed by a space or tab at the beginning of a paragraph. A numbered list is created when you type a number followed by a period (.), followed by a space or tab at the beginning of a paragraph. Automatic numbering is only applied to paragraphs formatted with the Default, Text body or Text body indent paragraph styles.
To turn autoformatting on or off, go to Format > AutoFormat and select or delete the items on the submenu.
Creating numbered or bulleted lists
There are several ways to create numbered or bulleted lists:
- Use autoformatting, as described above.
- Use list (numbering) styles, as described in Chapter 7 (Working with Styles) in the Writer Guide.
- Use the Numbering and Bullets icons on the paragraph formatting toolbar (see Figure 9). This method is described here.
To produce a numbered or bulleted list, select the paragraphs in the list, and then click the appropriate icon on the toolbar.
Note: It is a matter of personal preference whether you type your information first, then apply Numbering/Bullets, or apply them as you type.
Using the Bullets and Numbering toolbar
You can create nested lists (where one or more list items has a sublist under it, as in an outline) by using the buttons on the Bullets and Numbering toolbar (Figure 12). You can move items up or down the list, or create subpoints, and even change the style of bullets. Use View > Toolbars > Bullets and Numbering to see the toolbar.

| 1 Bullets On/Off | 8 Insert Unnumbered Entry | |
| 2 Numbering On/Off | 9 Move Up | |
| 3 Numbering Off | 10 Move Down | |
| 4 Up One Level | 11 Move Up with Subpoints | |
| 5 Down One Level | 12 Move Down with Subpoints | |
| 6 Move Up (One Level) with Subpoints | 13 Restart Numbering | |
| 7 Move Down (One Level) with Subpoints | 14 Bullets and Numbering |
Figure 12: Bullets and Numbering toolbar
Hyphenating words
To turn automatic hyphenation of words on or off:
- Press F11 to open the Styles and Formatting window.
- On the Paragraph Styles page of the Styles and Formatting window (Figure 13), right-click on Default and select Modify.
- On the Paragraph Style dialog, go to the Text Flow page (see Figure 14).
- Under Hyphenation, select or deselect the Automatically checkbox. Click OK to save.
Note: Turning on hyphenation for the Default paragraph style affects all other paragraph styles that are based on Default. You can individually change other styles so that hyphenation is not active; for example, you might not want headings to be hyphenated. Any styles that are not based on Default are not affected.

Figure 13. Modifying a style.

Figure 14. Turning on automatic hyphenation.
You can also set hyphenation choices through Tools > Options > Language Settings > Writing Aids. In Options, near the bottom of the dialog, scroll down to the find the hyphenation settings (see Figure 15).

Figure 15. Setting hyphenation options.
Notes: Hyphenation options set on the Writing Aids dialog are effective only if hyphenation is turned on through paragraph styles.
Choices on the Writing Aids dialog for "characters before line break" and "characters after line break" override settings in paragraphs styles for "characters at line end" and "characters at line begin". This is a bug.
To enter a conditional hyphen inside a word, press Control+minus sign. The word is hyphenated at this position when it is at the end of the line, even if automatic hyphenation for this paragraph is switched off.
To insert a non-breaking hyphen, press Control+Shift+minus sign.
Undoing and redoing changes
To undo the most recent change, press Control+Z, or click the Undo icon ![]() on the Standard toolbar, or select Edit > Undo from the menu bar.
on the Standard toolbar, or select Edit > Undo from the menu bar.
The Edit menu shows the latest change that can be undone, as shown in Figure 16.

Figure 16. Edit > Undo last action.
Click the small triangle to the right of the Undo icon to get a list of all the changes that can be undone (Figure 17). You can select multiple changes and undo them at the same time.

Figure 17. List of actions that can be undone.
After changes have been undone, Redo becomes active. To redo a change, select Edit > Redo, or press Control+Y or click on the Redo icon ![]() . As with Undo, click on the triangle to the right of the arrow to get a list of the changes that can be reapplied.
. As with Undo, click on the triangle to the right of the arrow to get a list of the changes that can be reapplied.
To modify the number of changes OpenOffice.org remembers, select Tools > Options > OpenOffice.org > Memory and change Undo number of steps. Be aware that asking OOo to remember more changes consumes more computer memory.
Tracking changes to a document
You can use several methods to keep track of changes made to a document.
- Make your changes to a copy of the document (stored in a different folder, or under a different name, or both), then use Writer to combine the two files and show the differences. Click Edit > Compare Document. This technique is particularly useful if you are the only person working on the document, as it avoids the increase in file size and complexity caused by the other methods.
- Save versions that are stored as part of the original file. However, this method can cause problems with documents of non-trivial size or complexity, especially if you save a lot of versions. Avoid this method if you can.
- Use Writer's change marks (often called "redlines" or "revision marks") to show where you have added or deleted material, or changed formatting. Later, you or another person can review and accept or reject each change.
Tip: Not all changes are recorded. For example, changing a tab stop from align left to align right, and changes in formulas (equations) or linked graphics are not recorded.
Recording changes
See Chapter 2 (Setting up Writer) in the Writer Guide for instructions on setting up how changes will be displayed.
- To begin tracking (recording) changes, click Edit > Changes > Record. To show or hide the display of changes, click Edit > Changes > Show.
- To enter a comment on a marked change, place the cursor in the area of the change and then click Edit > Changes > Comment. (See Figure 18.) In addition to being displayed as an extended tip, the comment is also displayed in the list in the Accept or Reject Changes dialog. To move from one marked change to the next, use the arrow buttons. If no comment has been recorded for a change, the Text field is blank.
- To stop recording changes, click Edit > Changes > Record again.
Tip: Hover the mouse pointer over a marked change; you will see a Help Tip showing the type of change, the author, date, and time of day for the change. If Extended Tips are enabled, you will also see any comments recorded for this change.

Figure 18. Inserting a comment during change recording.
Inserting notes
To insert a note that is not associated with a recorded change:
- Place the cursor at the text you want to comment on, then click Insert > Note.
- On the Insert Note dialog (Figure 19), type your note. Click Author to insert your initials and the date and time.

Figure 19. Inserting a note.
To view a note, move the mouse pointer over the note marker (displayed as a small yellow rectangle). Writer displays the note in a Tip above the text. You can also double-click on the note to see it inside the Edit Note dialog. If you have trouble viewing or selecting notes this way, you can use the Navigator instead: expand the list of notes, select the one you want, right-click on it, and select Edit to display the Edit Note dialog.
The Edit Note dialog looks much like the Insert Note dialog, with the addition of forward and back arrow buttons if the document contains more than one note.
Tip: You can change the color of the note marker using the Tools > Options > OpenOffice.org > Appearance dialog. (In the Text Document section. look for Note Indicator.)
Accepting or rejecting changes and comments
- Click Edit > Changes > Accept or Reject. The Accept or Reject Changes dialog (Figure 20) opens.
- When you select a change in the dialog, the actual text is highlighted in the document, so you can see what the editor changed.
- Click Accept or Reject to accept or reject the selected change. You can also click Accept All or Reject All if you do not want to review the changes individually.

Figure 20. The List tab of the Accept or Reject Changes dialog.
Changes that have not yet been accepted or rejected are displayed in the list. Accepted changes are removed from the list and appear in the text without any marking.
To show only the changes of certain people, or only the changes made on specific days, or various other restrictions, use the Filter tab on the Accept or Reject Changes dialog. After specifying the filter criteria, return to the List tab to see those changes that meet your criteria.
| Content on this page is licensed under the Creative Common Attribution 3.0 license (CC-BY). |