Documentation/OOoAuthors User Manual/Getting Started/Working with Templates
This is Chapter 12 of Getting Started with OpenOffice.org 2.x (Third edition), produced by the OOoAuthors group. A PDF of this chapter is available from the OOoAuthors Guides page at OpenOffice.org.
<< User Manuals page
<< Getting Started Table of Contents
<< Chapter 11 Getting Started with Math |
Chapter 13 Working with Styles >>
Contents
What is a template?
A template is a model that you use to create other documents. For example, you can create a template for business reports that has your company's logo on the first page. New documents created from this template will all have your company's logo on the first page.
Templates can contain anything that regular documents can contain, such as text, graphics, a set of styles, and user-specific setup information such as measurement units, language, the default printer, and toolbar and menu customization.
All documents in OpenOffice.org (OOo) are based on templates. You can create a specific template for any document type (text, spreadsheet, drawing, presentation). If you do not specify a template when you start a new document, then the document is based on the default template for that type of document. If you have not specified a default template, OOo uses the blank template for that type of document that is installed with OOo. See Setting a default template for more information.
This chapter shows you how to:
- Use a template to create a document
- Create a template
- Edit a template
- Set a default template
- Organize templates
Using a template to create a document
To use a template to create a document:
- From the main menu, choose File > New > Templates and Documents. The Templates and Documents window opens. (See Figure 1.)
- In the box on the left, click the Templates icon if it is not already selected. A list of template folders appears in the center box.
- Double-click the folder that contains the template that you want to use. A list of all the templates contained in that folder appears in the center box.
- Click the template that you want to use. You can preview the selected template or view the template's properties:
- To preview the template, click the Preview icon. A preview of the template appears in the box on the right.
- To view the template's properties, click the Document Properties icon. The template's properties appear in the box on the right.
- Click Open. The Templates and Documents window closes and a new document based on the selected template opens in OOo. You can then edit and save the new document just as you would any other document.
-
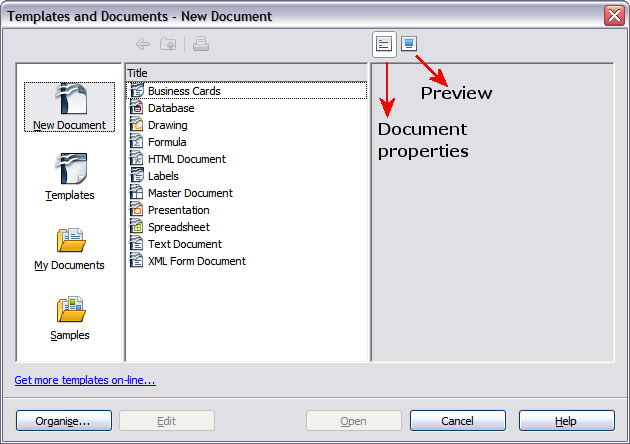
Figure 1: Templates and Documents window.

Creating a template
You can create your own templates in two ways:
Creating a template from a document
To create a template from a document:
- Open a new or existing document of the type you want to make into a template (text document, spreadsheet, drawing, presentation).
- Add the content and styles that you want.
- From the main menu, choose File > Templates > Save. The Templates window opens (see Figure 2).
- In the New template field, type a name for the new template.
- In the Categories list, click the category to which you want to assign the template. (The category is simply the template folder in which you want to save the template. For example, to save the template in the "My Templates" folder, click the My Templates category.) To learn more about template folders, see Organizing templates.
- Click OK. OOo saves the new template and the Templates window closes.
-
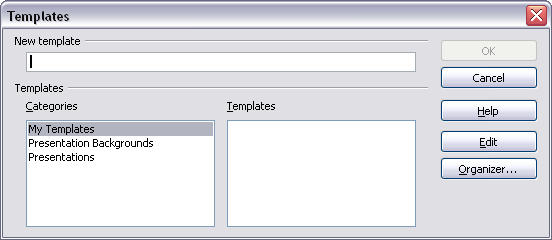
Figure 2: Saving a new template.

Any settings that can be added to or modified in a document can be saved in a template. For example, below are some of the settings (although not exhaustive) that can be included in a Writer document and then saved as a template for later use:
- Printer settings: which printer, single sided / double sided, and paper size, and so on
- Styles to be used, including character, page, frame, numbering and paragraph styles
- Format and settings regarding indexes, tables, bibliographies, table of contents
Creating a template using a wizard
You can use wizards to create these types of templates:
- Letter
- Fax
- Agenda
- Presentation
- Web page
For example, the Fax Wizard steps you through the following choices:
- Type of fax (business or personal)
- Document elements like the date, subject line (business fax), salutation, and complementary close
- Options for sender and recipient information (business fax)
- Text to include in the footer (business fax)
To create a template using a wizard:
- From the main menu, choose File > Wizards > type of template required (Figure 3).
- Follow the instructions on the pages of the wizard. This process is slightly different for each type of template, but the format is very similar.
- In the last section of the wizard, you can specify the name and location for saving the template. The default location is your user templates directory, but you can choose a different location if you prefer.
- Finally, you have the option of creating a new document from your template immediately, or manually changing the template. For future documents, you can re-use the template created by the wizard, just as you would use any other template.
-
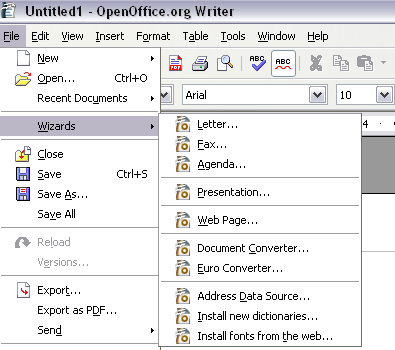
Figure 3: Creating a template using a wizard.

Editing a template
You can edit a template's styles and content, and then, if you wish, you can reapply the template's styles to documents that were created from that template. (Note that you can only reapply styles. You cannot reapply content.)
To edit a template:
- From the main menu, choose File > Templates > Organize. The Template Management window opens (see Figure 4).
- In the box on the left, double-click the folder that contains the template that you want to edit. A list of all the templates contained in that folder appears underneath the folder name.
- Click the template that you want to edit.
- Click the Commands button.
- From the drop-down menu, choose Edit. The Template Management window closes and the selected template opens.
- Edit the template just as you would any other document. To save your changes, choose File > Save from the main menu.
-
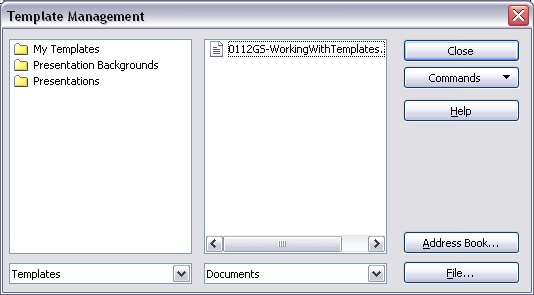
Figure 4: Template Management window.

The next time that you open a document that was created from the changed template, the following message appears.
-
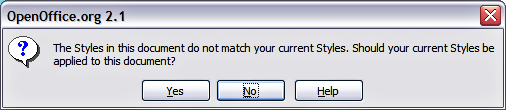
Figure 5: Apply current styles message.

Click Yes to apply the template's changed styles to the document. Click No if you do not want to apply the template's changed styles to the document. Whichever option you choose, the message box closes and the document opens in OOo.
Caution: If you choose No in the message box shown in , that message will not appear again the next time you open the document after changing the template it is based on. You will not get another chance to update the styles from the template, although you can use the macro given in the Note below to re-enable this feature.
Note: To re-enable updating from a template:
- Use Tools > Macros > Organize Macros > OpenOffice.org Basic. Select the document from the list, click the +, and select Standard. If Standard has a + beside it, click that and select a module.
- Name the macro. For example, you could call it FixDocument. If the Edit button is active, click it. If the Edit button is not active, click New, type a module name in the pop-up dialog, and click OK.
- In the Basic window, enter the following:
- Click the Run BASIC icon, then close the Basic window.
- Save the document.
 Sub FixDocument
 TemplateName = ThisComponent.DocumentInfo.Template
   if TemplateName <> "" then
   ThisComponent.DocumentInfo.Template = TemplateName
   end if
 End Sub
Next time when you open this document you will have the update from template feature back.
Adding templates with Extension Manager
The Package Manager was introduced in OOo 2.0.4 and renamed the Extension Manager in OOo 2.1. This feature provides an easy way to install collections of templates, graphics, macros, or other add-ins that have been "packaged" into files with a .OXT extension.
- After you download a package, select Tools > Extension Manager from the menu bar. In the Extension Manager dialog (Figure 6), click Add.
- A file browser window opens. Find and select the package of templates you want to install and click Open.
- On the Extension Manager dialog (Figure 7), select the package you just added and click Enable.

Figure 6: Installing a package of templates.

Figure 7: Enabling a newly-added package of templates.
Setting a default template
If you create a document by choosing File > New > Text Document (or Spreadsheet, Presentation, or Drawing) from the main menu, OOo creates the document from the Default template for that type of document. You can, however, set a custom template to be the default. You can reset the default later if you choose.
Setting a custom template as the default
You can set any template to be the default, as long as it is in one of the folders displayed in the Template Management window.
To set a custom template as the default:
- From the main menu, choose File > Templates > Organize. The Template Management window (Figure 4) opens.
- In the box on the left, double-click the folder containing the template that you want to set as the default.
- Click the template that you want to set as the default.
- Click the Commands button.
- From the drop-down menu, choose Set As Default Template. The next time that you create a document by choosing File > New, the document will be created from this template.
Resetting the default to OOo's in-built Default template
To re-enable OOo's Default template for a document type as the default:
- From the main menu, choose File > Templates > Organize. The Template Management window (Figure 4) opens.
- In the box on the left, click any folder.
- Click the Commands button.
- From the drop-down menu, choose Reset Default Template.
Organizing templates
OOo can only use templates that are in OOo template folders. You can, however, create new OOo template folders and use them to organize your templates. For example, you might have one template folder for report templates and another for letter templates. You can also import and export templates.
To begin, choose File > Templates > Organize from the main menu. The Template Management window (Figure 4) opens.
Note: All the actions made by the Commands button in the Template Management window can be made as well by right-clicking on the templates or the folders.
Creating a template folder
To create a template folder:
- In the Template Management window, click any folder.
- Click the Commands button.
- From the drop-down menu, choose New. A new folder called Untitled appears.
- Type a name for the new folder, and then press the Enter key. OOo saves the folder with the name that you entered.
Deleting a template folder
You cannot delete template folders supplied with OOo or installed using the Extension Manager; you can only delete template folders that you have created.
To delete a template folder:
- In the Template Management window, click the folder that you want to delete.
- Click the Commands button.
- From the drop-down menu, choose Delete. A message box appears and asks you to confirm the deletion. Click Yes.
Moving a template
To move a template from one template folder to another template folder:
- In the Template Management window, double-click the folder that contains the template you want to move. A list of all the templates contained in that folder appears underneath the folder name.
- Click the template that you want to move and drag it to the desired folder. If you do not have the authority to delete templates from the source folder, this action copies the template instead of moving it.
Deleting a template
You cannot delete the templates supplied with OOo or installed using the Extension Manager; you can only delete templates that you have created.
To delete a template:
- In the Template Management window, double-click the folder that contains the template you want to delete. A list of all the templates contained in that folder appears underneath the folder name.
- Click the template that you want to delete.
- Click the Commands button.
- From the drop-down menu, choose Delete. A message box appears and asks you to confirm the deletion. Click Yes.
Importing a template
If the template that you want to use is in a different location, you must import it into an OOo template folder.
To import a template into a template folder:
- In the Template Management window, double-click the folder into which you want to import the template.
- Click the Commands button.
- From the drop-down menu, choose Import Template. A standard file browser window opens.
- Find and select the template that you want to import and click Open. The file browser window closes and the template appears in the selected folder.
Exporting a template
To export a template from a template folder to another location:
- In the Template Management window, double-click the folder that contains the template you want to export. A list of all the templates contained in that folder appears underneath the folder name.
- Click the template that you want to export.
- Click the Commands button.
- From the drop-down menu, choose Export Template. The Save As window opens.
- Find the folder into which you want to export the template and click Save.
<< Chapter 11 Getting Started with Math | Chapter 13 Working with Styles >>
| Content on this page is licensed under the Creative Common Attribution 3.0 license (CC-BY). |