Documentation/OOoAuthors User Manual/Getting Started/Working with Styles
This is Chapter 13 of Getting Started with OpenOffice.org 2.x (Third edition), produced by the OOoAuthors group. A PDF of this chapter is available from the OOoAuthors Guides page at OpenOffice.org.
<< User Manuals page
<< Getting Started Table of Contents
<< Chapter 12 Working with Templates |
Chapter 14 Working with the Gallery >>
Contents
What are styles?
A style is a set of formats that you can apply to selected pages, text, frames, and other elements in your document to quickly change their appearance. When you apply a style, you apply a whole group of formats at the same time.
OpenOffice.org supports the following types of styles:
- Page styles include margins, headers and footers, borders and backgrounds. In Calc, page styles also include the sequence for printing sheets.
- Paragraph styles control all aspects of a paragraph's appearance, such as text alignment, tab stops, line spacing, and borders, and can include character formatting.
- Character styles affect selected text within a paragraph, such as the font and size of text, or bold and italic formats.
- Frame styles are used to format graphic and text frames, including wrapping type, borders, backgrounds, and columns.
- Numbering styles apply similar alignment, numbering or bullet characters, and fonts to numbered or bulleted lists.
- Cell styles include fonts, alignment, borders, background, number formats (for example, currency, date, number), and cell protection.
- Graphics styles in drawings and presentations include line, area, shadowing, transparency, font, connectors, dimensioning, and other attributes.
- Presentation styles include attributes for font, indents, spacing, alignment, and tabs.
Different styles are available in the various components of OOo, as listed in Table 1.
Table 1. Styles available in OOo components
| Style Type | Writer | Calc | Draw | Impress | |
| Page | X | X | |||
| Paragraph | X | ||||
| Character | X | ||||
| Frame | X | ||||
| Numbering | X | ||||
| Cell | X | ||||
| Presentation | X | X | |||
| Graphics | (a) | X | X |
(a) Included in Frame styles
OpenOffice.org comes with many predefined styles. You can use the styles as provided, modify them, or create new styles, as described in this chapter.
Why use styles?
Many people manually format paragraphs, words, tables, page layouts, and other parts of their documents without paying any attention to styles. They are used to writing documents according to physical attributes. For example, you might specify the font family, font size, and any formatting such as bold or italic.
Styles are logical attributes. Using styles means that you stop saying "font size 14pt, Times New Roman, bold, centered", and you start saying "Title" because you have defined the "Title" style to have those characteristics. In other words, styles means that you shift the emphasis from what the text (or page, or other element) looks like, to what the text is.
Styles help improve consistency in a document. They also make major formatting changes easy. For example, you may decide to change the indentation of all paragraphs, or change the font of all titles. For a long document, this simple task can be prohibitive. Styles make the task easy.
In addition, styles are used by OpenOffice.org for many processes, even if you are not aware of them. For example, OOo relies on heading styles (or other styles you specify) when it compiles a table of contents.
Applying styles
OpenOffice.org provides several ways for you to select styles to apply.
Using the Styles and Formatting window
- Click the Styles and Formatting icon
 located at the left-hand end of the object bar, or click Format > Styles and Formatting, or press F11. The Styles and Formatting window shows the types of styles available for the OOo component you are using. Figure 1 shows the window for Writer, with Page Styles visible. You can move this window to a convenient position on the screen or dock it to an edge (hold down the Ctrl key and drag it by the title bar to where you want it docked).
- Click on one of the icons at the top left of the Styles and Formatting window to display a list of styles in a particular category.
- To apply an existing style (except for character styles), position the insertion point in the paragraph, frame, or page, and then double-click on the name of the style in one of these lists. To apply a character style, select the characters first.
Tip: At the bottom of the Styles and Formatting window is a dropdown list. In Figure 1 the window shows Automatic, meaning the list includes only styles applied automatically by OOo. You can choose to show all styles or other groups of styles, for example only custom styles.
Figure 1
Figure 1. The Styles and Formatting window for Writer, showing paragraph styles.
Using Fill Format mode
Use Fill Format to apply a style to many different areas quickly without having to go back to the Styles and Formatting window and double-click every time. This method is quite useful when you need to format many scattered paragraphs, cells, or other items with the same style.
- Open the Styles and Formatting window (Figure 1) and select the style you want to apply.
- Click the Fill Format mode icon
 . The mouse pointer changes to this icon.
- Position the moving icon on the paragraph, page or frame to be styled and click the mouse button.
- If you are applying a character style, hold down the mouse button while selecting the characters.
- To quit Fill Format mode, click the Fill Format mode icon again or press the Esc key.
Caution: When this mode is active, a right-click anywhere in the document undoes the last Fill Format action. Be careful not to accidentally right-click and thus undo actions you want to keep.
Using the Apply Style list
After you have used a style at least once in a document, the style name appears on the Apply Style list (Figure 2) at the left-hand end of the Formatting toolbar, next to the Styles and Formatting icon.
You can open this list and click once on the style you want, or you can use the up and down arrow keys to move through the list and then press Enter to apply the highlighted style.

Figure 2: The Apply Style list on the Formatting toolbar.
Tip: Select More... at the bottom of the list to open the Styles and Formatting window.
Assigning styles to shortcut keys
OOo provides a set of predefined keyboard shortcuts that allow you to quickly apply styles while typing in a document. You can redefine these shortcuts or define your own.
- Click Tools > Customize > Keyboard. The Keyboard page of the Customize dialog (Figure 3) opens.
- To have the shortcut key assignment available only with one component (for example, Writer), select that component's name in the upper right corner of the page; otherwise select OpenOffice.org button to make it available to every component.
- Choose the shortcut keys you want to define. In this example we have chosen Ctrl+9.
- In the Functions section at the bottom of the dialog, scroll down in the Category list to Styles and click the + sign.
- Choose the type of style (our example uses a paragraph style). The Function list will display the names of the available styles for the selected type. The example shows some of OOo's predefined styles.
- To set Ctrl+9 to be the shortcut key combination for the Text Body style, select Text Body in the Function list, and then click Modify. Ctrl+9 now appears in the Keys list.
- Make any other required changes and then click OK to save these settings and close the dialog.

Figure 3: Defining keyboard shortcuts for applying styles.
Modifying styles
OpenOffice.org provides two ways to modify styles (both the predefined styles and custom styles that you create):
Tip: Any changes you make to a style are effective only in the document you are working on. The changes do not go into any associated template. If you want the changes to apply to more than one document, you need to change the template (see Chapter 12, Working with Templates) or copy the styles into the other documents as described in Copying and moving styles.
Changing a style using the Style dialog
To change an existing style using the Style dialog, right-click on the required style in the Styles and Formatting window (Figure 1) and select Modify from the pop-up menu.
The Style dialog displayed depends on the type of style selected. Each style dialog has several tabs. See the chapters on styles in the user guides for details.
Updating a style from a selection
To update a style from a selection:
- Open the Styles and Formatting window.
- In the document, select an item that has the format you want to adopt as a style.
- In the Styles and Formatting window, select the style you want to update (single-click, not double-click), then long-click on the arrow next to the New Style from Selection icon and click on Update Style (see Figure 4).
-
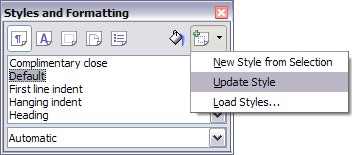
Figure 4: Updating a style from a selection.

Using AutoUpdate (paragraph and frame styles only)
If the AutoUpdate checkbox is selected on the Organizer page of the Paragraph Style or Frame Style dialog, applying direct formatting to a paragraph or frame using this style in your document automatically updates the style itself.
Tip: If you are in the habit of manually overriding styles in your document, be sure that AutoUpdate is not enabled.
Updating styles from another document or template
You can update styles by copying or loading them from a template or another document. See Copying and moving styles.
Creating new (custom) styles
You may want to add some new styles. You can do this in two ways:
Creating a new style using the Style dialog
To create a new style using the Style dialog, right-click in the Styles and Formatting window and select New from the pop-up menu.
If you want your new style to be linked with an existing style, first select that style and then right-click and select New.
If you link styles, then when you change the base style (for example, by changing the font from Times to Helvetica), all the linked fonts will change as well. Sometimes this is exactly what you want; other times you do not want the changes to apply to all the linked styles. It pays to plan ahead.
The dialogs and choices are the same for defining new styles and for modifying existing styles. See the chapters on styles in the user guides for details.
Creating a new style from a selection
You can create a new style by copying an existing style. This new style applies only to this document; it will not be saved in the template.
- Open the Styles and Formatting window and choose the type of style you want to create.
- In the document, select the item you want to save as a style.
- In the Styles and Formatting window, click on the New Style from Selection icon.
- In the Create Style dialog (Figure 5), type a name for the new style. The list shows the names of existing custom styles of the selected type. Click OK to save the new style.
-
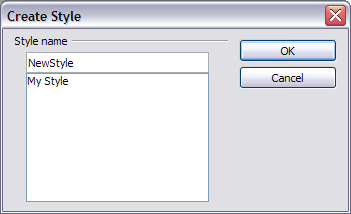
Figure 5: Creating a new style from a selection.

Dragging and dropping a selection to create a style
You can drag and drop a text selection into the Styles and Formatting window to create a new style.
Writer
Select some text and drag it to the Styles and Formatting window. If Paragraph Styles are active, the paragraph style will be added to the list. If Character Styles are active, the character style will be added to the list.
Calc
Drag a cell selection to the Styles and Formatting window to create cell styles.
Draw/Impress
Select and drag drawing objects to the Styles and Formatting window to create graphics styles.
Copying and moving styles
You can copy or move styles from one template or document into another template or document, in two ways:
Using the Template Management dialog
To copy or move styles using the Template Management dialog:
- Click File > Templates > Organize.
- In the Template Management dialog (Figure 6), set the lists at the bottom to either Templates or Documents, as needed. The default is Templates on the left and Documents on the right.
- Open the folders and find the templates from and to which you want to copy. Double-click on the name of the template or document, and then double-click the Styles icon to show the list of individual styles (Figure 7).
- To copy a style, hold down the Ctrl key and drag the name of the style from one list to the other.
- Repeat for each style you want to copy. If the receiving template or document has a lot of styles, you may not see any change on screen unless you scroll down in the list. When you are finished, click Close.

Figure 6: Template Management dialog.

Figure 7: Copying styles using the Template Management dialog.
Tip: To load styles from a file that is not open, click the File button. When you return to this window, both lists show the selected file as well as all the currently open documents.
Caution: If you do not hold down the Control key when dragging, the style will be moved from one list to the other. The style will be deleted from the list you are dragging it from.
Loading styles from a template or document
You can copy styles by loading them from a template or another document:
- Open the document you want to copy styles into.
- In the Styles and Formatting window, long-click on the arrow next to the New Style from Selection icon, and then click on Load Styles (see Figure 4).
- On the Load Styles dialog (Figure 8), find and select the template you want to copy styles from.
- Select the checkboxes for the categories of styles to be copied. Select Overwrite if you want the styles being copied to replace any styles of the same names in the document you're copying them into.
- Click OK to copy the styles. You will not see any change on screen.
Note: To copy the styles from another document, click the From File button to open a window from which you can select the required document.

Figure 8: Loading styles from a template into the open document.
Deleting styles
You cannot remove (delete) any of OOo's predefined styles from a template, even if you are not using them.
You can remove any user-defined (custom) styles; but before you do, you should make sure the styles are not in use. If an unwanted style is in use, you will want to replace it with a substitute style.
Replacing styles (and then deleting the unwanted ones) can be very useful if you are dealing with a document that has been worked on by several writers or has been formed by combining several documents from different sources.
To delete unwanted styles, right-click on them (one at a time) in the Styles and Formatting window and click Delete on the pop-up menu.
If the style is in use, you receive the message shown in Figure 9.

Figure 9: Deleting an applied style.
Caution: Make sure the style is not in use before deletion. Otherwise, all objects with that style will return to the default style and retain their formatting as manual formatting. This can be a problem in a long document.
If the style is not in use, you receive the message shown in Figure 10.

Figure 10: Deleting a style that is not in use.
<< Chapter 12 Working with Templates | Chapter 14 Working with the Gallery >>
| Content on this page is licensed under the Creative Common Attribution 3.0 license (CC-BY). |