Documentation/OOoAuthors User Manual/Getting Started/Setting up OpenOffice.org
This is Chapter 5 of Getting Started with OpenOffice.org 2.x (Third edition), produced by the OOoAuthors group. A PDF of this chapter is available from the OOoAuthors Guides page at OpenOffice.org.
<< User Manuals page
<< Getting Started Table of Contents
<< Chapter 4 Menus and Toolbars |
Chapter 6 Getting Started with Writer >>
Contents
Choosing options that affect all of OOo
This section covers some of the settings that apply to all the components of OOo. For information on settings not discussed here, see the online help.
- Click Tools > Options. The list in the left-hand box varies depending on which component of OOo is open. The illustrations in this chapter show the list as it appears when no document is open. (For example, when a Writer document is open, additional options for OpenOffice.org Writer and OpenOffice.org Writer/Web appear on the list.)
- Click the + sign to the left of OpenOffice.org in the left-hand section. A list of subsections drops down.
Note: The Back button has the same effect on all pages of the Options dialog. It resets the options to the values that were in place when you opened OpenOffice.org.
User Data options
Because OOo's revision features mark your changes and comments with the name or initials stored in User Data, you will want to ensure that your name and initials appear there. To do this:
- In the Options dialog, click OpenOffice.org > User Data.
- Fill in the form on the OpenOffice.org User Data page (Figure 1), or delete any existing incorrect information.
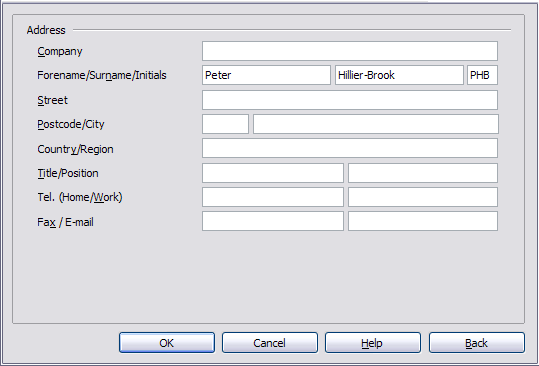
Figure 1. Filling in user data

General options
- In the Options dialog, click OpenOffice.org > General.
- On the OpenOffice.org - General page (Figure 2), the options are as described below.
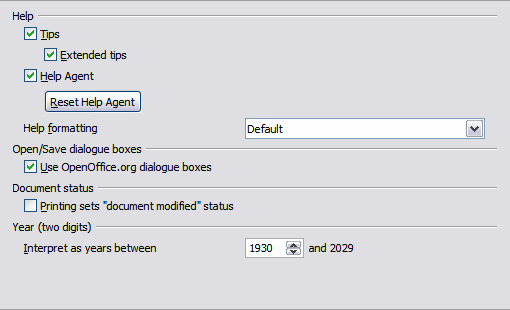
Figure 2. Setting general options for OpenOffice.org

Help - Tips
When Help Tips are active, one or two words will appear when you hover the cursor over an icon or field on the main OOo window. This setting also affects the display of notes: if both Help Tips and Extended Tips are turned off, then you will not see the contents of a note when you hover the cursor on the note.
Help - Extended tips
When Extended tips are active, a brief description of the function of a particular icon or menu command, or a field on a dialog appears when you hover the cursor on that item.
Help Agent
To turn off the Help Agent (similar to Microsoft's Office Assistant), deselect this checkbox. To restore the default Help Agent behavior, click Reset Help Agent.
Help formatting
High contrast is an operating system setting that changes the system color scheme to improve readability. To display Help in high contrast (if your computer's operating system supports this), choose one of the high-contrast style sheets from the list.
Open/Save dialogs
To use the standard Open and Save dialogs for your operating system, deselect the Use OpenOffice.org dialogs checkbox. When this checkbox is selected, the Open and Save dialogs supplied with OpenOffice.org will be used. See Chapter 3 (File Management) more about the OOo Open and Save dialogs.
Document status
Choose whether printing a document counts as changing the document. If this option is selected, then the next time you close the document after printing, the print date is recorded in the document properties as a change and you will be prompted to save the document again, even if you did not make any other changes.
Year (two digits)
Specifies how two-digit years are interpreted. For example, if the two-digit year is set to 1930, and you enter a date of 1/1/30 or later into your document, the date is interpreted as 1/1/1930 or later. An “earlier" date is interpreted as being in the following century; that is, 1/1/20 is interpreted as 1/1/2020.
Memory options
- In the Options dialog, click OpenOffice.org > Memory.
- On the OpenOffice.org - Memory dialog (Figure 3):
- More memory can make OpenOffice.org faster and more convenient (for example, more undo steps require more memory); but the trade-off is less memory available for other applications and you could run out of memory altogether.
- To load the Quickstarter (an icon on the desktop or in the system tray) when you start your computer, select the checkbox near the bottom of the dialog. This makes OpenOffice.org start faster; the trade-off is OOo uses some memory even when not being used. This option (called "Enable systray quickstarter") is disabled in some Linux installations.
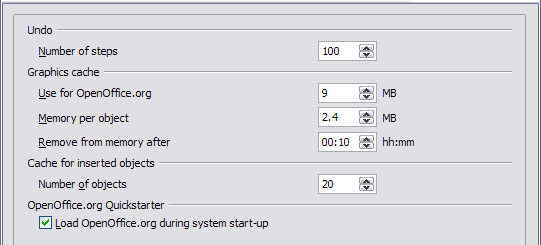
Figure 3. Choosing Memory options for the OpenOffice.org applications

View options
The choices of View options affect the way the document window looks and behaves.
- In the Options dialog, click OpenOffice.org > View.
- On the OpenOffice.org - View page (Figure 4), set the options to suit your personal preferences. Some options are described below.
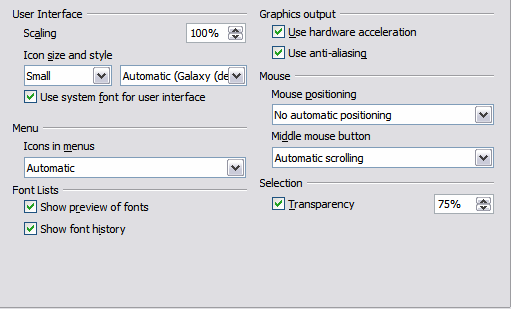
Figure 4. Choosing View options for the OpenOffice.org applications

User Interface - Scaling
If the text in the help files and on the menus of the OOo user interface is too small or too large, it can be changed by specifying a scaling factor. Sometimes a change here can have unexpected results, depending on the screen fonts available on your system. It does not affect the actual font size of the text.
User Interface - Icon size and style
The first box specifies the display size of toolbar icons (small, large or automatic); the Automatic option uses the icon size setting for your operating system. The second box specifies the icon set (theme); here the Automatic Option uses an icon set compatible with your operating system and choice of desktop: for example, KDE or Gnome on Linux.
User Interface - Use system font for user interface
If you prefer to use the system font (the default font for your computer and operating system), instead of the font provided by OOo, for the user interface, select this checkbox.
User interface - Screen font antialiasing
(Not available in Windows, so not shown in Figure 4.) Select this checkbox to smooth the screen appearance of text. Enter the smallest font size to apply antialiasing.
Menu - icons in menus
Select this option if you want icons as well as words to be visible in menus.
Font Lists - Show preview of fonts
When you select this option, the font list looks like Figure 5, left, with the font names shown as an example of the font; with the checkbox deselected, the font list shows only the font names, not their formatting (Figure 5, right). The fonts you will see listed are those that are installed on your system.


Figure 5. (Left) Font list showing preview; (Right) Font list without preview
Font Lists - Show font history
When you select this option, the last five fonts you have assigned to the current document are displayed at the top of the font list.
3D view
These options are for use with Draw and Impress. For more information, see the online help or other documentation on these applications.
Mouse
Use these options to choose how the mouse is positioned in newly opened dialogs and to select the function of the middle mouse button.
Print options
Set the print options to suit your default printer and your most common printing method. You can change these settings at any time, either through this dialog or during the printing process (by clicking the Options button on the Print dialog).
- In the Options dialog, click OpenOffice.org > Print.
- On the OpenOffice.org - Print dialog (Figure 6), look at the Printer warnings section near the bottom.
- Here you can choose whether to be warned if the paper size or orientation specified in your document does not match the paper size or orientation available for your printer. Having these warnings turned on can be quite helpful, particularly if you work with documents produced by people in other countries where the standard paper size is different from yours.
Tip: If your printouts are coming out incorrectly placed on the page or chopped off at the top, bottom, or sides, or the printer is refusing to print, the most likely cause is page size incompatibility.

Figure 6. Choosing general printing options to apply to all OOo components
Path options
You can change the location of files associated with, or used by, OpenOffice.org to suit your working situation. In a Windows system, for example, you might want to store documents by default somewhere other than My Documents.
- In the Options dialog, click OpenOffice.org > Paths.
- To make changes, select an item in the list shown in Figure 7 and click Edit. On the Select Paths dialog (not shown), add or delete folders as required, and then click OK to return to the Options dialog. Note that many items have at least two paths listed: one to a shared folder (which might be on a network) and one to a user-specific folder (normally on the user's personal computer).
Tip: You can use the entries in the OpenOffice.org - Paths dialog to compile a list of files, such as those containing AutoText, that you need to back up or copy to another computer.

Figure 7. Viewing the paths of files used by OpenOffice.org
Color options
In the OpenOffice.org - Colors dialog (Figure 8), you can specify colors to use in OOo documents. You can select a color from a color table, edit an existing color, or define new colors. These colors will then be available in color selection palettes in OOo.

Figure 8. Defining colors to use in color palettes in OOo
Font options
You can define replacements for any fonts that might appear in your documents. If you receive from someone else a document containing fonts that you do not have on your system, OpenOffice.org will substitute fonts for those it does not find. You might prefer to specify a different font from the one the program chooses.
- In the Options dialog, click OpenOffice.org > Fonts.
- On the OpenOffice.org - Fonts dialog (Figure 9):
- Select the Apply Replacement Table checkbox.
- Select or type the name of the font to be replaced in the Font box. (If you do not have this font on your system, it will not appear in the drop-down list in this box, so you need to type it in.)
- In the Replace with box, select a suitable font from the drop-down list of fonts installed on your computer.
- The checkmark to the right of the Replace with box turns green. Click on this checkmark. A row of information now appears in the larger box below the input boxes. Select the checkboxes under Always and Screen.
- In the bottom section of the dialog, you can change the typeface and size of the font used to display source code such as HTML and Basic (in macros).
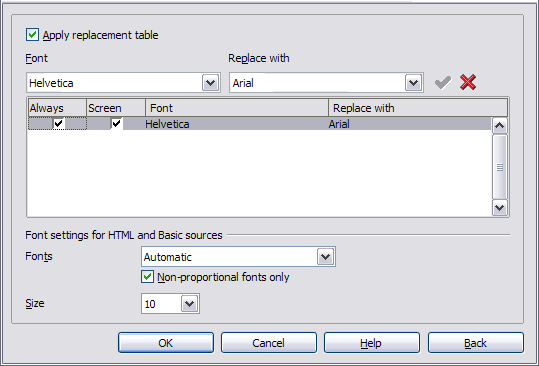
Figure 9. Defining a font to be substituted for another font

Security options
Use the OpenOffice.org - Security page (Figure 10) to choose security options for saving documents and for opening documents that contain macros.

Figure 10. Choosing security options for opening and saving documents
Appearance options
Writing, editing, and page layout are often easier to do when you can see as much as possible of what is going on in your document. You may wish to make visible such items as text, table, and section boundaries (in Writer documents), page breaks in Calc, and grid lines in Draw or Writer. In addition, you might prefer different colors (from OOo's defaults) for such items as note indicators or field shadings.
On the OpenOffice.org - Appearance page (Figure 11), you can specify which items are visible and the colors used to display various items.
- In the Options dialog, click OpenOffice.org > Appearance.
- To show or hide items such as text boundaries, select or deselect the checkboxes next to the names of the items.
- To change the default colors for items, click the down-arrow in the Color Setting column by the name of the item and select a color from the pop-up box.
- To save your color changes as a color scheme, click Save, type a name in the Scheme box; then click OK.
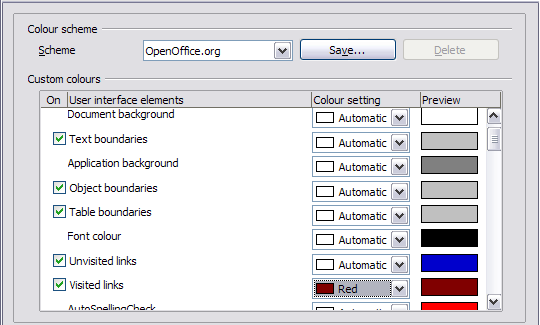
Figure 11. Showing or hiding text, object, and table boundaries

Accessibility options
Accessibility options include whether to allow animated graphics or text, how long help tips remain showing, some options for high contrast display, and a way to change the font for the user interface of the OpenOffice.org program (see Figure 12).
Accessibility support relies on Sun Microsystems Java technology for communications with assistive technology tools. See Java options. The "Support assistive technology tools" option is not shown on all OOo installations. See "Assistive Tools in OpenOffice.org" in the Help for other requirements and information.
- In the Options dialog, click OpenOffice.org > Accessibility.
- Select or deselect the options as required.
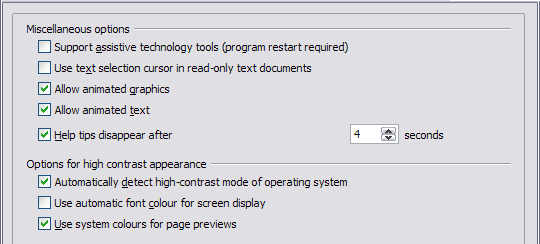
Figure 12. Choosing accessibility options

Java options
If you install or update a Java Runtime Environment (JRE) after you install OpenOffice.org, or if you have more than one JRE installed on your computer, you can use the Java options page (Figure 13) to choose the JRE for OOo to use.
If you are a system administrator, programmer, or other person who customizes JRE installations, you can use the Parameters and Class Path pages (reached from the Java page) to specify this information.
- In the Options dialog, click OpenOffice.org > Java.
- If you do not see anything listed in the middle of the page, wait a few minutes while OOo searches for JREs on the hard disk.
- If OOo finds one or more JREs, it will display them there. You can then select the Use a Java runtime environment checkbox and (if necessary) choose one of the JREs listed.
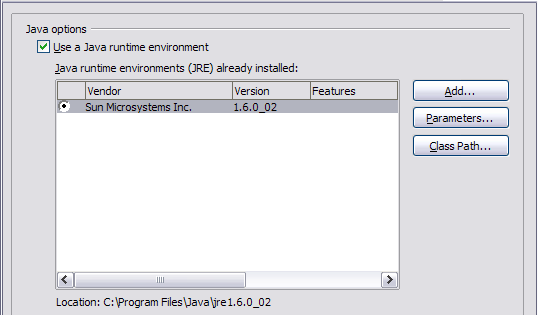
Figure 13. Choosing a Java runtime environment

Online Update options
On the Online Update page (not shown here), you can choose whether and how often to have OOo check the OOo website for program updates.
Choosing options for loading and saving documents
You can set the Load/Save options to suit the way you work.
General Load/Save options
- If the Options dialog is not already open, click Tools > Options. Click the + sign to the left of Load/Save.
- Choose Load/Save > General.
Most of the choices on the Options - Load/Save - General dialog (Figure 14) are familiar to users of other office suites. Some items of interest are described below.

Figure 14. Choosing Load and Save options
Load user-specific settings with the document
When you save a document, certain settings are saved with it. For example, your choice (in the options for OOo Writer) of how to update links is affected by the Load user-specific settings option. Some settings (printer name, data source linked to the document) are always loaded with a document, whether or not this checkbox is selected.
If you select this option, these document settings are overruled by the user-specific settings of the person who opens it. If you deselect this option, users' personal settings do not overrule the settings in the document.
Edit document properties before saving
When you select this option, the Document Properties dialog pops up to prompt you to enter relevant information the first time you save a new document (or whenever you use Save As).
Save AutoRecovery information every
Note that AutoRecovery in OpenOffice.org overwrites the original file. If you have also chosen Always create backup copy, the original file then overwrites the backup copy. If you have this set, recovering your document after a system crash will be easier; but recovering an earlier version of the document may be harder.
Size optimization for XML format (no pretty printing)
OpenOffice.org documents are XML files. When you select this option, OOo writes the XML data without indents and line breaks. If you want to be able to read the XML files in a text editor in a structured form, deselect this option.
Default file format
If you routinely share documents with users of Microsoft Word, you might want to change the Always save as attribute for text documents in the Standard file format section to one of the Word document types.
VBA Properties Load/Save options
- Choose Load/Save > VBA Properties.
- On the Options - Load/Save - VBA Properties dialog (Figure 15), you can whether to keep any macros in MSOffice documents that are opened in OOo.
- If you choose Save original Basic code, the macros will not work in OOo but are retained if you save the file into Microsoft Office format.
- If you choose Load Basic code to edit, the changed code is saved in an OOo document but is not retained if you save into an MSOffice format.
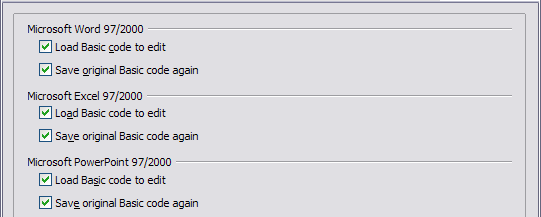
Figure 15. Choosing Load/Save VBA Properties

Microsoft Office Load/Save options
- Choose Load/Save > Microsoft Office.
- On the Options - Load/Save - Microsoft Office dialog (Figure 16), you can choose what to do when importing and exporting Microsoft Office OLE objects (linked or embedded objects or documents such as spreadsheets or equations).
- Select the [L] checkboxes to convert Microsoft OLE objects into the corresponding OpenOffice.org OLE objects when a Microsoft document is loaded into OOo (mnemonic: “L" for “load").
- Select the [S] checkboxes to convert OpenOffice.org OLE objects into the corresponding Microsoft OLE objects when a document is saved in a Microsoft format (mnemonic: “S" for “save").
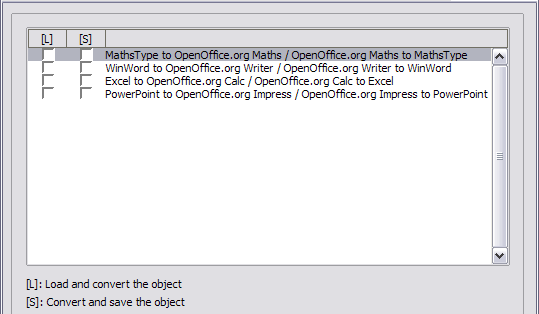
Figure 16. Choosing Load/Save Microsoft Office options

HTML compatibility Load/Save options
Choices made on the Load/Save - HTML Compatibility dialog (Figure 17) affect HTML pages imported into OpenOffice.org and those exported from OOo.
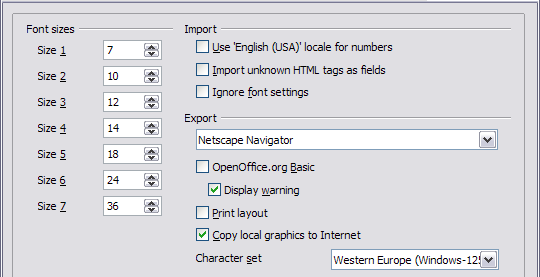
Figure 17. Choosing HTML compatibility options

Choosing language settings
You may need to do several things to set the language settings to what you want:
Install the required dictionaries
OOo 2.0 automatically installs several dictionaries with the program. To add other dictionaries, use File > Wizards > Install new dictionaries. An OOo document will open with links to different languages that you can install. Follow the prompts to install them.
Change some locale and language settings
You can change some details of the locale and language settings that OOo uses for all documents, or for specific documents.
- In the Options dialog, click Language Settings > Languages.
- On the right-hand side (as shown in Figure 18), change the Locale setting, Default currency, and Default languages for documents as required. In the example, English (Australia) has been chosen as the locale setting, and the Australian dollar (AUD) for the default currency. Although an English (Australia) dictionary exists, the English (UK) dictionary has been selected in the Default languages for documents.
- If you want the language (dictionary) setting to apply to the current document only, instead of being the default for all new documents, select the checkbox labelled For the current document only.
- If necessary, select the checkboxes to enable support for Asian languages (Chinese, Japanese, Korean) and support for CCTL (complex text layout) languages such as Hindi, Thai, Hebrew, and Arabic. If you choose either of these checkboxes, the next time you open this dialog, you will see some extra choices under Language Settings, as shown in Figure 19. These choices (Searching in Japanese, Asian Layout, and Complex Text Layout) are not discussed here.
- Click OK to save your changes and close the dialog.
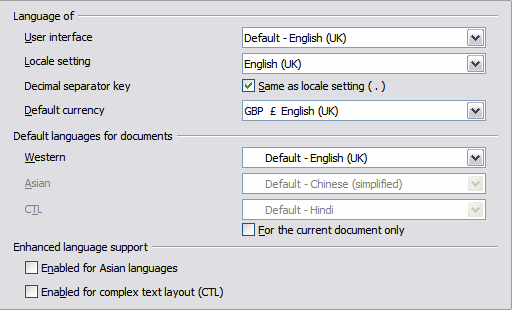
Figure 18. Choosing language options

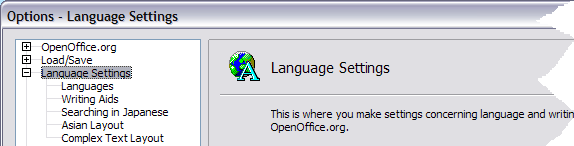
Figure 19. Extra language settings when enhanced language support options are selected

Choose spelling options
To choose the options for checking spelling:
- In the Options dialog, click Language Settings > Writing Aids.
- In the Options section of the Language Settings - Writing Aids dialog (Figure 20), choose the settings that are useful for you. Some considerations:
- If you do not want spelling checked while you type, deselect Check spelling as you type and select Do not mark errors. (To find the second item, scroll down in the Options list.)
- If you use a custom dictionary that includes words in all uppercase and words with numbers (for example, AS/400), select Check uppercase words and Check words with numbers.
- Check special regions includes headers, footers, frames, and tables when checking spelling.
- Here you can also check which user-defined (custom) dictionaries are active by default, and add or remove dictionaries, by clicking the New or Delete buttons.
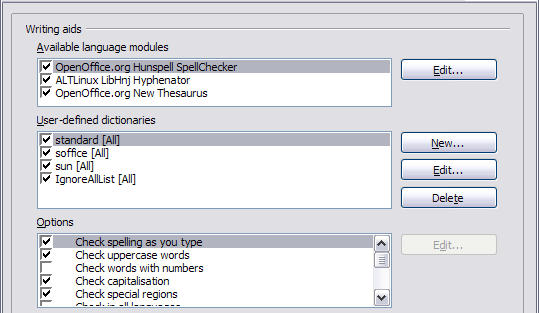
Figure 20. Choosing languages, dictionaries, and options for checking spelling

Internet options
Use the Internet Options pages to define search engines and save proxy settings for use with OpenOffice.org.
If you are using a Netscape or Mozilla browser (such as Firefox), you can enable the Mozilla Plug-in so you can open OOo files in your browser, print them, save them, and work with them in other ways.
If you are using a Unix or Linux based operating system (including Mac OS X), an additional page of E-mail options is available, where you can specify the e-mail program to use when you send the current document as e-mail (Figure 21).

Figure 21: Internet options, showing E-mail page available to Linux users
Controlling OOo's AutoCorrect functions
Some people find some or all of the items in OOo's AutoCorrect function annoying because they change what you type when you do not want it changed. Many people find some of the AutoCorrect functions quite helpful; if you do, then select the relevant checkboxes. But if you find unexplained changes appearing in your document, this is a good place to look to find the cause.
To open the AutoCorrect dialog, click Tools > AutoCorrect. (You need to have a document open for this menu item to appear.)
In Writer, this dialog has five tabs, as shown in Figure 22. In other components of OOo, where the dialog has only four tabs, the contents of the Options tab is as shown in Figure 23.

Figure 22. The AutoCorrect dialog in Writer, showing the five tabs and some of the choices

Figure 23. The AutoCorrect dialog in Calc, showing four tabs and the Options choices
| Content on this page is licensed under the Creative Common Attribution 3.0 license (CC-BY). |