Documentation/OOoAuthors User Manual/Getting Started/Formatting pages
This is the third part of Chapter 6 of Getting Started with OpenOffice.org 2.x (Third edition), produced by the OOoAuthors group. A PDF of this chapter is available from the OOoAuthors Guides page at OpenOffice.org.
<< User Manuals page
<< Getting Started Table of Contents
<< Chapter 5 Setting up OpenOffice.org |
Chapter 7 Getting Started with Calc >>
The other parts of this chapter are:
Contents
Formatting pages
Writer provides several ways for you to control page layouts:
- Page styles
- Columns
- Frames
- Tables
- Sections
For more information, see Chapter 4 (Formatting Pages) in the Writer Guide.
Tip: Page layout is usually easier if you show text, object, table, and section boundaries in Tools > Options > OpenOffice.org > Appearance, and paragraph ends, tabs, breaks, and other items in Tools > Options > OpenOffice.org Writer > Formatting Aids.
Choosing a layout method
The best layout method varies depending on what the final document should look like and what sort of information will be in the document. Here are some examples.
For a book similar to this user guide, with one column of text, some figures without text beside them, and some other figures with descriptive text, use page styles for basic layout, and tables to place figures beside descriptive text when necessary.

Use page styles (with two columns) for an index or other document with two columns of text where the text continues from the left-hand column to the right-hand column and then to the next page, all in sequence (also known as snaking columns of text). If the title of the document (on the first page) is full-page width, put it in a single-column section.

For a newsletter with complex layout, two or three columns on the page, and some articles that continue from one page to some place several pages later, use page styles for basic layout. Place articles in linked frames and anchor graphics to fixed positions on the page if necessary.

For a document with terms and translations to appear side-by-side in what appear to be columns, use a table to keep items lined up, and so you can type in both “columns".

A header is an area that appears at the top of a page. A footer appears at the bottom of the page. Information, such as page numbers inserted into a header or footer, displays on every page of the document with that page style.
To insert a header, click Insert > Header > Default (or the page style, if not Default) as shown in Figure 21.

Figure 21: Inserting headers and footers.
Other information such as document titles and chapter titles is often put into the header or footer. These items are best added as fields. That way, if something changes, the headers and footers are updated automatically. Here is one common example.
To insert the document title into the header:
- Click File > Properties > Description and enter a title for your document.
- Add a header (Insert > Header > Default).
- Place the cursor in the header part of the page.
- Select Insert > Fields > Title. The title should appear on a gray background (which does not show when printed and can be turned off).
- To change the title for the whole document, go back to File > Properties > Description.
Fields are covered in detail in Chapter 14 (Working with Fields) in the Writer Guide.
For more about headers and footers, see Chapter 4 (Formatting Pages) and Chapter 6 (Introduction to Styles) in the Writer Guide.
Numbering pages
To automatically number pages:
- Insert a header or footer, as described in Creating headers and footers.
- Place the cursor in the header or footer where you want the page number to appear and choose Insert > Fields > Page Number.
See Chapter 4 (Formatting Pages) in the Writer Guide for more information.
Restarting page numbering
Often you will want to restart the page numbering at 1, for example, on the page following a title page or a table of contents. In addition, many documents have the front matter (such as the table of contents) numbered with Roman numerals and the main body of the document numbered in Arabic numerals, starting with 1.
You can restart page numbering in two ways.
Method 1:
- Place the cursor in the first paragraph of the new page.
- Choose Format > Paragraph.
- On the Text Flow page of the Paragraph dialog box, check Insert in the Breaks area.
- In the Type drop-down list, select Page.
- In the Position drop-down list, select Before or After to position where you want to insert the page break.
- Check With Page Style and specify the page style to use.
- Specify the page number to start from and then click OK.
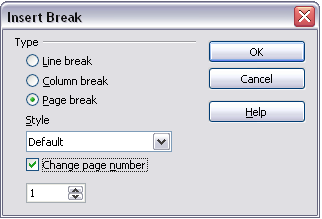
Method 2:
- Place the cursor in the first paragraph of the new page.
- Choose Insert > Manual break.
- Page break is the default selected on the Insert Break dialog box.
- Choose the required page in the Style drop-down list.
- Check Change page number.
- Specify the page number to start from and then click OK.
 Restarting page numbering after a manual page break.

The following derives from experience with OOo 3.2.1:
If the "Default" page style doesn't behave as desired when applied to both sections, create two new page styles (which could be based on Default) with names such as "BodyPage" and "FrontMatter." Apply the BodyPage style to the page you want to start as "1" in the Arabic page number sequence. Apply the FrontMatter page style to the first page in the document you want to start with Roman page numbers.
When creating either page style, make the "Next Page" style the same as the one you create. That is, a FrontMatter page is followed by a FrontMatter format--until changed by a page break and a new style, such as BodyPage, which can continue to the end of the document.
When creating a page style based on Default, check to be sure you are not creating a paragraph format based on the Default paragraph style. Select from the list of Page Styles, not from Paragraph Styles where there is also a Default.
Changing page margins
You can change page margins in two ways:
- Using the page rulers—quick and easy, but does not have fine control.
- Using the Page Style dialog—can specify margins to two (fractional) decimal places.
| If you change the margins using the rulers, the new margins affect the page style and will be shown in the Page Style dialog the next time you open it. |
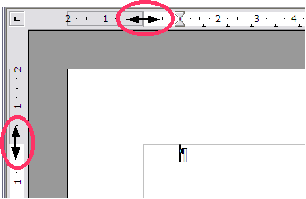
To change margins using the rulers:
- The shaded sections of the rulers are the margins. Put the mouse cursor over the line between the gray and white sections. The pointer turns into a double-headed arrow.
- Hold down the left mouse button and drag the mouse to move the margin.
-
 Moving the margins.

| The small arrows on the ruler are used for indenting paragraphs. They are often in the same place as the page margins, so you need to be careful to move the margin marker, not the arrows. Place the mouse pointer between the arrows and, when the pointer turns into a double-headed arrow, you can move the margin (the indent arrows will move with it). |
To change margins using the Page Style dialog:
- Right-click anywhere on the page and select Page from the pop-up menu.
- On the Page page of the dialog, type the required distances in the Margins boxes.
| Content on this page is licensed under the Creative Common Attribution 3.0 license (CC-BY). |