Guide to Bézier curves
Bézier curves – what are they?
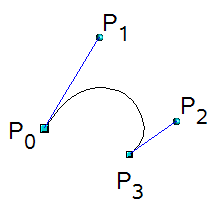
OpenOffice.org uses cubic Bézier curves. A curve is defined by means of a start point P0, an end point P3, and two control points P1 and P2 (see the figure at left). For points on the curve the terms nodes or anchors are often used. For the mathematical background of Bézier curves, see http://en.wikipedia.org/wiki/Bezier_curve.
Bézier curves are very suitable for experimenting with the shape and form of curves. In point mode you can change the curve alignment by dragging the points with the mouse. The curve leaves the start point P0 in the direction of the control point P1 and arrives at the end point P3 from the direction of the control point P2. These directions are shown in Draw by blue lines. The more distant a control is from its start or end point the smaller the curvature at that point. If a control point lies directly on one of these points it will have no influence on the curve.
Point mode of the Bézier curve
With the ![]() icon from the Draw toolbar or with the Edit points command from the context menu, you can bring the curve into a point mode from which you edit individual points on the curve. Points on the curve are shown with a square handle
icon from the Draw toolbar or with the Edit points command from the context menu, you can bring the curve into a point mode from which you edit individual points on the curve. Points on the curve are shown with a square handle ![]() , the control points with a round handle
, the control points with a round handle ![]() . The starting point of a curve appears somewhat larger than the other points. When you hover the mouse over a curve point the mouse cursor changes to
. The starting point of a curve appears somewhat larger than the other points. When you hover the mouse over a curve point the mouse cursor changes to ![]() ; over a control point it changes to
; over a control point it changes to ![]() . In point mode the toolbar Edit Points should appear. If not, turn it on from View > Toolbars > Edit Points.
. In point mode the toolbar Edit Points should appear. If not, turn it on from View > Toolbars > Edit Points.
You can switch on the option All control points in Bézier editor under Tools > Options > OpenOffice.orgDraw > View. Without this switched on you see the control points and guide lines only when a point is marked – you do this by clicking the point. By holding the Shift key down as you mark, you can select and mark several points at the same time. A marked point is shown a little darker ![]() .
.
| Content on this page is licensed under the Creative Common Attribution 3.0 license (CC-BY). |
