Difference between revisions of "Documentation/OOo3 User Guides/Writer Guide/Using AutoText to insert fields"
From Apache OpenOffice Wiki
(New page: {{DISPLAYTITLE:Using AutoText to insert often-used fields - DRAFT}} {{Documentation/WG3FieldsTOC |ShowPrevNext=block |PrevPage=Documentation/OOo3_User_Guides/Writer Guide/Using other field...) |
Clairedwood (Talk | contribs) |
||
| (2 intermediate revisions by one other user not shown) | |||
| Line 1: | Line 1: | ||
| − | {{DISPLAYTITLE:Using AutoText to insert often-used fields | + | {{DISPLAYTITLE:Using AutoText to insert often-used fields}} |
{{Documentation/WG3FieldsTOC | {{Documentation/WG3FieldsTOC | ||
|ShowPrevNext=block | |ShowPrevNext=block | ||
| Line 10: | Line 10: | ||
# Select the field, and then click '''Edit > AutoText '''(or press ''Ctrl+F3''). | # Select the field, and then click '''Edit > AutoText '''(or press ''Ctrl+F3''). | ||
# On the AutoText dialog box, choose the group where this new entry will be stored (in this example, it is going into ''My AutoText''), type a name for the entry, and change the suggested shortcut if you wish. | # On the AutoText dialog box, choose the group where this new entry will be stored (in this example, it is going into ''My AutoText''), type a name for the entry, and change the suggested shortcut if you wish. | ||
| − | # Click the '''AutoText '''button and click '''New''' to have the entry inserted as a field. Do not choose '''New (text only)''' because the AutoText entry will be plain text, not a field. Click '''Close''' to close the AutoText dialog box. | + | # Click the '''AutoText '''button and click '''New''' to have the entry inserted as a field. Do not choose '''New (text only)''' because the AutoText entry will be plain text, not a field. (The selection '''''New''''' does not appear until you have selected a group and typed a name for the entry.)Click '''Close''' to close the AutoText dialog box. |
# Now whenever you want to insert this field at the cursor position, type the shortcut, and then press ''F3''. | # Now whenever you want to insert this field at the cursor position, type the shortcut, and then press ''F3''. | ||
| − | [[Image:WG14-6.png|thumb|none| | + | [[Image:WG14-6.png|thumb|none|600px|''Creating a new AutoText entry.'']] |
{{CCBY}} | {{CCBY}} | ||
[[Category: Writer Guide (Documentation)]] | [[Category: Writer Guide (Documentation)]] | ||
Latest revision as of 13:05, 6 June 2010
- Using document properties to hold information that changes
- Using other fields to hold information that changes
- Using AutoText to insert often-used fields
- Defining your own numbering sequences
- Using automatic cross-references
- Using fields in headers and footers
- Using fields instead of outline numbering for chapter numbers
- Tricks for working with fields
- Developing conditional content
- Using placeholder fields
- Using input fields and input lists
If you use the same fields often, you will want a quick and easy way to insert them. Use AutoText for this purpose. To define an AutoText entry for a field:
- Insert a field into your document, as described previously.
- Select the field, and then click Edit > AutoText (or press Ctrl+F3).
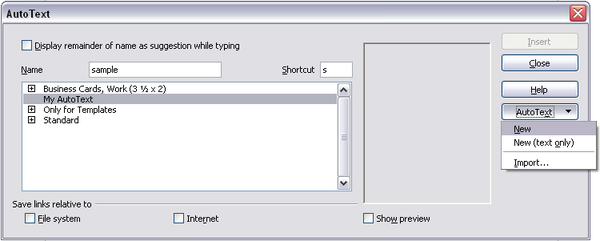
- On the AutoText dialog box, choose the group where this new entry will be stored (in this example, it is going into My AutoText), type a name for the entry, and change the suggested shortcut if you wish.
- Click the AutoText button and click New to have the entry inserted as a field. Do not choose New (text only) because the AutoText entry will be plain text, not a field. (The selection New does not appear until you have selected a group and typed a name for the entry.)Click Close to close the AutoText dialog box.
- Now whenever you want to insert this field at the cursor position, type the shortcut, and then press F3.
| Content on this page is licensed under the Creative Common Attribution 3.0 license (CC-BY). |
