Difference between revisions of "Documentation/OOo3 User Guides/Writer Guide/Styles, Columns, and Background"
Clairedwood (Talk | contribs) m (→Adding a graphic) |
Clairedwood (Talk | contribs) (→Using the Styles page) |
||
| Line 16: | Line 16: | ||
The style assigned to each level appears in square brackets in the ''Levels'' list. | The style assigned to each level appears in square brackets in the ''Levels'' list. | ||
| − | [[Image: | + | [[Image:CH12_InsertIndexTable_Styles.png|thumb|none|500px|''The Styles page of the Insert Index/Table Dialog.'']] |
| − | + | ||
To remove paragraph styling from an outline level, select the outline level in the ''Levels'' list box, and then click the '''Default''' button. | To remove paragraph styling from an outline level, select the outline level in the ''Levels'' list box, and then click the '''Default''' button. | ||
Revision as of 15:05, 4 June 2010
- Tables of contents
- Customizing a table of contents
- Using the Index/Table page
- Using the Entries page
- Using the Styles, Columns, and Background pages
- Maintaining a table of contents
- Alphabetic indexes
- Customizing index entries
- Customizing the appearance of an index
- Maintaining an index
- Other types of indexes
- Bibliographies
- Creating a bibliographic database
- Adding a reference (citation) into a document
- Formatting the bibliography
- Defining the paragraph style for the bibliography
- Updating and editing an existing bibliography
Using the Styles page
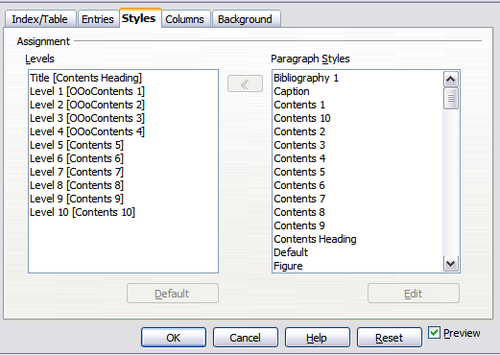
Use the Styles page, pictured in Figure 6, to change which paragraph style is assigned to each level in the table of contents. In most cases, the best strategy is to keep the assigned styles but change their settings as needed to make the TOC appear the way you want.
To apply a custom paragraph style to an outline level:
- In the Levels list box, select the outline level.
- In the Paragraph Styles list box, click the desired paragraph style.
- Click the < button to apply the selected paragraph style to the selected outline level.
The style assigned to each level appears in square brackets in the Levels list.
 The Styles page of the Insert Index/Table Dialog.
To remove paragraph styling from an outline level, select the outline level in the Levels list box, and then click the Default button.
To view or edit the attributes of a paragraph style, click the style in the Paragraph Styles list box, and then click the Edit button.
Columns page
Use the Columns page to change the number of columns for the TOC. Multiple columns are more likely to be used in indexes than in TOCs, so this page is described in the section on indexes. See below.
File:CH12 IndexTable Columns.pngColumns page of the Insert Index/Table dialog box.Adding multiple columns
To display the table of contents in more than one column:
- Either enter the number of columns desired in the box labeled Columns or select the icon representing the number of columns.
- To evenly distribute the columns according to the page width, check the AutoWidth box. If it is unchecked, you can manually set each of the following by altering the associated spin box:
- Width between each of the columns
- Spacing between each of the columns
- You can choose to have a separator line between the columns:
- Line: The width of the line.
- Height: The height of the line.
- Position: Relative position of the line to the table (top, middle, or bottom) if the height is less than 100%.
Background page
Use the Background page to add color or a graphic to the background of the TOC. Refer to Chapter 4 (Formatting Pages) for details.
Using the Background page
Use the Background page to add color or a graphic to the background of the table of contents.
Adding color
To add color to the background of the table of contents, select from the color grid.
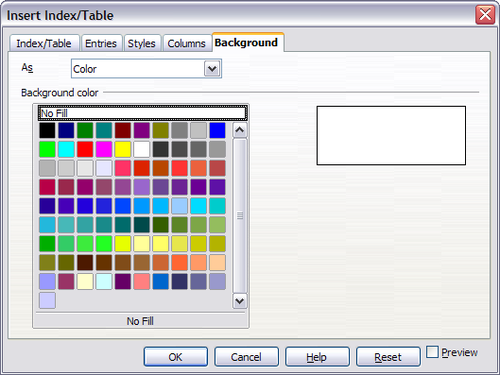 Background page of Insert Index/Table dialog box, showing Color choices.
Adding a graphic
To add a graphic to the background of the table of contents:
- From the As drop-down list, select Graphic. The Background tab now displays the graphics options, as shown below.
- Click the Browse button. The Find graphics dialog box opens.
- Find the graphic file you want and then click the Open button. The Find graphics dialog box closes and the selected graphic appears in the graphic preview box on the right-hand side of the Background tab. (If you do not see the graphic, select the Preview checkbox.)
- To embed the graphic in your document, clear the Link checkbox. To link the graphic to the document but not embed it, select the Link checkbox.
- In the Type area of the Background tab, choose how you want the background graphic to appear:
- To position the graphic in a specific location, select Position and then click the desired location in the position grid.
- To stretch the graphic to fill the entire background area, select Area.
- To repeat the graphic across the entire background area, select Tile.
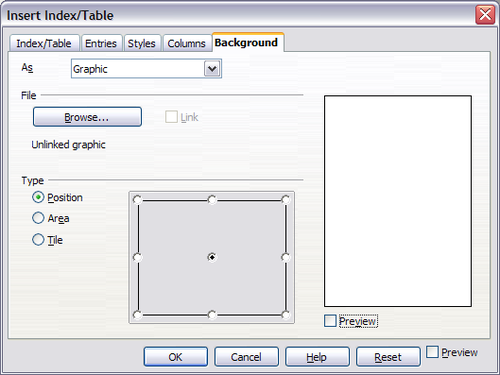 Graphic options on the Background page of the Insert Index/Table dialog box.
Deleting color or graphics
To delete color or graphics from the table background:
- From the As drop-down list, select Color.
- Click No Fill on the color grid.
Content on this page is licensed under the Creative Common Attribution 3.0 license (CC-BY).


